Saturday 30 May 2015

Battlefields along the West Highland Way


During our 8 day 96 mile trek along the West Highland Way we walked through a couple of battle fields which inspired me. Below is a photo I took of Inverlochy.

This was on our last day of the walk between Kinlochleven and Fort William, there was a memorial and battle plaque describing the events. It was great to walk through history and also to remember when Ian stole a sure victory from me when we played this out using POWR which even today I still doubt he can believe!


We also stumbled on the battle field of Dalrigh just shy of a place on the way called Tyndrum. I had not heard of this battle before so it was great to walk through the place.


Here is a brief of what took place here.......

When Bruce reached Strathfillan, just to the south of Tyndrum around a thousand MacDougalls were there to meet him, led by the son of Alexander the chief John of Lorne (also known as ‘John the Lame). Bruce was trapped! With Valence pursuing him and the MacDougalls blocking his path he was forced to fight. Bruce and his men were not prepared for battle and the result was a foregone conclusion. What few horses Bruce still had were cut down by the MacDougall axemen and many of his most valued allies such as Sir James Douglas and Gilbert Hey were wounded during the engagement. This rather fanciful poem gives account of the battle:
They thereupon withdrew. In this
There was no mark of cowardice.
They kept together; and the king
Was ever busy rescuing
The rearmost of his company.
With skill and valour there wrought he,
And safely all his men withdrew.
He daunted those that would pursue
So none durst leave their cloe array,
For he was never far away.
The fighting was desperate for Bruce, at one point cut off from his allies he was fighting alone against a small lochan. A MacDougall man attempted to pull Bruce from his horse by grabbing his cloak. Bruce killed him but lost his cloak in so doing. The dead MacDougall was found later still grasping the cloak with Bruce’s brooch still attached. This brooch is still in the possession of the clan to his day.
Bruce and a handful of men escaped with their lives. His army was now non-existent and he fled to the caves and into the history books!

This one's for Phil


Phil was asking about a suitable Renaissance castle in 6mm the other day and by sheer coincidence I had just ordered the above which would look well in Northern Italy or in the Appenines.  Remember we rolled for a fortification in our our last Renaissance game!

I bought this last week from a German railway store and it was delivered yesterday.  Really good service and with a good exchange rate it was the cheapest I have seen for a while.

I've been keeping my eye out for this for some years but have never gotten round to buying it as you can't get hold of it in the UK.  It's 10mm or Z scale, which can often fit in with 6mm especially with stand alone or feature pieces.  I've checked the parts and they should look good with my other castle features.

This should be suitable for central and eastern European battles, including the Balkans, Black Sea and Scandinavian theatres.  I think it would look right in the Pyrenees (Mark can confirm).  Late middle ages to WW2, I have even seen it a big club game at Deeside using it as a Warsaw Pact communication centre set in the Coldwar.

It will have to wait until after Joy of Six and I think it would look well being besieged by the Duke of Burgundy whilst the Swiss march to its relief.

Monday 25 May 2015

Battle of Sandershausen

A thumbnail map of the battle fought on 23rd June 1758; No, I can't decipher it either!


On Thursday, I looked around desperately for a quick game to play, as Mark was unable to make it and put on his planned Spearhead game.  I thought it would be just Jon but Phil was able to turn up a bit later.

I resurrected Sandershausen as it's quite a small game, suitable for a Thursday night with very little terrain but the two armies, Hessians and French, are quite different.  Historically this battle is a part of Ferdinand of Brunswick's campaign in the Rhineland following his victory at Krefeld.  The French are attempting to push his army back by outflanking his strategic position with an invasion of Hesse, one of his key allies and an important contingent within His Britannic Majesties Army in Germany. In this battle the small Hessian army are trying to delay the French advance whilst Ferdinand repositions the main Allied army.  Jon chose the Hessians, as he has never fought with them and promptly claimed that he would be lucky to hold on with such a meagre force for more than four turns; we shall see how this turned out!

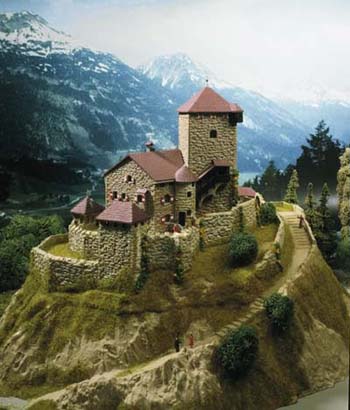
The initial dispositions


The above picture shows our initial deployment.  There are three objectives, take or hold the road exit in the top right of the picture, take or hold Ellenbach farm in the centre and inflict 50% casualties on your opponent forcing them to withdraw (this took the place of the usual army morale as the forces are so small).  

Along the road the woods are dense and slope down towards the Fulda River.  Stretching away from Ellenbach farm is a steep wooded gorge impassable except to light troops.  Jon has put grenadiers into the farm and his best infantry anchored to its west.  A jaeger unit is emplaced in the gorge, and to the rear and echeloned in a reserve line are the Hessian militia and invalid units which were poor in quality.  Way off to the Northwest under his CinC, Prinz Yssenburg, is the Hessian Cavalry defending the road to Hesse.

I kept the French plan simple.  My infantry commander split his force into two wings.  The right wing of three standard French regiments (poor fire discipline) covered by a unit of converged grenadiers, which the French often used as light infantry to skirmish ahead of their line just as they did under Napoleon, would attack the farm and pin his main line.  The left wing would attempt to turn the main Hessian line, and so I put my best troops here comprising two Swiss regiments, Diesbach and Waldner, ancestors of the pike units hired by the French during the 16th century.  They were supported by two indifferent German auxiliary regiments and a battery of heavy and medium cannon. The Hessians have no field artillery in this battle, so I was hopeful this would give the French a big advantage.

On my far left I ordered my cavalry command to engage the Hessian cavalry.  I gleefully looked at Jon's disposition and thought my two units should be able to manoeuvre against the Hessians flank, inspite of its superior quality, destroy it, take the road and then support the Swiss against the Hessian infantry.  I mentally rubbed my hands in anticipation of this cunning plan without realising that Jon, who was mentally sniggering, had an even more cunning plan!

His cavalry had the CinC attached (an Av die commander), and Jon was fully expecting me to attack this unit. He would order his cavalry to move and support the infantry forcing my cavalry to follow onto his refused second line which would then destroy me with musketry and free up his cavalry to attack the flank of my infantry!

Neither plan survived first contact.  My Wurtembourg Heavy Cavalry and Apchon Dragoons were onto the Hessian cavalry before Jon could reorder them.  Hit in front and flank it looked like it was over, but somehow the Hessians survived the first melee and forced their opponents off.  The Wurttemburgers fell back into the line of fire of the Hessian militia, shot up, were shaken again, charged by the Hessian cavalry and routed off the battlefield.  The dragoons, shaken and down to 7 strength cowered in the tree line.  Phase one of my plan was in tatters!

On the right flank the infantry advanced on the farm.  I expected Jon to have the advantage but I hoped to give him at least one casualty to every two I suffered whilst my brave lads kept his best troops away from my main attack.  Wrong again.  The grenadiers did some useful work dissipating the superior Hessian firepower with their skirmish formation, but as my regular infantry shook out into a firing line the difference in quality and position was stark.  The farm and gorge gave Jon's troops cover and every one of his units had high fire discipline and even the grenadiers had battalion guns.  My poor troops had poor fire discipline and for much of the engagement they were shaken.  For several turns Jon was rolling on the 70 and 80 tables whilst I returned fire on the less than.  Phil, as a neutral bystander and with laudable impartiality, cheered on what looked like a repeat of the infamous Kaptain Krapp fiasco!

The game had lasted longer than four turns which Jon gleefully acknowledged and my army had accrued 20% casualties.  It was not looking good for the French.  However, I had one last advantage; the French CinC the Duc DeBroglie took charge of the French left flank.  The deployed artillery blasted the Kanitz infantry regiment whilst the Swiss steadily advanced and fired a withering fire into the Hessian militia.

This looked encouraging, until the victorious Hessian cavalry turned up and charged the Swiss supporting regiment in flank.  To add insult to injury the Hessian militia and invalids returned fire and charged the lead Swiss.  And if that wasn't enough the routing Wurtemburgers shook up the artillery forcing the heavy battery to retire.  The decisive point in the battle had been reached and the French were on the backfoot.  

However, as so often happened in history, the Swiss mercenaries earned their pay and passed their morale.  Once more the battle turned as the Apchon dragoons returned to the fray, hit the Hessian cavalry in the flank and routed them off the table.  The German auxiliary regiment counter charged the militia and another unit was routed causing the remaining second line and the Kanitz regiment to become shaken.  Broglie took personal charge of the dragoons and left their incompetent commander to dither over his new orders, whilst turning and routing the entire second line.

The final positions

Jon was desperate and his skirmishers left the cover of the gorge to charge their weakened opponents whilst the grenadiers reorganised themselves in the farm to cover the threat from their right flank.  Jon hoped that one more morale test on my left flank infantry would cause a collapse in my army morale (I had lost 40% of my army's strength) and win him the day.  However, to my surprise the depleted De Rohan regiment held its ground and repulsed the elite jaegers.  Meanwhile, the Hessian army was beginning to disintegrate and had exceeded 50% losses.  The lumbering French juggernaut had won through and after 10 turns Jon and I shook hands over a very close fought and enjoyable game.

Historically the Hessians put up a strong fight causing many more casualties than the French were able to inflict.  However, French numbers were too many and they were eventually turned out of their position.  Our re-fight mirrored this very well and it must be remembered that PoW rules do not represent physical casualties but the morale or will to fight of a unit.  I had planned all along to overwhelm Jon with numbers but repeatedly he was able to rebut my attack with the quality of his troops and very nearly won a resounding victory at a point were he had not suffered appreciable losses.  This is a great little scenario (although I would concede that the French have the advantage) which can be re-fought many times over using a variety of deployments and plans.

Well done Jon and thanks Phil for the encouragement!


Tuesday 19 May 2015

Jetty for Mr Taylor!

As requested, I've knocked up a lovely jetty for the Joy of Six game.  I made it a bit longer so Ian's ship can sit alongside it (if necessary) but can make a shorter one if required.  It's stained and has individual planks inked in.  I will bring along on Thursday.

I was planning to do some more Spanish Renaissance figures on my day off - but a package from Hong Kong arrived - a 1/300 Japanese castle.  I spent most of Monday painting and constructing it - I now need to make the base look pretty.  Next time we do the samurai, I'll bring the finished article along.


Saturday 16 May 2015

Gettysburg boards

They still need work but since Mark keeps asking here are a few shots of the first two boards (of 12) covering the initial jump of point at Herrs Tavern for day1 of Gettysburg.

View from the Confederate entry point on Chambersburg Turnpike. Brigades of Heths division will be deployed in the plowed field bottom left and woods to the right of Herrs Tavern at bottom right. Across Willoughby Run the Federal cavalry (2 Brigades) will be deployed dismounted in the woods and plowed field and in the wheatfield and woods surrounding Mcpherson farm on the aptly named McPherson Ridge. To the center left is the wooded hill of Oak Hill with the Mummasberg Turnpike running through it and it the distance is the Seminary and the town of Gettysburg. The rail cutting for the pre war and unfinished railroad offers protection (or is it a death trap)

 Eye level view of same.
McPhersons Ridge upon which sits McPhersons Farm and McPhersons Woods both scenes of heavy fighting on the day between the Federal Iron Brigade aka Black Hats and the elite brigade of Brig Gen Pettigrew including the battalion lead by the boy colonel. Mcphersons ridge continues off to the right to an orchard and another road.

View from the confederate right toward McPhersons Woods. The wooded area at bottom right is an orchard.

View from Mcphersons farm across the federal line toward the rail cutting and Oak Hill. The farm and orchard to rear sit astride the Mummamsberg road. Two further boards including the Rock Ridge Creek and the cavalry battle field extend the table East approximately to 6 1/2 feet.
More work needed and a shed load more trees,fences and and fields but i am pretty pleased so far

Jon's Cornfields led me here!

After Jon posted his new cornfields I clicked on the link to the ebay page and found a load of really nice scenery items.

I am thinking of purchasing some of these....


Grass Fields (different colours are available)

Leafy crops / vineyards 


Moorland Clumps

They are all approx 120mm x 100mm and cost around £6 each, not exactly cheap but you get what you pay for as usual


I like all these and they will definitely enhance my collection further.

The moorland clumps will be used to create some bog land pieces which after seeing how Ian created his water with the tissue paper/liquitex method has inspired me to look at creating some dark and gloomy moorland pieces using these clumps as islands in the water.


Friday 15 May 2015

Waterloo

Buildings from Total battle miniatures

Hougermont

Papelotte
 La belle alliance
Spare Papelotte £10
 Spare  La belle alliance £8

Thursday 14 May 2015

Cornflakes anyone!

Behold the first of my new crop fields. They do different types (colors etc) and can be cut to size. They are not cheap at £6.00 a pop but i think will really stand out when placed among my trees as cleared farmland


http://www.ebay.co.uk/itm/Leafy-Crop-Strips-Basing-Scenery-Wargame-Miniatures-Model-Railway-Dioramas-/281064404665?pt=LH_DefaultDomain_3&hash=item4170be76b9


Tuesday 12 May 2015

Water effects

Sample 1; I brushed the liquitex on straight and it shows.  Fast under current, that's my excuse!


These are my latest attempts to create a water effect and improve the terrain boards.  Phil managed to get hold of some polystyrene samples for me to practice on (It was very hard to find as it mustn't be as common for packaging these days).  I experimented with an initial coat of watered down PVA but the holes in the polystyrene showed through.  And then I thought on again about the conversation I had with Phil regarding kitchen paper; I knew that I wouldn't get a flat surface and although its good for textured land terrain I thought I would need a better base for water.  Being in an experimental mode of thinking I thought I would try it any way and I think it adds to the water effect.

Above is my green based attempt and below is my blue based attempt.  Let me know what you think and more importantly which you prefer.  I shall bring the samples with me on Thursday.  Vanessa's new i-pad camera is very good and both photos do justice to the reality of the effects!


Sample 2; a more swirly attempt at applying the liquitex.

Friday 8 May 2015

Plassey Update

I promised some more pictures.  It was a pig to put together and the instructions were minimalist.  However, it looks better than I expected and I may well try another in the future.

And this is a good record for me in case I drop it and need to put it together again.  I want to use this for a variety of 18th century amphibious games.  Jon pointed out it's unusual configuration in my previous post but this type of boat, a sloop or brigantine was much used in coastal warfare.  The Kingfisher, which this represents was present with the RN squadron in India and was also active in the West Indies during the seven years war and finished up being used as a bomb ketch, the RN's secret weapon for destroying shore fortifications (again, a future game!)

The flags are interchangeable and I already have plans to use this on the Danube with the Austrians, on the Black Sea with the Russians as well as in the Med, the West Indies and Canada.  Incidentally, I will need to change the ensigns and pennants for the different theatres in which the RN fights; Blue for the Far East and Pacific, Red for the North Atlantic and Caribbean, white for the Med.  Depending on which colony the squadron of the RN protected dictated the flag of that colony; blue for New Zealand and Australia, Red for Canada etc.

A fortified shore battery from Langton miniatures.  It won't be used at Plassey but it will be handy for a few future games.

The new terrain I have ordered for the Baggirutti River which features on the west side of the battlefield.  The battle and campaign moved along this river and Clive relied on this river for the rapid deployment and supply of his army whilst the Bengali army also relied on it for communication with their capital.  My plan is to re-do the water affects using liquitex (Thanks Phil for the spare foam to experiment on)  and hopefully create an effect that is more realistic than the blue paint but generic enough to represent a major river and coastal water - I'll post my efforts when I have something to show.  I will then separately base up reed beds to better indicate that this is a river.  I am open to feed back and opinions on this idea!

Wednesday 6 May 2015

Rum, sodomy and the lash!


No, it's not a plug for Jon's BBQ but a quote by Churchill regarding the Royal Navy in the eighteenth century.  In fact he was wrong, although the Pogues thought it was so funny they named an album after it.


This is a rather poor pic (but thanks Phil for showing me how!) of my 12 gun sloop for Plassey.  I will try and get some better pictures in the next few days but I wanted to try out my latest blog no-how.

Ian's French


Took some shots of Ian's renaissance French for colour inspiration for my Spanish armies, so I thought I'd share.


Pike and shooty troops
Tents (need to know where these come from!)

Gendarmes and archers  

Gendarmes and Archers (another lot)


Monday 4 May 2015

Flags Ready


I have gotten the flag poles and bases ready for Mark and Russ; can you both pick out three flags each and I will finish your army markers for you.  Phil, I will do the same for you when you've finished your army - you will need to print/buy suitable Spanish flags.

Also, can someone tell me how to take a photo on my i-phone or i-pad and use it on blogger.  I want to show my latest update for Plassey!

Sunday 3 May 2015

Rapier Elephants


These are the Elephants I purchased from Rapier Miniatures to boost my Carthaginian army.

I washed these black (not with soapy water) to try and pick out some details.

I really like them and would say they are better than the Baccus ones.

Can't comment on the H & R models.


Metal bases

Russ has recently sprung for some metal bases for his 6mm Greeks and suggested I do the same for my Renaissance Spanish armies.  They are much thinner than normal mdf bases, are less likely to move on the table and stick nicely to the magnetised sheets in my A4 box folders.

Of course they're not cheap and finding the right size is tricky.  The Spanish need to be based for Principles of War - 3cm x 9cm.  A non-standard size.  Enquiries into a couple of companies who say they do these has revealed that they don't.  So I need to look at extending the search or making my own.

I've seen some companies that provide metal sheet in 0.4mm thickness.  Easy to cut but is it too thin? Perhaps a trial sheet needs to be purchased to give it a go.

Alternatively, thin plywood gives the thinness required (as I'm using Heroics and Ros figures, 2mm and 3mm mdf makes them look like they're hovering above the battlefield).  But this may be prone to warping.

Decisions, decisions!

Update: http://www.freewebs.com/pwsltd/steelbases.htm These chaps do them in PoW sizes! 61p a pop.

Saturday 2 May 2015

TREEES

My trees covering an area approx 2feet x  2feet. I need lots ,lots more!


Friday 1 May 2015

Events 2015 (so far)

Russ makes a note of the next time he'll be offering to tidy the tables away!


I got a list some weeks ago from Len outlining up coming dates for the club.  I did offer to put them on the blog but due to a broken computer I have been somewhat amiss as Mark pointed out last night!

Thus, these are the relevant events so far.

16th/17th May   Sheffield Triples

23rd/24th May   Open Gaming Weekend in Main Hall

6th June             BBQ at Jon's house  (He's 41 and will need a cardio test as part of this years medical)

20th June           Phalanx, St Helens

4th/5th July       Gauntlet  (Mark will be putting on Waterloo on the Saturday to commemorate the bicentenary)

18th/19th July   Joy of Six weekend - visit to Bosworth on the Saturday and show on the Sunday

12th/13th Sept  Open Gaming Weekend in Main Hall

26th/27th Sept  Battle for Hannover (?) plus Open Gaming Weekend in Main Hall

3rd/4th Oct       Derby Wargames Show

10th Dec           Christmas Do


Feel free to add anything I have missed.

Trees and elephants

Top- original trees
middle-sprayed trees
bottom- Jons trees


original, sprayed, jons

H+R Indian, Baccus Indian, Baccus successor, H+R Persian, Baccus?, H+R Carthaginian

Carthaginian, Persian