Tuesday 31 October 2017

WW2 winter 1942 Eastern Front (and piano shifting)

Do you know the piano's on my foot?  You hum it, son, I'll play it.

We had another Monday bash at WW2 winter warfare on Monday as the Russians in early 1942 attempt to oust the Germans from their winter quarters in Kholm.  But before we could begin I had to drive back over to Moreton to help Mark and Ian manhandle a piano into the back of Mark's van (hence the PG Tips Chimps reference!).  This included much grunting and straining and a bit where the piano did land on my foot!  But we got it in in the end.

As a consequence we were late starting and the inevitable gabbing during the day meant that we didn't get a conclusion but we all enjoyed the day and it led to a few additional tweaks to our rule amendments.

The Scenario
A couple of German battalions are deeply entrenched in their winter quarters in Feb 1942.  With no armoured support and no aerial cover, they have fortified much of their position to fend off another attack by Russian forces.  No air supply this time but they have sufficient supplies to last another battle.

The Germans are entrenched in the town, on the hill to the north of the town and in a redoubt (a fortified position including wrecked vehicles to provide extra cover.  The Russians will attack from both north and south but where will the main strength of the Russian attack fall?

The Forces
The Festung Kholm forces comprise two strong infantry battalions (composite infantry and composite mountain infantry with MG's and mortars, an infantry gun and Pak38 in the town and some 105's and a 150 artillery support 'off table).  Germans are mainly dug in giving them +2 when shot against and a whopping +3 in the redoubt (basically impossible to shoot!).

The Russians have the 75th Naval Brigade and the 943rd Rifle Regiment with a couple of Quad AA's on trucks, some infantry guns, ATG's and heavy mortars.  The infantry battalions are relatively small (6-7 units of infantry with MG's and mortars) but they do have tank support (a mix of British abnd Soviet tanks) and air support from a Tupolev SB2 with three bombing missions.

The battlefield.  The Germans can only deploy on the middle board.  Arrows show Russian attack routes.

Turn 1

Ian (as the German commander) laid out his troops to try and counter an attack from both sides.  The Pak 38 faced south (which proved a good choice).  One of his FOO's was on the hill to the north but the other was parked in town meaning he could spot virtually nothing and he was in charge of the 105's. 

Weather started as OK and the initial Russian moves reflected this - all moved full whack towards their objectives.  From the north came the 257th Ski Bttn. And from the south came pretty much all the artillery. and the 75th Naval Brigade's battalions.

Food for thought was whether the Germans could have pre-planned an artilley barrage on the road.  If they had done so it would have been devastating as all the Russian artillery was bunched up.  The sole German attack was from a mortar stuck out in the snow (with MG support) which missed.  In turn the Tupolev bombed a town sector to little effect.

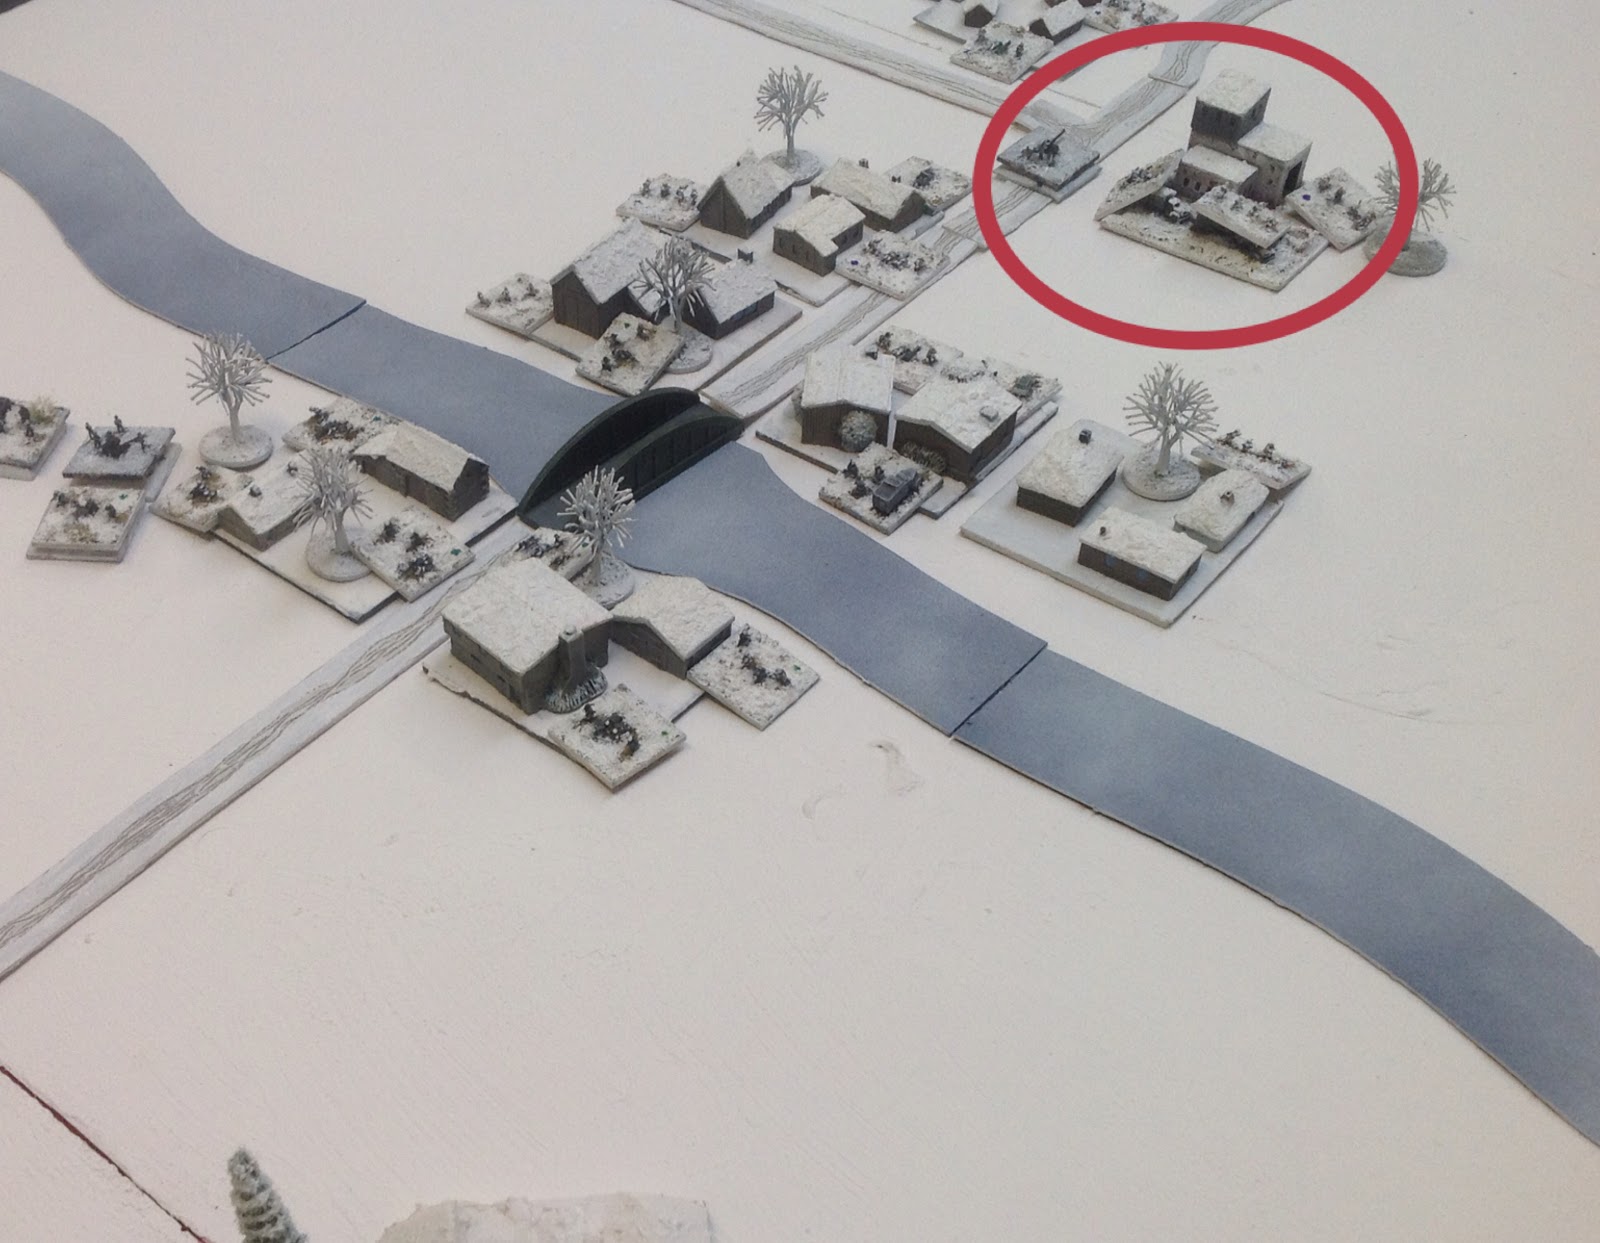
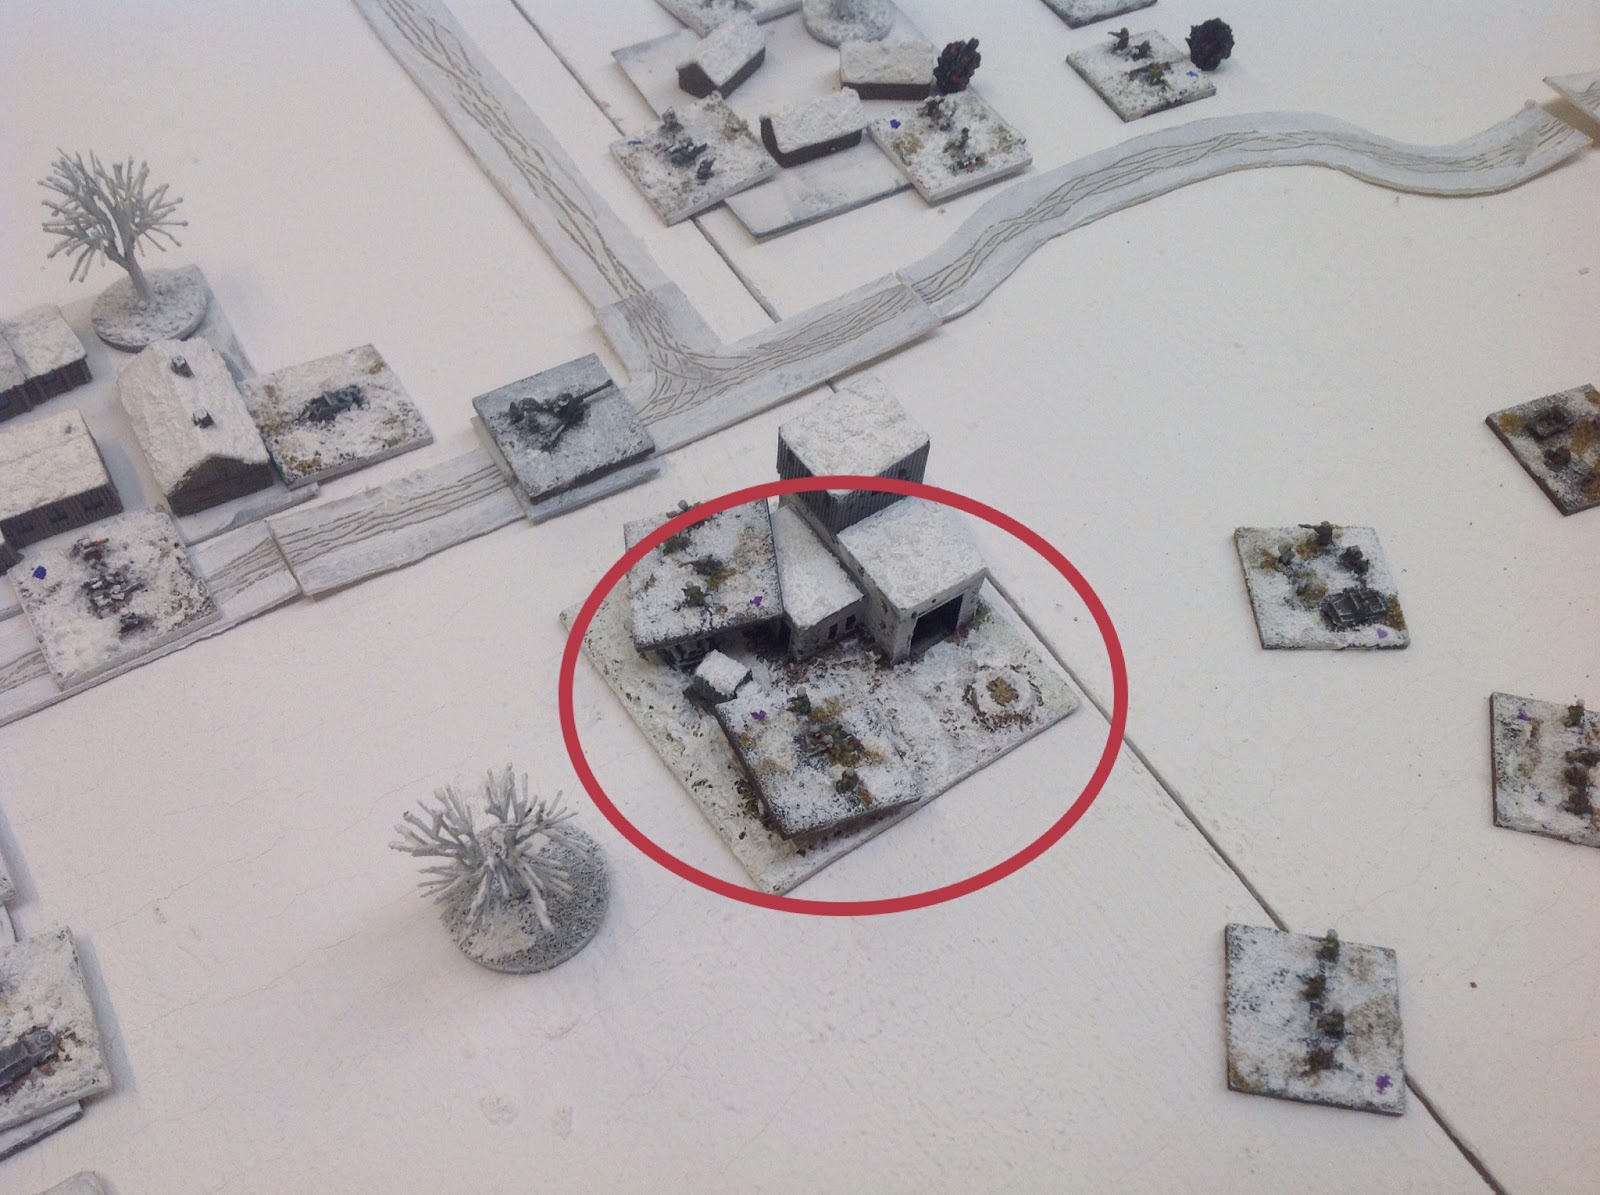
Germans dug in.  The Redoubt (circled).  A tough objective!  You can also see the Pak 38 dug in on the road pointing south.
Turn 2
An adverse weather front comes in.  The Russians choose not to risk their bomber and instead deploy their artillery by the side of the road (as trucks can only run on the road).  The ski troops also move to the edge of the woods approaching the town from the north.  The Germans stay hunkered down and again only the mortar in the snow gets involved - suppressing an infantry gun. 

Russian artillery deploys as the 1/75th reach the wood edge. The Quad AA sits back so as to not to be spotted.

Turn 3
As the weather takes a turn for the better, the Russians move up and both 1/75 and 2/75 to the edge of the woods and the 257th Ski appear from the woods to attack.  The German mortar again suppresses the infantry gun.  The FOO in town cannot see anything to call the 105's in on but the FOO on the hill sees the ski troops and tries to call in the 150mm - and fails.  The mortar to the north of town is not registered either and the infantry gun also fails to be called in so its left to the MG42 on the hill to open up and suppress a ski platoon.  As per the rules of Spearhead, Mark rolls for the quality of the troops and gets Green for the ski troops. Which is bad.

Ski troops of the 257th rush their objective with no indirect fire to stop them.  Only the MG on the hill makes an impression.

Turn 4

The weather closes in again and the 75th troops seem unwilling to leave the cover of the trees (variable movement can affect the Russians as well!).  They end up just clear of the trees.  On the other hand, not believing their luck at not being bombarded by artillery, the 257th ski as fast as they can to engage the Germans dug in on the hill.  The FOO on the hill realises that his radio is malfunctioning and the 150mm remains silent.  The mortar does register however and suppresses another ski unit.  The accompanying infantry and MG fire causes suppression markers to bloom in the snow around the ski troops.

To the south, the MG supporting the mortar in the snow suppresses a unit of 1/75 as they emerge from the trees.  Encouraged by this the infantry in the nearest town sector to the Russians opens up with infantry fire - and miss.  Ian starts blaming the cursed blue dice that appears to not have a 5 or 6 on it and Mark suggests borrowing Frank's 'begging bowl' (a wooden beastie he rolls his dice into to stop them spraying across the table. 

It turns out that 1/75 are also Green and Mark fails to unsuppress any units.  Which is very bad.

1. 1/75 attack (and are shot at) from the nearest town sector while 2. the 2/75 have the trickier redoubt to take on


Turn 5
As the weather appears to have settled the Russians bring in the Tupolev.  As the Germans have no AA it has a clear bombing run nut rather than attacking the troops on the hill (who are dug in in the open) Mark chose to bomb the troops in the nearest sector to 1/75 (dug in in the town).  He therefore needed 6's on the dice and basically failed to hit anything. 

The 257th decide discretion is the better part of valour and do a break-off before they are shot to pieces.  They run back into the woods to hide and stay there for the rest of the battle. 

To the south, 1/75 stop in the open to fire into the town sector as 2/75 move up to shoot into the reboubt (which proves pretty worthless given the defensive qualities of the redoubt).

The mortar fails to kill the 1/75 suppressed platoon and as if to celebrate this, the massed Russian artillery kills the supporting German MG!  In turn, the German infantry suppress another 1/75 platoon but the reboubt's infantry miss when they open up on 2/75.  They turn out to be Green as well!  Mark was not happy.  His only consolation is that the infantry manage to suppress a german platoon in the town.

1. The German MG in the snow is killed, leaving the mortar vulnerable and alone.  2. the 2/75 get within shooting range of the redoubt.

Turn 6
A whopping snow shower prevents any aircraft sorties and also affects movement and spotting.  Which proves beneficial to the Russians.  2/75 get closer to the redoubt and 1/75 get the Quad AA up to add its firepower to the attack on the town sector - safe in the knowledge that - for now - the FOO and the Pak38 can't see it!

The German mortar crew care not if they are left alone in the snow and kill a platoon of 1/75.  Its the only effective firing this turn as either poor dice by the Germans (that bloody blue dice!) or the effect of cover on Russian fire means no-one gets hit.  This probably saves the leftmost platoon of 2/75 who otherwise would get shot from around 4 town sectors!  The snow saves their asses.

 1. 1/75 get closer to try a direct assault on the town sector to their front while 2.  2/75 take advantage of the sudden snowfall to assault the redoubt!  Brave lads.
Turn 7
The weather improves and this allows the FOO for the 105's to call them in and they kill a platoon of Russians.  In return, the Russian artillery is poor.  2/75 close assault the redoubt and are undeterred by desultory German infantry fire (Ian blames the blue dice again and tries to palm it off onto Mark who's having none of it and clasps his trusty red dice close to his heart).  It proves a good move as the green Russians prise the German defenders out and take the redoubt for themselves!

Meanwhile another 1/75 platoon is suppressed by fire.  The German mortar is close assaulted and....survives!  The 1/75 lose another platoon as a result and are close to a morale roll as a result. 


The redoubt is taken!


Turn 8
The bad weather comes in again and again spotting and movement on the ground is affected.  The Tupolev is kept grounded.  Another Russian platoon is saved from certain death by the weather as he can no longer be spotted by the majority of German units in the town.  And again the Quad AA (who had scarpered as the weather cleared last turn) tries his luck again and moves up under the cover of snowfall. 

The Russian tanks make their appearance (led by a Matilda with its hefty frontal armour) but slowly as the Matilda only moves 6".  The Germans find out how badly snow can affect movement as one platoon tried to move from one side of the river to the other and found themselves in the open on the bridge;  Luckily for them no Russians were close enough to take action.  The mortar (having survived the close assault) suppressed another 1/75 platoon while the Russian artillery suppressed a unit of infantry in the town. 

Mark and Ian started fighting over who was not going to use the blue dice (despite it rolling three 6's in succession for shooting at Russians in the redoubt) when Ian tried some cheeky German firing. 

Amazingly the mortar survived another close assault by 1/75 (some Iron Cross winners here come the dawn). 

German platoon stuck in the open - luckily for them no Russians can see them!


Turn 9
The topsy turvy weather improves again and the tanks have to move up to shield the Quad AA (which proves its a beast at direct fire at infantry) has to move back or be Pak38'd.  1/75 are one platoon away from a morale check and they fall back into the woods.  2/75 decide to stay put (the attack on the redoubt cost them too much to give up) but it means units are stuck in the open and 2/75 is not far off a morale check either.  Mark brings on 943rd Rifles to have a go instead (planning a joint assault with the tanks).  The Russian 122mm howitzer is finally called in and immediately suppresses the Pak38.  In response the blue dice dictates that the German 105's are not called in.  Much muttering and gnashing of teeth in Berlin. 

The redoubt is peppered with shots but the Russians inside survive.

1. The Russians in the redoubt are subjected to sustained infantry fire from the town while 2.  the rest of 2/75 hide in the snow as the tanks arrive.
Turn 10
The weather turns bad again!  The 943rd move up with the tanks to have a go at the town sector.  Because of the snow the tanks move in undetected.  Russian artillery fire is again ineffective. 

We're faced with the sight of neither Russian or German infantry at the nearest town sector wanting to fire in case they get spotted through the snowfall! 

Ian cursed the blue dice for the 100th time as it rolled off a 5 (hit) onto a 4 (miss). 

1. Combined arms attack on the town sector while 2. the 943rd infantry shield the troops of 2/75 to prevent a morale check.  Meanwhile 3. troops of 1/75 stay hidden in the woods.

Turn 11
The weather clears but the Russians decide to save the Tupolev (which may have been a mistake as the Germans now had a lot of no-longer dug in troops in some of the town sectors.  The 943rd attacked the town sector which had seen off the 1/75 in the company of the Matilda and a T60.  previous firing had left a suppressed German platoon in the town which despite this handicap saw off one of the attacking platoons.  The tanks and infantry killed off the other two German units and left one suppressed German platoon facing two tanks and two infantry platoons.  1 dice against 4 - and the Germans won! The remaining platoon and the tanks retired all the way back up the road. 

 No more cursing of the blue dice and it appears Steiner was leading the defence.  They clearly followed the example of the mortar just to the side of them that had also seen off impossible odds. 

The heroic defenders of the outlying town sector.  The mortar which had seen off all comers (circled) and in the back of the town sector, Steiner's suppressed infantry platoon which would see off 2 tanks and 3 infantry platoons
Turn 12
The weather was still not good.  The Germans pulled Steiner back into the next town sector to create a second line of defence.  The 943rd started moving forward again after licking their wounds but the clock ran out on us. 

The Russians held the redoubt and could walk into the first town sector unopposed.  The German composite infantry (holding the redoubt and south town sectors) had lost a few units but the mountain infantry were unscathed.  The Russians still had another battalion of infantry to move up and the tanks and artillery were fine but had two battalions of infantry not far off morale checks and the ski troops were unlikely to do anything. 

We'll call it an honourable draw.

Summary
A great test of the winter rules and its clear to see they have a big effect on a battle.  German shooting was less effective but they are still formidable.  The Russians have some advantages but are still hampered to a great degree (such as calling in and order changes). 

We then got onto a discussion about amendments for a winter operational battle (Russians attacking) and the options available to both sides.  This included the need to be in supply (i.e. trace a line of supply back to a base line OR be supplied by air.  Being out of supply means units fighting at a disadvantage (-1 on shooting).  So non-Russian troops get a -1 in winter and an additional -1 for being out of supply making them very vulnerable.   It might encourage commanders to save up supplies to ensure greater effectiveness in shooting for longer.

So the emphasis may change to cutting opponents' line of supply, using bombers as supply carriers (such as the He-111 during the Stalingrad battle) and also using fighters to target supply aircraft over bombers and other fighters (and so reducing the fighting effectiveness of the ground forces).

We thought that  1 aircraft being able to carry 4 units of supply - enough for 1 battalion to shoot for 4 turns) - was about right.

Off-table artillery is considered to be always 'in-supply' but can only fire indirect and may not reach tables further back.  On table artillery may be kept on the back tables to keep them in supply and so not take supply from other battalions.  C in C's may face tough decisions as to where to allocate scarce supplies! 

In addition we could see the tactical challenges facing both sides.  Weather can play a massive part - grounding aircraft when attacks or supplies are desperately needed and planes on the ground providing tempting targets for surprise attacks, planned bombardments etc.

Given the state of Russian 'roads' at the time, its suggested that only a few tables would have a defined road on it - making the defence of roads vital for supply purposes and also for mobility.  As we've seen, variable movement can be a pain should you want to get somewhere quick or combine an attack.  Frozen rivers become less of a barrier than a free flowing one.  Plans and tactics have to be meticulous and the Germans may be tempted to take Allied troops like Hungarians or Romanians to provide garrisons while the German troops roam around doing the fighting (but with a spectre of supply always at the back of the mind).

For the Russian operational game we also need to develop more lakes and frozen swamps to provide different tactical challenges.

The Ardennes battle would be very different - many more roads but the Americans at a materiel disadvantage.  Crossroads will be vital points both for supply and movement.  Airdrops for both sides become crucial. 

Amazing how just a change of scenery from summer to winter can completely change a period.  WW2 is fun again!

Tuesday 24 October 2017

Retire Orders in PoW Renaissance.

Image result for mounted crossbowmen


As we are going to delve into the Italian Wars for our next operational outing on the 4th November I need to write up a fuller version of the "Retire" orders for the Renaissance PoW rules.

At present retire orders are simply, "All units except skirmishers must retire at a minimum of speed 2" towards or away from their ordered destination. (The Italics is my replacement for the movement arrow.)

As it stands,  at least half the units in a command must obey the order.  So if half your command is non-skirmish and the other half is skirmish then that's an easy option of retiring with all your non-skirmishers and fending off the enemy with your skirmishers?

Or can it be interpreted that if you retire with half your non-skirmishers you are complying with your orders as the half of the non-skirmishing units AND ALL the skirmishing units (which are fully complying with the retire orders!) fend off the enemy?

Or half of all your units regardless of whether they are non-skirmishing or skirmishing must retire - in which case the skirmisher option is being ignored?

Personally I prefer the second option as this gives light formations a great deal of flexibility.  In an operational game it also makes this formation well placed to hold and react to enemy advances on the first tables.  Detached units can have conditional orders to retire against the nearest enemy unit, allowing them to skirmish and slow down attacking forces but have the option of using their superior evades to fall back against overwhelming numbers.

We never use retire orders in a standard battle as there is seldom the room to make it relevant.  The operational game will make the "affairs of the lights" or the "petit guerre" far more relevant.  Let me know what you think.

Tuesday 17 October 2017

Renaissance Battle - Burgundy v France

Over the weekend Mark and I managed to dust down the Renaissance PoW rules and get out the French and Burgundian armies.  Prior to Charles the Bolds defeat and death by the Swiss, Burgundy's principle foe was France with whom it sought to dominate the lowlands, Alsace, Lorraine and Burgundy.  Luckily for France, Burgundy's utter defeat and collapse at the hands of the Swiss left a power vacuum on its borders which it filled with the help of the Holy Roman Empire. 

Historically, the Burgundians should be a match for the French.  Whenever, the English campaigned on the continent they always needed Burgundian men at arms to match the French.  The Burgundians also led Europe in the development of artillery and in the establishment of a combined arms standing army.  

The French emerged victorious from the Hundred Years War through the establishment of heavy artillery that took every English stronghold except Calais.  It was also used effectively on the battlefield mowing down assaults by previously irresistible dismounted men at arms.  The French heavy cavalry remained  the finest in Western Europe and was composed with the cream of French society.  However, the infantry was weak and was some years behind the developments led by Burgundy.

We both struggle to determine each other's real deployment.  My French are on the left and Mark is on the right.

The generally open battlefield benefitted us both but where do we put our main effort?  Mark has put 25 points on each of the hills nearest the viewer.  He was relying on a firm push ahead of his baggage to secure victory.  I had opted for a defensive 25 points on the central steep hill and a further 25 points on the far town.  We had 13 turns to secure a victory but both of us were wary of committing an attack until we knew the others intentions.  We wasted the first six turns trying to spot each other!

My artillery offers only desultory support as my infantry move against the all arms force in the distance.  Off to my far left and beyond the woods my skirmishing bow lure Mark's troops towards me.  However, they are soon wiped out by the first rolled "20" of the day.

At last I felt I had enough information to force the issue.  My main infantry command was anchored on the left flank guarding the town and utilising the difficult ground.  I had attached a Gens d'armes and a retainer unit to this flank to give it some punch.  My two other cavalry commands were behind the steep hill under my CinC and on top of the right flank hill.  Mark had a weak combined arms force opposite the town and I decided to push against it and see whether this would prompt a response.

My CinC (cavalry in the bottom right) charges forward in support of my left flank which is already in combat around the village.  My Gens d'armes have already pushed the Burgundian men at arms back towards the table edge.

Mark still stuck to his wait and see plan.  He moved a little further forward to better engage my left flank and as a result was further away from any support that could be got from his slow central infantry command and his far away left flank cavalry.  My CinC slowly (it took 2 turns!) changed his orders and charged off in support of my infantry in the hope of smashing Mark's right flank and uncovering his centre.  However, they were not needed.  My left flank efficiently overwhelmed their opposite numbers and my CinC was able to change his orders from a position that uncovered the flank of the Burgundian infantry.

The Burgundian artillery has already routed and a unit of Gens d'armes and retainers is munching through  a lone unit of archers.  Mark's CinC is attached to the archers in a vain attempt to shore up this flank.  For fun I have charged the pike block with a spare unit of Gens d'armes - ouch!

We had reached the final two turns of the game by this point.  Mark had skirmished ahead of my right flank in the hope of forcing my elite Gens d'armes off their high ground.  However, this suited me as his remaining army were pinned watching my right flank as my CinC smashed into archers and artillery in the centre uncovering the Burgundian baggage.

Just to see how good the Burgundian pike was I charged into a block of three - I was minced!

The Burgundians are a good army but difficult to wield.  The generals are all D6 which is OK and it has all troop types but not an overwhelming superiority in one particular type.  Mark allowed himself to be picked off in detail without challenging me in the one troop type in which he did have a decided superiority - his pike!  Until I saw an opportunity I was not willing to risk my army against this all round force.

As a result of this game we think this period would be ideal for our first operational game outside of the twentieth century.  Once we have fully developed the ideas we will discuss further.

Wednesday 11 October 2017

modern spearhead errata rules

Errata & Amendments

These changes update your copy of Modern

Spearhead to the latest version.

Title Page (with Picture of M60)

Paste the following, if you wish, into the bottom

corner of the picture to identify what version

your rules are updated to:


Page 1 – Ground Scale

Replace first 2 lines with:
the ground scale For MSH is 1” = 100 metres. MSH uses this


scale with realistic engagement ranges which permits play-

Page 1 – Part One: The Command System

Replace the last 2 lines with:
organized by nationality and describes the typical composition of


all units in the game according to nationality.

Page 2 – National Characteristics of Forces

Replace the 5 Paragraphs NATO1, NATO 2,

Warsaw Pact “Warpac” 1, etc, with:
NATO 1: Tactically and technologically sophisticated forces following the


doctrine of flexible mission orders and a recon-pulled command and

control system. Typically Regular Army forces from the USA, Great


Britain, Israel, Germany, France, and Canada, All SAS, Seals, etc.


NATO 2: Forces that follow the doctrine but are not as capable as NATO

1 forces due to lack of technology or training. Typically Regular Army


forces from Holland, Belgium, Italy, Greece, Australia, New Zealand,

Saudi Arabia; Jordan, etc, and some National Guard forces in the USA.


Warsaw Pact “WARPAC” 1: Technologically sophisticated forces


following a doctrine of centralized, detailed orders and command-pushed

command and control systems. Typically frontline Soviet forces and


immediate reserves, some East German and Chinese forces.


Warsaw Pact “WARPAC” 2: Forces that follow similar doctrine but are

not as capable as WARPAC 1 forces due to lack of technology or

training. Typically frontline forces from Poland, Czechoslovakia,


Yugoslavia, China, some East German forces, selected elite formations

from Syria, Egypt, and Iraq, and some Soviet (Russian) reserve forces.


Third World: Although generally (but not exclusively) organised using

Warpac doctrine, these armies suffer from inferior command and control,

technology, and/or training. Typically Egyptian, Syrian, Iraqi, and Iranian


forces, Guerrillas, other Warpac reserves, and all ‘third line’ reservists.


Page 8 – 3.1.3 Command Zone “CZ”

Replace the second ‘paragraph’ with:
12” for Battalions containing up to 12 Platoons

18” for Battalions containing between 13 and 18 Platoons

24” for Battalions containing 19 or more Platoons


Modern Spearhead – Official Errata – Version 1.11 – 13 August 2006

http://modernspearhead.net/
Modern Spearhead is © 2000 Wargames Inc, John Moher, Alex Macris, Arty Conliffe. This update © 2006 John Moher, Alex Macris, Arty Conliffe. Page 2 of 7


Page 8 – Command Zone Diagram

The diagram is wrong – all distances should

read 12” not 6” (there are 6 references).

Replace Diagram and accompanying text with

the following:
An 11 Platoon Battalion with its 12” CZ to the BC. All the Infantry

Platoons are within 12” of the BC. The Mortar Platoon (a Support

Platoon) has been dropped off and left beyond the 12” to provide fire


support.

Page 8 – Top of Second Column

First Paragraph – replace with:
The CZ distances are based upon the original size of the Battalion

(including any Attachments) and are permanent for the game; i.e.

these distances do not shrink as the Battalion receives losses except

for when companies are dropped off (see 3.9.1).


Page 12 – Cover (under 6.1 Spotting Distance)

Lines 4-5 (last 2) or Paragraph, replace with:
Provides protection from fire, while other Cover only conceals;

see Combat Chart (Direct Fire modifiers); sec 7.5.2.


Page 12 – Woods & Marshes

There is a print error on the second to last line,

S3” should read 3” – Strike Out or Delete the S

or cut out and paste the following:
same terrain feature, Spotting is limited to 3”. See LOS, sec 6.3,

and Firer Eligibility Sec. 7.4.

Page 13 – Hills & Depressions

Last paragraph after diagram (2 lines) –

replace with:
However, Platoons in or at the Edge of a Depression are Spotted

by Platoons on Hills as if in the Open.


Page 13 – 6.4 Hull Down

First paragraph (2 lines) – replace with:
Hull Down (HD) is protective cover. Hull Down may be obtained

only by selected vehicles on Hills or in Depressions.


Page 13 – 6.5 Ambush

Paragraph 1, Lines 3-4; replace with:
Ambush fires first in the stationary fire phase, and may not be fired upon


in the turn in which it was first spotted; i.e. a previously Unspotted Platoon

Page 15 – 7.4 Firer Eligibility

Paragraph 3, lines 3-4; Strike Out or Delete the

following:
or in “Hull-Down” positions


Page 16 – Direct Fire Adjudication

Paragraph 2, line 6 (last line); Strike Out or

Delete the following:
less than -3 or


Page 17 – Effective Ranges For Infantry Weapons

Top of column 2, replace all 6 lines with:
type Platoons, based on the approximate effective ranges of

modern small arms. AI Ranges are 6” for most Infantry and 9” for

(MG) Support Platoons; and 3” for low firepower Infantry or

Militia. Infantry use ATGW factors for Anti-Tank fire and these

have a range of 3” or 6” unless the platoon includes a heavier

complete ATGW weapon, when ranges will be 9” or greater.


Modern Spearhead – Official Errata – Version 1.11 – 13 August 2006

http://modernspearhead.net/
Modern Spearhead is © 2000 Wargames Inc, John Moher, Alex Macris, Arty Conliffe. This update © 2006 John Moher, Alex Macris, Arty Conliffe. Page 3 of 7


Page 17 – 7.6.1 Infantry Anti-Tank Fire

Replace the whole section, both paragraphs

and Title, with:
7.6.1 Infantry Anti-Tank Fire “ATGW”


The ATGW factor of infantry represents the anti-armour capabilities

of Dismounted Infantry and Combat Teams; LAW/MAW type

weapons; rocket-propelled grenades; and in some cases full ATGW

systems. Infantry ATGW Factors usually have a 3”, or 6” Range (or

very rarely 9”). They may attack targets out to these ranges using

the appropriate ATGW factors listed and in these cases they may

combat move and fire or Ambush using those ATGW factors.

Infantry with the longer ranges (9”+) are usually using full ATGW

systems and may not move and shoot or Ambush with them. Infantry

stands with the longer 9”+ range ATGW systems can be assumed to

also have a second 2-3” Infantry ATGW factor as well. The 3” and 6”

range is exaggerated for game purposes to produce the desired

overall effect. See 7.8.1 for more on the firing procedure for ATGW.


Page 17 – 7.7 Vehicle Direct Fire

First two lines, replace with:
Vehicle (and Combat Team) AT fire represents attacks from cannon


using various anti-armor shells. The cannon also contributes

Page 17 – 7.7.1 Front/Flank Shots

Replace the first two lines with:
All Platoons have an imaginary “Front Line” (which runs

indefinitely) across/parallel to the front edge of the Platoon’s


Page 18 – Passenger Targets in Trucks

Lines 4-5 (last 2 lines), replace with:
automatically suffer the same effect. Suppressed passengers must

immediately dismount and the soft vehicle is removed from play.


Page 18 – 7.8.1 ATGW Fire Eligibility

Paragraph 2 (the example), replace lines 1-2

with:
Example: A Leopard 2 is the priority target of a stationary BMP-2

Combat Team. The Range is 9”. The BMP-2’s AT factor is 5, while


Page 20 – On-Table Artillery Arc and Range of Fire

Last Paragraph, lines 7-8 (last 2 lines), replace

with:
All Gun & Howitzer Artillery must use Direct Fire when targets are within

Direct Fire range and LOS. They may not fire indirect in this situation.


Page 21 – FOs for Brigade- and Divisional-level Artillery

Paragraph 2; replace lines 9-10 (last 2) with:
FOs do not block line of fire for friendly Platoons and do not count as

platoons towards the capacity limit in Town Sectors.

Page 23 – 8.5 Round Types

Second Paragraph, replace whole paragraph

with:
The availability of Round Types based on nationality, year, and level

of artillery, is indicated below under the Round descriptions. Note


that certain weapons are only eligible to fire specific types of

Rounds. Where possible these limitations are noted on the Data

Cards for those weapons.


Page 23 – 8.5.3 Precision-Guided Munitions (PGM)

Paragraph one, lines 7-9 (last 3 lines), replace

with:
ifies the AT factor of the firing artillery by +2 against ground targets

and always attacks the Flank Aspect. PGM is the only indirect fire

round that may be used against Helicopters, see sec. 11.9.


Third Paragraph, replace entire paragraph

with:


  - ! "
# $ % & '
(
#

-

Page 23 – 8.5.4 Rocket Assisted Projectiles (RAP)

First Paragraph, replace entire paragraph with:
Rocket Assisted Projectiles are used to give conventional

“tubed” guns the long range of rockets. When using RAP, the

effects are identical to Smoke, HE, ICM, or Chemical

ammunition except that the Maximum Indirect Fire Range of the

weapon is increased by about 1/3. This is particularly useful


when applied towards Counter Battery Fire, see sec 9.0. Note

that minimum range of RAP weapons is also increased. Where

possible the maximum range of RAP capable weapons has been

given on the Data Cards, otherwise assume an increase of 1/3.


Modern Spearhead – Official Errata – Version 1.11 – 13 August 2006

http://modernspearhead.net/
Modern Spearhead is © 2000 Wargames Inc, John Moher, Alex Macris, Arty Conliffe. This update © 2006 John Moher, Alex Macris, Arty Conliffe. Page 4 of 7


Page 24 – Smoke Screen Procedure

Third Paragraph, replace entire paragraph

with:
A platoon that is in Ambush and has just been spotted may conduct


Ambush Fire through Smoke which was first placed during the

Artillery Fire phase of that turn. (This prevents a player from using

smoke to avoid Ambushes by Platoons which have just been

spotted). However, a Platoon may not claim Ambush Fire through

Smoke which is being ‘stoked’; i.e. smoke which has previously been

placed in an earlier turn and is being sustained through stoking.


Page 24 – 8.5.6 Chemical Smoke

Replace entire Paragraph with:
Chemical smoke rounds are identical to Smoke rounds except that

they block Spotting even for Platoons equipped with TI night vision

equipment. Chemical Smoke is available to Soviet artillery from


1980, U.S. artillery from 1988, and other NATO artillery from 1990.

Warpac and Others do not have Chemical Smoke unless specified.


Page 25 – 9.2 Locating Enemy Batteries

Paragraph 3 (2 lines) – replace entire

paragraph with:
If the modifier is such that it is impossible for a throw of 6 to succeed,

a roll of 11-12 on two dice instead will always locate.


Page 25 – Counter Battery Location Chart

Replace modifiers section with:
-1 if target unit just fired for the first time in the game.

-1 if target unit has moved since the previous time it fired.


-1 if target unit is SPGs (but not MRLs).

+1 if target unit is MRLs.


+1 if target unit has fired for two or more consecutive turns.

Page 25 – 10.1 Type of Aircraft

Last 4 lines of paragraph, replace with:
may perform only one type of attack during a game. Ground


Attack Aircraft may execute a Cannon attack and one other

additional mode of attack during a game. Attack ordnance must


always be chosen before the game begins.

Page 26 – 10.3 Calling-In Sorties

First paragraph (3 lines), replace with:
Any number of Air Sorties, up to an entire Squadron or 3 Sorties

(whichever is greater), may be Called-In by a single Spotter


against any targets that are initially within LOS of the Spotter.

Page 26 – 10.4 Aircraft Attacks

First Paragraph, last 3 lines at the bottom of

the first column, replace with:
Specialist Ground Attack Aircraft (such as the A-10) receive two Beaten

Zones per sortie, each 6” long and 2½” wide, place contiguously

extending from the Aircraft’s front base edge to form a 12”

Page 26 – Attack Modifiers (for Aircraft)

One modifier is missing; replace the last 3

modifiers with the following 4:
· ICM attack vs. any moving vehicle or combat team +1

· Napalm attack vs. Tank/AFV (not including Combat Team) -2

· Napalm attack vs. target in Entrenchments -1

· Anti-Radiation Missile (ARM) attack vs. Veterans -1


Page 26 – AA Presence Modifiers

Replace chart of 3 modifiers with:
-1 if Enemy AA Guns, or Infantry SAMs are firing within 18” of the

Aircraft (ignored if delivering SB or ARM).

-1 if Larger Enemy SAMs are firing within 30” of the Aircraft.

-1 if Any Enemy Off-Table SAMs fired this turn.

(Note: these modifiers do not apply to attacking helicopters).

Page 28 – 11.3.4 Mission D: Air Defense Suppression

First Paragraph, lines 5-6 (last 2 lines), Strike

Out/Delete:
that fired against the Helicopter this turn


Page 29 – Attack Modifiers (for Helicopters)
Last (3rd) Bullet Point – top of Second Column,


replace entirely with:
· Target is an AA Platoon that fired at the attacking Helicopter

which is operating under Mission D: -1


Modern Spearhead – Official Errata – Version 1.11 – 13 August 2006

http://modernspearhead.net/
Modern Spearhead is © 2000 Wargames Inc, John Moher, Alex Macris, Arty Conliffe. This update © 2006 John Moher, Alex Macris, Arty Conliffe. Page 5 of 7


Page 30 – 11.8 AA Fire vs. Helicopters

First & Second Paragraph, replace both

paragraphs with:
All dedicated AA Platoons (with Fire Priority D), except for Off-Table

vehicle-launched & emplaced SAMs, may fire at any spotted enemy


helicopters. AA platoons may also claim Disappearing Fire if they

can spot the Helicopter at any point along its flight path on its turn of

entry. Other Platoons which may fire AA are designated in the Data

Cards as having an AA Factor, but may only fire on a Helicopter if

they are the current priority target of that Helicopter’s attack; or if

they have no ground targets and no other air targets of a higher

priority (and/or closer proximity).

HS AA fire and similar may be fired over the heads of friendly Platoons at

Helicopters at Cruise Altitudes, but not at NOE. Dedicated AA Platoons

may fire over the heads of friendly Platoons at any Helicopters. AA Fire


comes before Helicopter attacks are conducted.

Note – change from version 1.00 is modification to last sentences and

the addition of the 2nd paragraph in the errata.
Page 31 – Assaulting Vehicles

Replace the Paragraph with:
Dismounted Infantry are not permitted to Assault AFVs or Combat

Teams unless the AFV or CT is inside terrain (i.e. not in the Open) or

Suppressed. Unarmed Transport Vehicles may be Close Assaulted

anywhere, and are automatically destroyed along with any

passengers and/or towed or portée weapons they are transporting.


Page 31 – 12.1.1 Combined Arms Assaults

Second Paragraph, replace the whole

paragraph with:
Combined Arms Assaults (CAA) differ from Infantry Assaults in only


two respects; otherwise they are exactly the same. First, if the target

of the CAA is a crew-served weapon it is automatically destroyed if

contacted, and second, CAAs may be conducted against AFVs at


any time – even if they are in the Open and Unsuppressed. Note: All

dedicated ATGW & SAM vehicles and SPGs with DEF 3 (5) count as

Crew-Served weapons for CAAs and Overruns.


Page 31 – 12.2 Overrun Attacks

Fourth Paragraph, replace whole paragraph

with:
Unarmed Transport Vehicles (along with any passengers and/or

towed or portée weapons they are transporting) and crew-served


weapons are automatically destroyed if contacted. Overrun Attacks


may not be used to circumvent Target Priority rules (i.e. to attack

enemy infantry in the face of enemy armor). Combat resolution is

similar to Assault Movement & CAAs and uses the same Modifiers.

Page 31 – Close Combat Modifiers Table

Replace entire table with:
Close Combat Modifiers:


All modifiers are cumulative.

Attacking an Entrenched Enemy Platoon -1

Any Vehicle in a Town Unsupported -2*

Armour conducting Overrun in the Open +1 (+0 elsewhere)

Combat Team in a Town +1

Combat Team in the Open against any Soft target +2

Combat Team in the Open attacking an Unsuppressed AFV -1

Combat Engineers/Assault CEV/Flamethrower +1**

Veterans +1

HQ Stands +1

Crew-Served Weapons incl. ATGW and SAM Vehicles -1

Suppressed -2

* Vehicle stands are unsupported if at least 1 non-HQ dismounted

Infantry or Engineer, or non-HQ Infantry or Engineer Combat Team stand

is not present in the sector.

** Standard (Light) Engineers do not get this modifier.

Page 33 – 14.0 Morale

Paragraph at top of second column, Lines 5-6

(last 2), replace with:
experience. Ratings are flexible and relative depending upon

scenario design; suggested Morale ratings are listed in the TO&Es.


Page 34 – 14.2.3 Rallying From Suppression

First Paragraph, Lines 6-7 (last 2 before list of

modifiers):
next turn’s Rally Phase. The following modifiers to the die roll apply:


Page 35 – 15.2.1 Laying Minefields

Second Paragraph, Replace entire paragraph

(3 lines) with:
Once play begins, Mines may be emplaced by Minelayer

Vehicles at a rate of 1 x 1¼” Minefield each turn, or delivered by


Aircraft or Artillery. They are always treated as Mixed Minefields.


Page 36 – Soviet Armored Fighting Vehicles

Replace entire paragraph (5 lines) with:
Soviet Self-Propelled Guns and Tanks, and some Western Tanks, which


are equipped with Dozer Blades, should automatically receive Light

Entrenchments if the scenario specifies that they have been on-table for

at least 2 hours before the game begins. A battalion may have 1 x 1¼”


Light Entrenchment per Dozer Stand per 2 hours preparation.


Modern Spearhead – Official Errata – Version 1.11 – 13 August 2006

http://modernspearhead.net/
Modern Spearhead is © 2000 Wargames Inc, John Moher, Alex Macris, Arty Conliffe. This update © 2006 John Moher, Alex Macris, Arty Conliffe. Page 6 of 7


Page 36 – 15.5.1 Bridging

First Paragraph; Replace entire paragraph

with:
One Engineer Platoon requires 16 turns to assemble a single 1¼” long light pontoon

bridge using 1 bridge section (stand). These bridges may bear the weight of all

platoons and their tows with weight 2 or less. One or Two additional Engineer

Platoons may help reducing the time taken to 8 and 4 turns respectively. Double the

time (32 turns) and bridge sections (2 stands) is required to assemble a 1¼” pontoon

bridge capable of bearing platoons of any weight (and completion times are 32, 16,

and 8 turns respectively). If a 2½" Pontoon Bridge is required double the time and

bridge sections required above for the respective type of bridge. No more than 3

Engineer stands can ever work on any one bridge.


Third Paragraph; Replace last 2 lines with:
create a large bridge. Ribbon bridges may also be used as Heavy

Ferries, see sec. 15.5.2.


Page 38 – 17.4 Effects of Weapons of Mass

Destruction – Attack Modifers

Replace last line at bottom of column with:
* Not Cumulative; Open-Topped APCs (of ICTs); and SPGs with

DEF 3 (5) or Recon AFVs do not impose either modifier

Page 40 – Top of Second Column

First Paragraph (3 Lines), replace entire

Paragraph with:
Make certain your games have enough terrain. Even the

comparatively open spaces of Sinai and the German Plains


contain rolling hills, rises, depressions, and other features.

Page 42 – Scenarios

Sword & Shield Scenario
4/60th Armored Battalion, replace 2nd line with:


)
* + ,- .

1/32nd Armored Battalion, replace 2nd line with:


%
)
* + ,- .

Page 47 – Designers Notes

Box with contact details at bottom right of

page, replace box with:
Support for Modern Spearhead:

Official Website:

http://modernspearhead.net/

Discussion and Support Group:

http://groups.yahoo.com/group/Spearhead/

Quick Reference Sheet

Update the appropriate sections of the QRS by

pasting in the following:

Sequence of Play Table
1. Determine Initiative

2. Movement:


2a. Side A moves all units, declares Close Combats,

makes EW attacks. Side B marks disappearing fire.

2b. Side B moves all units, declares Close Combats,

makes EW attacks. Side A marks disappearing fire.

3. Fire Attacks:


3a. Indirect Artillery, Mortar, Rocket, & SRBM Fire.

3b. Air Support Requests, then Anti-Aircraft Fire, then

Fixed Wing Attacks, then Helicopter Attacks.

3c. Stationary Direct Fire.

- Ambush Fire is resolved First, then

- All other Stationary Direct Fire.

3d. Moving Direct Fire.

4. Morale Tests – due to Fire Combat Casualties.


5. Close Combat:


5a. Resolution of all Close Combats.

5b. Morale Tests – due to Close Combat Casualties.

6. Command Phase:


6a. Attempt to Rally Suppressed Platoons.

6b. Issue Order Changes & Commit Reserves.

Combat Chart

Modifiers to die roll: The “Target in Heavy

Cover” modifier is missing its “-2”, write it in or

paste the following over the top:
/ &
0
  1 2 3 +
4 ( # 5 - (
6

Modern Spearhead – Official Errata – Version 1.11 – 13 August 2006

http://modernspearhead.net/
Modern Spearhead is © 2000 Wargames Inc, John Moher, Alex Macris, Arty Conliffe. This update © 2006 John Moher, Alex Macris, Arty Conliffe. Page 7 of 7