Wednesday 27 January 2016

Thursday nights game

Russ put on a spearhead game of his own devising.
The British troops (veteran commandos and paras)
had to take the three 88 AA units to win the game.
Germans had 2 regular infantry battalions to stop them
German troops set up is hidden then the British enter from any table edge.
 German set up
 Phil's I Pad (not required)
 British push on the objective halted by German ambush
 Ranges were reduced to simulate dark, so close combat is the order of the day
 German armour waiting to pounce
 British finally crush ambush
 Paras try to assault town but run out of steam and break
German blocking battalion breaks as well leaving the reduced commando battalion to finish mission
A German infantry battalion is hidden  in the town waiting to pounce.
Time Gentlemen please.
Cheers Russ nice scenario defiantly got replay value.


Friday 22 January 2016

One Day Campaign Rules

Everyone is up for playing our first one day campaign on Sunday 7th Feb.  I propose Jon and Russ as the British, and Mark and Phil as the commanders of local German forces.

Russ has kindly agreed to create 10 x tables of 4'x 3' of generic flocked terrain.  He will be experimenting with different effects so that these tables can be used as stand alone tables for other Thursday night games.  Impressively, Russ will make this happen over the next two weeks!  This is a massive help in  making sure that we do not put too much time and expectation into the preparation of a one day game that will largely use existing figures and terrain that I hope will get everyone thinking whether they want to use the same format for their beloved army or period.

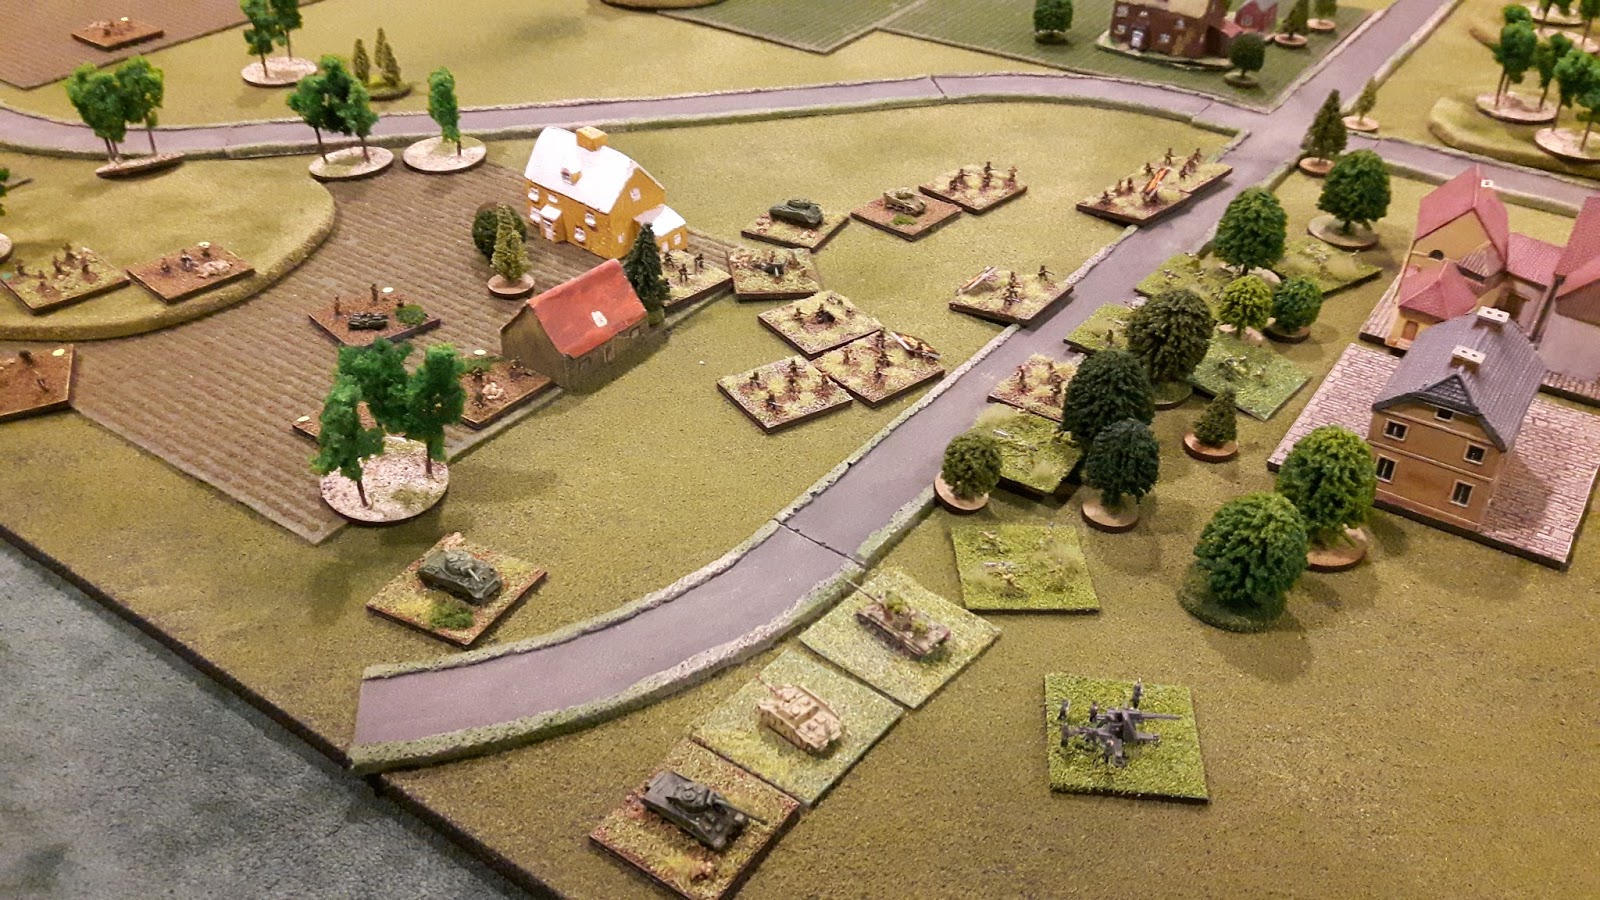
The Game will be set in early September 1944 somewhere in northern Belgium, with a limited offensive by a reinforced British division.  They will be attempting to improve the overall situation of XXX corp in preparation for the Arnhem offensive (It could have been a local counter offensive after the Bulge battles or part of the drive towards the Elbe in 1945 with different weather conditions and troop types and that's the flexibility of this campaign system).  The Germans are desperately trying to create a defensive line after their defeats in Normandy and will be defending with whatever local forces they are able to gather.


Objectives

The objective will be to hold terrain boards that provide the most points.  9 points = draw, 10-12 points = partial victory, 13 - 15 points = victory, 16 - 18 points = overwhelming victory.

Terrain Layout

Row one of the tables will hold one objective point.  Row two will have two and row three will equal three.  The objectives for each table will be made up of the following;

1A  1 pt for the ridge
1B  1 pt for the farm
1C  1 pt for the town
1D  1 pt for the farm

2A  1 pt to clear the north side of the river of the enemy.  1 pt to clear the south side of the river of the enemy.
2B  1 pt to clear the north side of the river of the enemy.  1 pt to clear the south side of the river of the enemy.
2C  1 pt for the ridge, 1 pt for the large wood.
2D  1 pt for the village and 1 pt for the bridge (there will be a small stream across the bottom right)

3A  2 pts for the airfield, 1 pt for the village
3B  1 pt for the town, 1 pt for the bridge, 1 pt to clear north bank of the enemy

1B, 1C, 1D, 2A, 2D and 3A are "Fairly Open Terrain".
1A, 2C and 3B are "Hilly Terrain".
2B, 2C and 3B are "Close Terrain".

"Fairly Open Terrain" = 1x hill and 4x woods or fields.
"Hilly Terrain" = 4x hills or 2 ridges or 2 hills and 1x ridge.
"Close Terrain" = 1x hill and 6x woods or fields.

Placing of terrain and initial deployments

The towns, highway, bridge, river and airfield will be fixed terrain items.

The German players place the terrain on the tables and the British may move up to three of the pieces.

Defending units and placed terrain must not be placed within 6" of any table edge.

The German players place the HQs of all the units they intend to initially deploy on the tables.  The British players are then able to make their plans and organise any pre-planned bombardments.  Once the British are ready, the German players may move their HQs up to 6".

The British must deploy all their forces on either of their reserve tables at the start of the game.  They can only advance from table to table using the broad outlined arrows.  The Germans can move their forces using the broken arrows.  All off table reserves are screened and hidden.

All individual units are placed on contested tables.  HQ's need be the only units deployed on uncontested tables.  Artillery firing indirectly must be deployed.  Units can be command arrowed to and placed on reserve orders on an uncontested table.  Units that have fought and secured their arrow point are on hold orders.

Movement and timescale

Units move double speed on uncontested tables.

There will be no turn limit.  Combat on two different tables will take place at their own speed and where there is a crossover from one side to the other this will coincide with the sequence of play.

Aircraft

Air assets will be deployed on a table every hour.  German (or allied aircraft if they capture it) can operate from the on table airfield every half hour.  Orders for air assets will be interdiction/ top cover, recon or ground attack.  Fighters will automatically drive away unaccompanied bombers and spotters, destroying fighter bombers on a 6 and medium bombers and spotters on a 5 or 6.  Outnumbered fighters are also driven away and shot down on a 6.  Equal numbers of fighters will dogfight with the higher dice roll shooting down the opposition and draws forcing both to withdraw.  Aircraft that withdraw or complete their missions are deemed to be at their base refuelling and rearming until the hour (or half hour) is complete.

Inter-table firing

There will be no direct fire from one table to another.  Mortar fire can only be used on the same table that it is deployed.  Guns up to and including 105mm can fire indirectly on adjacent tables.  Guns of greater calibre can fire on adjacent two tables.

Spearhead rule amendments for this game.  

Troops testing at 33% fail on a 6, at 50% 5 or a 6 and 66% a 4,5 or 6.  Therefore green troops still test at 1/3 losses but have a better chance of staying in the game whilst veteran troops have an increased chance of failing when they eventually have to test.

Germans will change orders on a roll of 3 or higher.  Still very good but simulates their disorganisation at this particular point.

Each British player can make a 2x command rolls for their forces each turn.  Each German player can make one.

German units under air attack or off table artillery fire cannot change their orders.

British artillery rolls are as USA 1944-45.

Counter battery fire is allowed against off table artillery that has fired.  For purposes of spotting any unit of medium or heavy artillery is revealed by the counter detection systems employed by both sides artillery HQs, and therefore HQs must be with a battery or battalion to enable counter battery fire.

Each German artillery battery has 6x indirect ammunition, each British has 8x ammunition.


I hope I've covered all the particulars.  Let me know if you think I have missed something or if you don't agree with an amendment.  I will work on the OOBs and present them a week on Thursday (4th Feb) for our pre-game planning session.  Please reread the rules and use that session to bring up anything you think we are doing wrong.  And just to confirm, Len has agreed to us using the club on Saturday 6th Feb - I can't wait!


Sunday 17 January 2016

One day campaign game


This is something I have had in the back of my mind for some time - in fact its from issue 2 of Miniature Wargames way back in 1983.

I enjoyed Jon's game on Thursday but it got me thinking about the possibilities of playing a large game in one day but with plenty of movement, reserves, flank attacks, off table artillery etc. when I remembered this famous article from George Gush.  I also thought how much fun we all got from Russ' terrain board and how many scenarios we managed to wring from one set up.  The above is a development of both these ideas.

If Russ is up for it, he very kindly creates boards of the same dimension (4'x3') to represent the areas indicated in the squares above listed 1A to 3B.

At the top a British infantry division with armour support deploys on red start table A or B.  These tables are screened from the German player to disguise the axis of attack.  The British can only move from table to table following the large outlined arrows.  This simulates unit demarcation and command chains for a large push to secure as many of the tables as possible.

Tables in the first row have one objective, tables in the second two and the third row three.  To win the British must secure more objectives than the Germans hold.

However, the Germans are fewer in number but they can move from table to table using the dotted lines to represent their more flexible command and control, and so have the opportunity to launch local counter attacks.

In addition both sides have an air table from which they give their air assets orders during the game including counter strike, ground attack or top cover.

Unoccupied tables allow double movement, artillery of 105mm or less can fire indirectly on adjacent tables, artillery that is larger can bombard tables that are two rows away.

We would need to use the club and the aim would be to get the game finished in one day.  There are no turn limits just a time by which the game ends.  Air assets are refuelled and reused on the hour regardless of the turns taken and only indirect fire is allowed from one table to the other.

I would need Russ to agree to making up the tables, and all of us to agree on a Saturday or a Sunday for the game.  What we get is another set of tables that can be used like the scenarios we played for weeks last year and we also get a campaign set up that can be used again and again.  It could be an American, a Russian or a mixed allied division attacking.  It could be a German division attacking the Russians.  It could be a Napoleonic large scale battle or even an ACW battle with the Union attacking a Confederate city whereby the river could be used to bring on naval assets.  The list could be endless but the basic system is there to use over and over again just like that one terrain board.

Apart from the tables we have everything else.  Obviously Russ needs to be up for this (although I could probably put something together using my terrain boards) but can everyone let me know if this is of interest as I think the format could be used for everyone's favourite period and army.

Saturday 16 January 2016

Marks Medieval Town


Finally finished - Marks TBM Medieval Town


Their Finest Hour


Their Finest Hour


A WW2 Spearhead scenario written by Russ Fewtrell

Background

North Western France - October 1943

36 miles North West of Brest lies the small hamlet of Saint Rennan . A detachment from the German 984th Grenadier regiment has been deployed with re enforcements to defend a Flak 88 anti aircraft battery which the Germans have deployed to defend Brest from RAF nigh time Bomber raids.
The battery has proved highly effective in defending Brest from attacks over the North Western point of Brittany forcing the allied bomber command to rethink it's flight plans and ultimately resigning to the fact that higher casualties would be inflicted should the bombers have to fly around the coast and into heavily defended axis flak fire.

As a result the allies have deployed a veteran battalion of commandos armed with specialist explosives to infiltrate and knock out the flak battery at Saint Rennan.

The scenario will take place during night time and turn 1 represents the arrival of the commandos from the small port of 'Le mole' some 23 miles West of Saint Rennan.

The allied player(s) objectives are to assault the Flak battery and place explosives to destroy the guns. There are 3 88 Flak guns deployed in the battery. To claim victory the British must of destroyed at least 2 of the guns by the end of turn 12.

The German player(s) objectives is to successfully repel the British assault. The Germans will claim a victory if they hold on to 2 guns or by beating the British attack back.

British intelligence reports of possible German re enforcements from nearby detachments of the 9th Panzer Division but there is uncertainty about the accuracy of the intelligence.

The British will come on table from the Western edge. Night time rules for spotting apply as follows:

Infantry in open - 3" extended to 6" if any stand fires
Infantry in cover - no spotting extends to 6" if any stand fires
Vehicles - as above but 6" and  12" if fired

Vehicles in cover 3" or 12" if fired


I'll e mail each of you the orders of battle shortly.......

Wednesday 13 January 2016

War on the Eastern Front

I've started the mammoth task of redoing my WW2 Russians to provide troops for both winter and non-winter battles (in 6mm of course)!. 

The first phase is done - with a division of German troops in winter camo already painted up and in the same numbers as the Russians below (4 men for standard infantry, 6 for SMG etc.)

Next phase I'm in at the moment - rebasing my 'summer' Russians.  I've acquired these over a number of years from Ebay etc. and they are all on slightly different base sizes with different uniform colours, non-standard units per base (some with 8, 6, 3, 4 per stand plus vehicles etc.) and with different base depths (card, MDF) and flock - so basically they just looked a mess on the table.

So the big initial job has been taking them off their bases (never easy and a few casualties that had been excessively glued were incurred).  This allows me to mix units up a bit more to make them look more interesting (so rather than just 4 infantry with the same pose I can mix it up with a grenade thrower, LMG, SMG, kneeling shooter etc.).

They will all be painted the same colour though and all base materials (talus, flock and paint colours) will be the same to give a much better overall look.

These will be based for Spearhead (3cm square bases) with 4 men per base for basic infantry, 6 for SMG, each heavy weapon will have its own base (81mm mortar, HMG etc.), engineers will be 4 to a base in a square formation (to differentiate from basic infantry) and all HQ units will have a small vehicle (scout car) plus 3 units.  This will make units easier to identify.  In addition, the rear edge of the base will have a different colour painted on it to provide easier identification of regiments.

This phase is well underway.  I bought some more Russian infantry to ensure I had enough to fill the infantry requirements for any scenario and found I have many more SMG figures than I need so I will use one per base on standard infantry bases to meet the quotas.  Some may find themselves fighting in Winter as a result (see below).

Phase 3 will then be vehicles - most of my tanks, AFV's etc. are well painted but as above come on many different bases.  So this will be a simple case of just rebasing the vehicles themselves.  However, with Winter war in mind, I must allocate essentially half of everything to have winter bases and winter camo. 

Then Phase 4 is painting the Winter Russians.  I've ordered a batch of basic infantry, SMG and heavy weapons from Heroics and Ros to meet the numbers required.  These are fairly easy to paint up but winter basing is trickier so that's the bit which will take longest.  Like their new Winter Germans, these are slightly chunkier but with better detail and more poses.

Final stage is then painting Winter German tanks and AFV's.  I have a large number of vehicles acquired from Ebay over the years.  Paint jobs on them are pretty poor and done for 'summer' campaigns.  I need to basically strip the paint and start from scratch - and then base as per the winter infantry.  I don't have summer Germans as Mark has everything we need.

In between times I have to put some thought to special rules for fighting in winter.  Generally in Spearhead the Germans are basically much better than the opposition.  Their infantry are better (+1) to account for their greater tactical nous and use of automatic weapons.  They can change orders on anything but a 1 while Russians need a 6 to change orders for example - so the German commander can be much more flexible and change plans on a whim.  Their vehicles also are better in terms of defence and attack.

However, in the Russian winter things were not as straightforward.  Russian AFV's were better suited to the conditions (wider tracks on the tanks, better starters in the cold etc.).  Russian troops were more comfortable in the cold and their hand held weapons were better (their lubricating oils meant that Russian guns rarely jammed in the cold - German guns often did).  German troops were also disinclined to go on the offensive in the winter months.

This would probably be translated as ideas along the lines of...

a) German vehicles do not automatically start - they may need d4 or d6 turns to get started.
b) Once on the move, German vehicles roll a d6 each time they move and a 1 means they are stuck for that turn.  If a 1 is rolled for the following turn it is stuck for the duration of the battle - it can still fire (if an AFV) or disembark troops (if and APC or truck).
c) Germans troops do not get their usual fighting bonus (the volume of firepower is offset by jammed weapons and cold fingers).
d) Before the battle starts the German player rolls against all troops and vehicles as if being hit by mortar or small-arms fire and suffers Supressions on a 'hit' - this represents poor unit cohesion, loss of troops through frostbite or cold-related conditions.  Supressions are removed in the usual way.  This may be optional after 1944 when better cold-weather uniforms were issued.
e) The referee can designate parts of the battlefield as 'deep snow' - areas in each sides zone of control are known by that player but not the opponent.  Moving into these areas would slow or halt movement while inside them. 

Some more ideas will come but that will do for now...


Friday 8 January 2016

Joy Of Six 2016 - The Bridge At Remagen


Well folks it's time to decide on this Years JOS game and last night we had a chat about what was in the pipeline.


There have been a few games that keep on cropping up in conversation....


Pavia

peleliu

Tarawa

The Somme


I think we reached a conclusion last night and despite Pavia being the strong contender I personally feel that the terrain is a bit too much to take on.

The other games above (bar the Somme) have both been played before but are both "serious" battles and would require a fair amount of sprucing up if we were to go with one of these.


It just so happened out of coincidence we looked at Ian's Christmas game "The Bridge At Remagen"

and thought...... could we put this on at JOS?


Well the response was YES


The game itself was "fun" and the mechanics are already in place, a good starting point

There is a definite feeling that this would be the most unique game at the show - even better

It just has that "Novel" feel about it and you know that no one else will be pitching in the same spot.


I just need to know that Jon and Phil are okay with this decision (we voted last night)

If we are all on board then Ian will call a meeting to lay out the Project proper.


Falaise Pocket

Thursday nights game of spearhead .
scenario taken from Warning order online gaming magazine (cheers)
Germans had to gather their spread out forces and push  the British blocking forces as British reinforcements arrived from random directions.


Result=A draw

Tuesday 5 January 2016

New H & R WW1 Germans


Just thought I would take a few snaps of my first packet of painted and based new sculpt H&R WW1 Germans....


The unit at the front with 4 figures represents my Stormtrooper company


The new poses are excellent and bring the figures to life
 You get a full strip of command figures in each pack with a good assortment of poses,
for my HQ I have used a mix of figures with the binocular chap at the front, who will also come in handy as a FO on other stands.


As normal I asked for a second opinion on the base colour and the response from Debbi was "it looks like an alien planet"..... well for me that will do as I wanted to try and replicate the muddy battlefields of the Western Front on this army. I was reminded that the figures are still too small though.......


Bases are Coat'D Arms brushscape sand brown washed with GW sepia and the dry brushed Vallejo beige brown.

I sprayed the figures with the army painter matt spray which I am still not sure I like the finish.

Overall quite pleased with these and am looking forward to the next pack.

Battle of Como, Summer 1506


Imperial and French armies clash

The battlefield was constrained by steep hills, closely cultivated slopes and stoutly built villages that reflected this part of Northern Italy that bordered Lake Como and the Alps beyond.


The French command had decided to cautiously await the Imperial advance against Como before releasing their heavy cavalry against an enemy that they hoped would be divided by the terrain.  However, there plans seemed misplaced as the Imperials adopted a position covered by high terrain and appeared to await the imminent arrival of the Duke of Milan which would give them an overwhelming advantage against the French.  The French, therefore, felt they had to bring the battle to the Imperials before the Duke could tip the balance against them.

The French commander took the bulk of the Gensd'armes on a wide outflanking manoeuvre on the right whilst the rest of the army moved forward to pin the Imperials.  To the surprise of the French, the Imperial commander had chosen not to wait for the Duke and hoped that a sudden attack would upset any French calculations; it did!

As Imperial knights struggled dangerously through narrow defiles, the few French Gensd'armes on the left flank were hamstrung by their initial orders and failed to contain the Imperial advance.  Brushing aside the limited opposition, the Imperial commander was close to taking the French baggage.  Meanwhile the French commander was appraised of the developing situation and was slowly able to reorder his mass of cavalry towards the baggage and support his centre.  The inferior French Pike in the centre was doing its best the hold the Imperials but a desperate charge by the compromised French left temporarily shut the door on further Imperial reinforcements and slowed the attack against the baggage.

Now the French commander and the van made their influence felt and the Imperial attack stalled amidst the French pike and reinvigorated French left.  Imperial knights were beginning to route off the field and it seemed the crisis point of the battle had been reached .  The French commander urged on his command to crush the Imperials and the French pike reformed and advanced in support; the French were now confident of victory.

However, the Imperial commander still had his uncommitted centre made up of veteran lansknechts and supporting arquebusiers.  These moved forward through the fleeing knights and opened a withering fire upon the advancing French.  Daunted by the covering pike the French were now more cautious and opted to await night and better opportunities in the morning against their half beaten foe.

As expected the Duke arrived during the night with his badly needed reinforcement of Milanese knights.  The Imperial commander had been dismayed at the failure of his attack and the many casualties his knights had suffered.  He advised a retreat onto Milan but the Duke was determined to continue the battle.  He argued that his command amply covered Imperial losses and that many of the routers were returning the to their colours.  The commander of the pike also made it clear that his men were still fresh and willing to fight.  Heartened, the Imperial commander agreed to continue the battle but chose a plan that kept his cavalry massed and in reserve whilst deploying his infantry to make the most of the difficult terrain.

Early the next morning, the French resumed their attack on what they considered to be the demoralised and weakened Imperial right.  Once more, the French commander advanced against the Imperial left in an attempt to pin the mass of Imperial and Milanese cavalry on that flank.

As the French left advanced, the supporting centre once more came under a deadly arquebus and light artillery fire.  French infantry began to route, and as gunners ran from their cannon the pike also began to collapse.  Spurred on to bring the battle to a close, the Gensd'armes of the left charged the arquebusiers in difficult terrain and boldly advanced against a contingent of Imperial knights that they recognised as the defeated remnants of the force that they had routed the previous day.

However, the Imperial commander had fully recovered his composure and in a cunning display of tactics, he manoeuvred his lansknechts into a position that blocked the French but forced them onto their pikes.  The weak Imperial knights had been placed as a lure and the French had taken the bait.  Simultaneously, the arquebusiers had been able to inflict considerable damage upon the French before retiring in the difficult terrain or behind the protective pike.


Again, a tipping point had been reached and the French were quick to see that it was not in their favour.  On the far right, the French commander had been easily contained and was now aware of the disadvantage of his inferior numbers.  The French centre was disintegrating purely from Imperial firepower and the French left struggled not to impale itself on the lansknechts whilst taking fire from enemy skirmishers.

Dismayed, the French commander elected to save his army and retire off the battlefield.  Yet, the French struggled to extricate themselves from the superior pursuing Imperial light cavalry and the army was considerably weakened by the time it reached Turin, having to abandon much equipment and valuable artillery in its retreat.

Commentators were quick to see the Imperial use of combined pike and arquebusier as a decisive development in the art of war, although many advocates for the superiority of the armoured horseman argued that the terrain mitigated against French success.  Nevertheless, the Duke and Emperor were delighted by this famous victory and now looked to see what advantages could be seized, and what vengeance could be wrought!

Monday 4 January 2016

Preview for 2016

I thought that I would blog my ideas for the coming year as I can refer back to this during 2016 and may be get a reaction form you guys to push an idea further up the schedule or you might want to contribute to one of the ideas.

The theme for me this year is no new projects or armies but the completion, extension or re-use of existing armies - basically use what I already have to put on new games.

First off we need to decide on the game for JoS.  Front runner for me is Pavia 1525.  We already have all the troops but its whether Russ is up for doing the terrain.  Otherwise we need to pick a game we have already played and polish it.

Secondly is to continue the Italian Wars campaign.  I have thoroughly enjoyed this and have been heartened at how everyone has thrown themselves into it and played it in their own style.  I am not precious as to playing it to a conclusion but I think we will all know when we have got a result that we agree with; let the greatest (or most devious) prince win!

The fact that we got a good result from the Malaya campaign and that the Italian campaign has rolled so well has encouraged me to plan Operation Nostalgia; a WW2 amphibious campaign in the Aegean.  The Christmas game went well and I will put on a couple of taster games over the next few weeks before I get everyone's view on whether this elaborate combination of VAS and Spearhead will work.  I will also need some more amphibious craft from Mark and a few more aircraft and ships from Phil, Russ and Marks British and American units, and Jon's Royal Navy.


I need to make more terrain like this for the Nostalgia Campaign

Russ' spearhead tester map gave us weeks of different games in several rule sets.  I will put on a series of Principles of War scenarios for Thursdays spanning late medieval, renaissance, ECW and 18th Century to see whether the same scenario can illustrate the development of weapons, troop types and tactics over a three hundred year period.

I intend to rebase (or recoat) my WW2 desert troops.  This will spur me on to put on a series of linked battles for Alamein.  I already have the troops and I have never played this iconic struggle between Montgomery and Rommel.  This also gives me the potential to look at a Tunisia campaign next year if Nostalgia is successful.

I would like to put on Swordfish at company level, perhaps covering the first two days to allow for 21st panzers counter attack; this would put a different decision making context for both sides.  We have the troops and this would spur me on to complete more seashore terrain.

I need to finish the 18th Century Dutch that Russ sold me.  This would allow me to put on the gargantuan battle of Fontenoy.  I also want to progress the Indian theatre of war as I have a campaign I would like to put on in the future.  This will also need some fleets for naval actions and I will need to decide on which scale; keep it small and make it happen or upgrade to 1/1200 and use the langton models?  An expansion of my 18th century Indians will also give me a Renaissance Indian Army so that I get an extra army for the same effort.  However, I see this stretching into next year!

I have the forces and (almost) the terrain for an 18th Century amphibious attack by the British against the French in the Caribbean.  This could be fought on a Saturday or over two Thursdays.

I also have the fortifications, troops and siege lines to put on an 18th Century siege game.  I just need to develop the rules and I have another easy play campaign.

I need to rebase my 19th Century armies for Prussia, France and Austria.  I have enough troops to put on some big battles for the Franco-Prussian, Austro- Prussian and Italian War of 1859.

I would like to put on some 1916 WW1 scenarios; the Somme, Verdun and even a Brusilov offensive once Mark has completed the Russians.

I can also do a Rowton Moor 1645 ECW battle, the battle that finished Charles I hopes of victory and is as local as you can get.  A tour of the sites and siege of ECW Chester in the morning and a wargame in the afternoon.  I think this would be a good one for the spring.

I have plenty of other battles and projects that may rear their head during the year, such as Ottomans for WW1, Tuetonic Knights, Hong Kong 1941, Guadalcanal etc. but I think the above will be enough to keep me busy.  However, I could be talked into a trip to Salute, to Paris to see the fabulous French Army museum and a tour of Normandy and the low countries!