|
| Matilda's move up amid dust. |
I wanted to put on an operational game and try out my latest ideas for an encounter version. I knew the hall would be available for 2nd December so I asked Mark if he would be free and planned a robust 2 player version that could be expanded if more players were able to make it - only Jon was available and unfortunately Mark was too ill. Jon was unable to make a pregame meeting to discuss the new layout and his order of battle but I am increasingly confident in the format and I knew Jon would be up for trying something different.
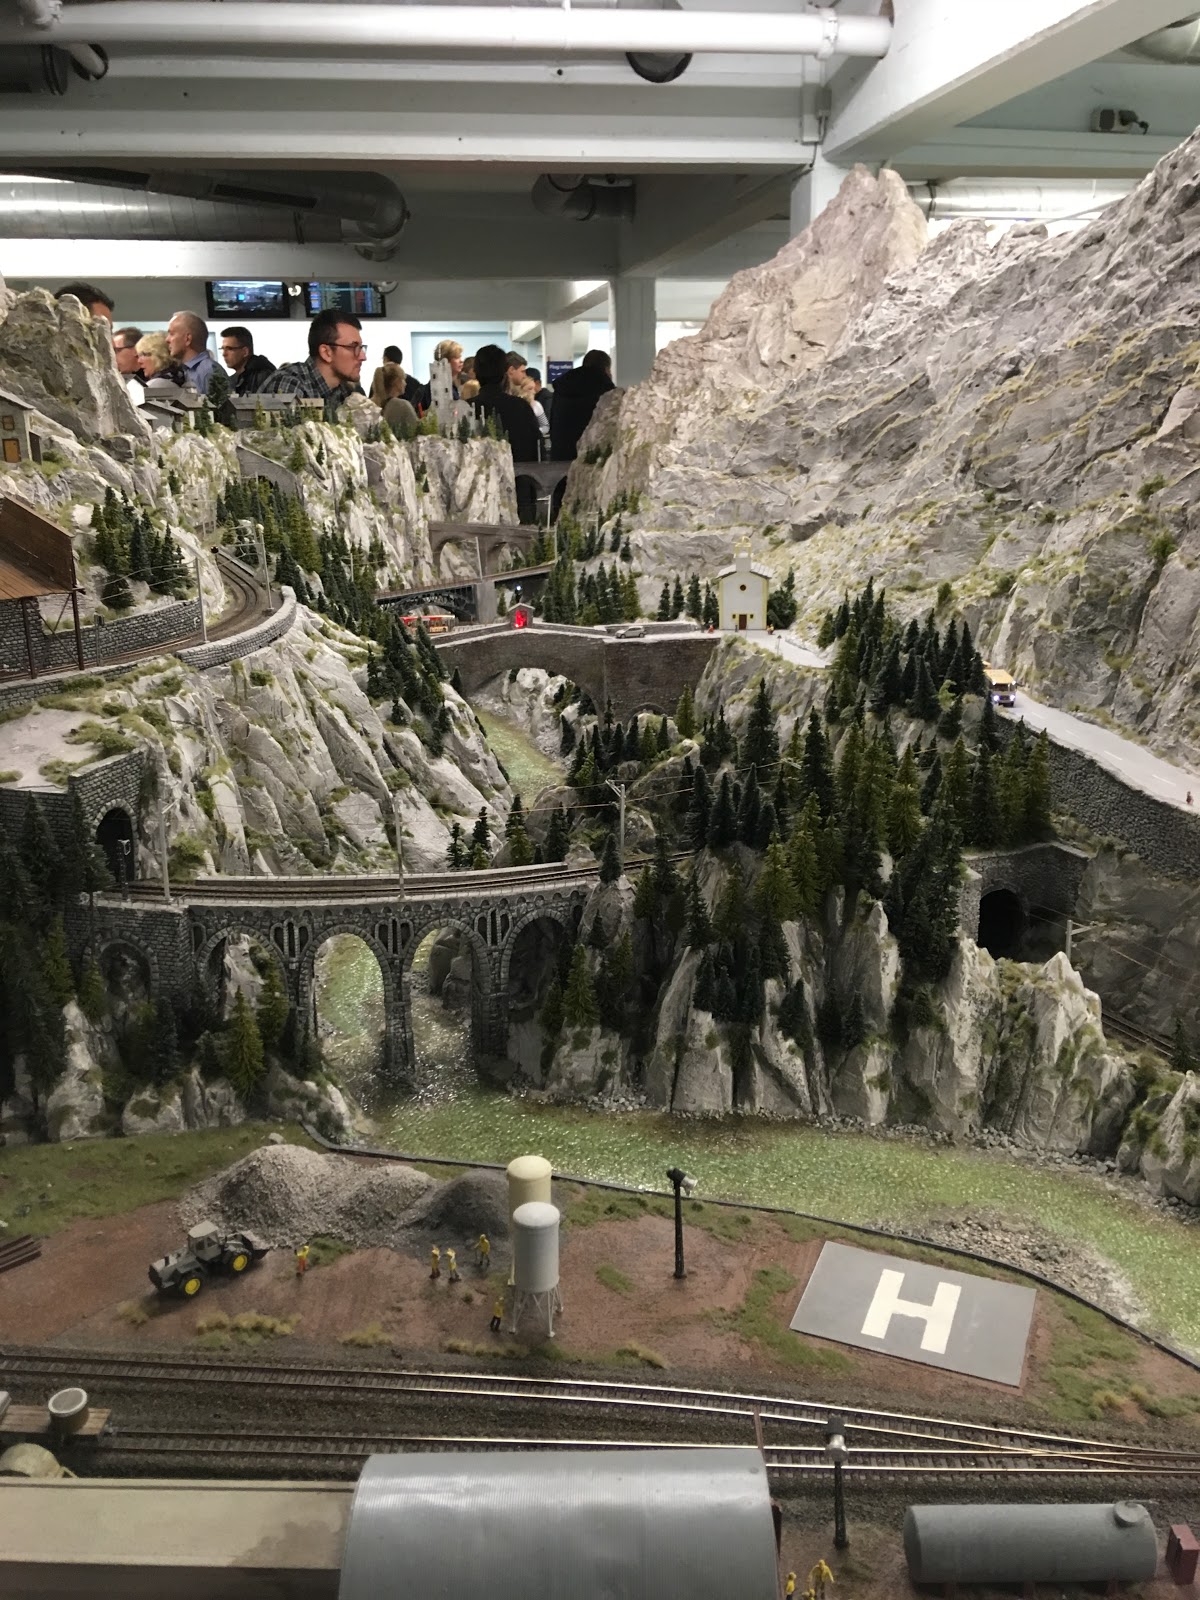
We got the tables hauled upstairs (we really missed everyone at that point!) and then organised the tables on a 2-3-3-2 basis. Jon had the initiative and we took turns choosing which tables would be nearest our base line. Once this was done, we had 9 objective points each and took turns securing the positions on each table (You will need to refer back to the table below to follow the action report).
 |
| 2-3-3-2 layout. Jon can come on from the top two tables and I from the bottom two. If either of us owned a table completely we could deploy dug in from turn one. X= Axis (Jon), O= British (Ian). |
I was able to secure the airfield near my entry point and surround it with Fort Capuzzo (1C) and the two minefields (2B and 2A). To be fair to Jon came to the game cold and may have chosen differently if he had the time beforehand.
 |
| Jon, Rommel-like, surveys the battlefield. |
As an extra novelty, I had organised the armies into a "bath tubbed" version of two divisions each. A battalion would represent a brigade/regiment and support units would have no HQ, would be company sized and would need to be attached. This gave us six fighting units each with all their supports, no C in C but two divisional commanders each that could change one order per turn. This was very manageable.
 |
| Blenheim Bomber - it helped with several of my attacks. |
We had begun the game with a bomber and two fighters each, but as Jon realised what an advantage the airfield was to me (my dice throwing, however, balanced things up!) he hit upon the idea of just fielding a bomber each. This was the right proportion to the units fielded and made my advantage in air support important without being overwhelming. As ever in operational games, it is vital to establish a balance for gaming.
 |
| The SM79 provided Axis air support - it was the scourge of the Coldstream Guards. |
Jon's forces were 5th German Light Division, Rommel's first unit in North Africa and made up of various veteran formations from the Polish and French campaigns, supported by Mussolini's premier armoured formation "Ariete".
My order of battle were two seasoned formations, 7th Armoured Division, the Desert Rats, and 4th Indian Infantry Division, veterans of the Northwest Frontier and conquerors of Italian East Africa.
 |
| The airfield (3A), securely in British hands. A Bristol Bombay and the RAF ensign denote ownership. The three objective markers bearing RAF roundels can be flipped to show Luftwaffe crosses if taken by the Axis. |
I began the game having secured 1C, 1D, 2A and 3A, meaning that I could deploy troops dug in on these tables which would count towards the 2/3 deployment required of the British.
 |
| 5th Mahratta's with a field artillery regiment in support are in a brigade box on 2A. A bofors light AA company is centrally placed to fend off Axis air attacks. |
Jon had contested the minefield on 2B but allowed me to take all the points on 2A. I therefore placed 5th Mahratta's with a regiment of 60 pounders and a bofors detachment into a brigade box on 2A. By holding all the objective points the owning player can swing back two sides of the minefield to create a box or fortress. All the defenders are dug in, including their support weapons and are never out of supply during the game. This creates a very secure position but you have to be careful of being too defensive in your thinking and historically, these positions could be left behind and made redundant in a fast moving battle. I reasoned this would be a good position to defend the airfield, interdict any attacks along 2B and 1D and support any of my attacks onto 1A.
 |
| Central India Horse with a regiment of 25 pounders dug in on 1D. 4th Armoured's Matlilda's are positioned at the bottom right to assist in any attacks. |
Needing to deploy most of my units on table, I made the most of securing 1D by digging in the Central India Horse in a potential jumping off point. 4th Armoured Brigade, with its powerful Matildas was placed to support any advances and ensure that Jon didn't pounce on the Indians and disrupt my plans.
This left me with 7th Support Group at 1C and 7th Armoured Brigade and the Coldstream Guards off table in reserve.
 |
| 39th Italian Infantry Regiment dug in behind Wadi Jon-Jon on 2D with a regiment of German 105mms dug in and supporting 1A. The Italian 20mm AA is placed to cover both the Italians and their German allies. |
Jon had more options with his deployment as he could keep half his units in reserve. The extremely flexible Recon battalion 33 was placed on 3B to take my only objective point on that table (I placed it there to stop him digging in) and ready to lead any of his reserve armoured units. He chose to deploy one of his Italian infantry regiments on 2D, to secure one of his flanks and support 1A. His German motorcycle infantry regiment z.b.V.200 was dug in on 1A and these two tables were to be the basis of a forward axis screen and jumping off point for further attacks.
 |
| 1st Dragoon Guards flee from the superior numbers of Recon Battalion 33. The British objective marker is about to be flipped on 1B! |
The first move of the game had 4th Armoured Brigade sending it's recon attachment, 1st Dragoon Guards, onto 1B as I tried to feel out Jon's dispositions. In response, Jon sent the mighty Recon Battalion 33, fresh from securing the whole of table 3B, to throw the Dragoons out. I was hoping to entice the Germans onto 1D and the waiting Central India Horse and 4th Armoured Brigade - but he wasn't willing to bite!
 |
| CIH and 4th Armoured wait in vain for a German attack. |
At this point I thought it time to up the ante. I committed 7th Armoured Brigade from reserve with orders to take retake 1B and force a response from Jon. Recon 33 was sent packing but I wasn't detecting any suitable counter move from Jon. The recon attachment of 7th Armoured, the 11th Hussars was sent onto 3B and 1A to try and ascertain where Jon's forces were located. Recon 33 brooded on the high ground before the anti-tank ditch on 3B but on 1A the Hussars uncovered the dispositions of z.b.V 200.
 |
| 11th Hussars come under sporadic mortar, artillery and anti-tank fire along the escarpment on 1A. |
11th Hussars sustained casualties on 1A over a number of turns but were able to radio in some 25 pounder fire onto the German defences and witness the RAF softening up z.b.V 200.
 |
| Ariete Divisional CinC checks road directions whilst Jon organises his armoured formations. |
Unbeknown to me, Jon was reordering Panzer Regiment 8 and 32nd Italian Armoured Brigade to coordinate a set-piece attack onto 1B. However, the Italian communications were causing him some trouble as he struggled to roll a 4+.
 |
| 8th Bersaglieri moves up to support z.b.V 200 . |
At the same time, without 11th Hussars spotting them, 8th Bersaglieri redeployed onto 1A as a second line of defence behind z.b.V 200. As I skirmished with the Germans, the Italians were furiously digging in! I still thought that I needed to force the battle somewhere so I risked a reconnaissance in force onto 1A with the whole of 7th Armoured.
 |
| 7th Armoured are repulsed as Jon commits his air assets in support. |
I don't like to blame the dice, but Jon now rolled a rash of sixes! His one remaining antitank gun and dug in infantry with satchel charges took out three cruiser squadrons and the SM79 wiped out the supporting 2 pounder portees. My gamble had not paid off and I ordered a break off.
 |
| The RAF wreak revenge on the German anti tank guns. |
7th Armoured had suffered casualties without evicting the German defenders on 1A but it wasn't a total British loss. My constant air attacks had gutted the dug in anti tank guns and Jon now sensed that the time (and his Italian dice throws) were right for a concentrated armoured attack onto 1B against what he considered was the weakened British armour.
 |
| The thin British line spread out to meet multiple threats under the glare of a merciless desert sun (or the reflection of my rubbishy lamp setup!). 25 pounders bring the Italian armour under fire. |
Jon had finally been goaded into an attack but my 7th Armoured Brigade was all over the place on 1A as a result of my break off order. 11th Hussar picquets bravely attempted to slow down the convergence of Ariete's 32nd Armoured Brigade from 1A and 8th Panzer Regiment with Recon Battalion 33 thrusting from 3B.
 |
| 7th Armoured scores some early sporadic hits as 4th Armoured races into support. |
I just about managed to form a meagre defensive line as Jon's combined armoured might rolled onto 1B. I considered another break off onto 1D but succeeded with an order change to bring up 4th Armoured into support. I reasoned that an action would be worthwhile, even if slightly outnumbered, as I could fall back onto the prepared positions of the Central India Horse, where I hoped to impale whatever was left of Jon's armour. If I just meekly fell back without a fight I did not think he would follow. So I risked all on a major clash on my present positions.
However, 7th Armoured got the best of the initial skirmish and the supporting 25 pounders, firing over open sights, had no trouble in destroying the forward elements of the Italian armour. At this point, 4th Armoured made their appearance, and what had at first looked like easy prey now looked a little tougher. I reckoned Jon's chances of winning this particular fight was 50/50 but he didn't think a win here was worth the losses and he broke off - I think he was right.
 |
| 4th Armoured resumes the attack on 1A. |
Knowing how difficult it was to reorganise 7th Armoured after it's break off, I felt there was now an opportunity to exploit the disarray in the Axis concentration and push 4th Armoured onto 1A in a further attempt to break z.b.V 200. I also reckoned on the Italian armour being in the same vicinity and I had faith in the awesome armour of the Matilda's to overcome both formations. I ordered my last off table reserve, the Guards Brigade, to move up and support the attack via 2A. However, the Italian armour continued to flee, but the Matilda's quickly overwhelmed the veteran German infantry.
 |
| German 105mm regiment fires in support of their infantry from 2D onto 1A. The ammunition markers indicate how many shots remain - 5 each. The large base represents 4 whilst the small round bases are 1. |
The Matilda's lost two squadrons in the assault, which I considered worthwhile, but the Guards were not so fortunate. Off table artillery caused some losses but air attacks were devastating, almost leading to a morale check.
 |
| The Italian bomber squadron launches a powerful attack on the Guards as they de-bus to support 4th Armoured . |
As z.b.V 200 routed off 1A, 4th Armoured and the Guards ran into Jon's second line of 8th Bersaglieri. The infantry had been able to dig in but their support weapons of 47mm anti tank portee and 105mm artillery slugged it out without the benefit of defensive terrain.
 |
| The Guards crest the objective point on 1A as they come under fire from the Italian medium artillery. |
The Matilda's successfully despatched the portees, but the Guards were struggling to hold their own against the Italian infantry. I needed the Matilda's to reorganise and attack the Bersaglieri and break this final Axis defence on 1A and hopefully unhinge Jon's whole position.
 |
| 8th Panzer takes some casualties as it smashes into the weakened and disorganised 4th Armoured. |
Meanwhile, Jon had decided the Italian armour was not strong enough to blunt 4th Armoured and ordered it to raid the the airfield on 3A via 2B and never mind the minefield. The constant half hourly attacks by the RAF were a steady drain on his forces. Instead, he ordered Recon 33 to assume an overwatch position on 3B and sent 8th Panzer to smash the British attack on 1A. My Matilda's were all over the place having just over run the German infantry and they struggled to arrange themselves into a cohesive line. If they couldn't hold the panzers I did not expect the weakened Guards to put up much of a fight.
But we had reached 4 O'Clock and completed 30 turns. 4th Armoured were putting up a spirited defence but 8th Panzer looked ready to overwhelm both them and the Guards. I didn't think the Italian armour would make it through the minefields on 2B without being interdicted by the 5th Mahratta's on 2A. I still had a powerful force on 1C made up of the Rifle Brigade and the rest of 7th Support Group - which I had been desperately trying to order up onto 1A. I also had the uncommitted Central India Horse on 1D and the still potent 7th Armoured on 1B, ready to exploit any Axis weakness or mistake. And yet Jon had only lost z.b.V 200, his armour was still largely intact and at 9 objective points each, the game was still in the balance - a fitting draw had been achieved after a very well fought battle.
Jon and I had played the game with the intention of concentrating our forces and only launching an all out attack when a suitable weakness had been spotted in the other sides ranks. We both struggled to find that weakness, and although I tried to chisel away at 1A, Jon was never enticed into an attack onto the powerful positions at 2A and 1D - damn! Well played Jon, very very good game.
(We had the game set up by 10.00am and we had begun playing by 10.45. It was about an hour to clear up. With only two of us playing a new concept of the operational game without any preparation I think it ran very smoothly. I would be more than happy to play another two player game in the future.)