my new mobile number us 07895 590066. I think Jon set up the What's App group. Can you send me an invite to join again? Ta.
Saturday, 27 April 2019
M109 A1 emplaced battery
 |
| Iranian M109's are resupplied by Chinook. |
A quick shot of the artillery battery Mark gave to me - I think I may get some more for dedicated off table artillery positions for operational games. They won't take spearhead bases but as a terrain piece it really looks the part.
A pity about my photographic skills - I could really do with a photo session with Russ!
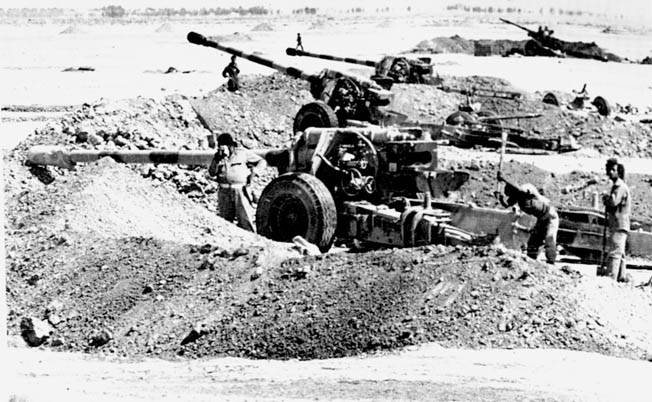 |
| Not the same equipment but it gives you a comparison |
Friday, 26 April 2019
Medieval again

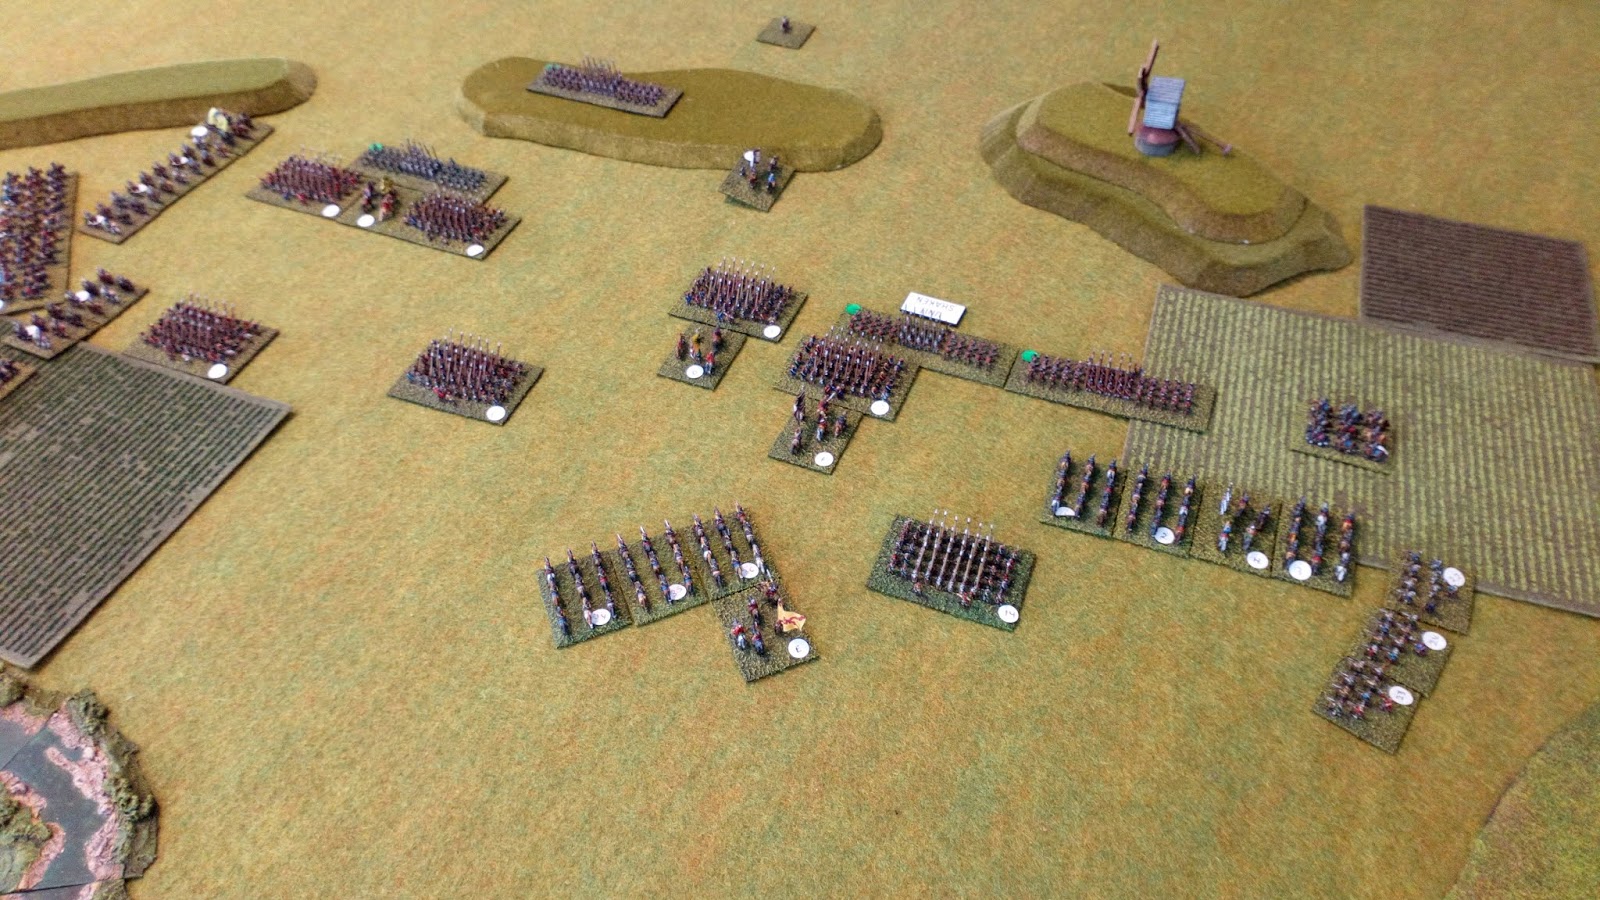
English line Bill units mixed in with bill and bow in the foreground,Longbow with foot knights higher up with a reserve of cavalry

French van of Mounted knights and retainers beyond the red tower
and the main of crossbow and foot knights with a small reserve of knights and retainers

French left wing of hand gunners militia and mercenary bill

English start point

English move to stream as the french cavalry try to turn their flank

English Bill and bow wing swing round the right flank
the hand gunners try to push them back

French foot knights head for the longbows


French cavalry having forced the English foot knights to redeploy then slam into them

French crossbow didn't fare well against the longbow

Hand gunners having pushed one unit back get caught in a melee which destroys one unit
The English flank attack stalls in the wood and takes no part in the action
Bit of a theme there

French cavalry with a succession of charges grinds away at the foot knights.
English reserve moves up

French foot knights finally get to grips with the hated longbows


Fighting along the line

French left wing pulls back to avoid the bill and bow units

Who decided to camp out just past the wood
Dusk falls and as neither army was broken they pull back to lick their wounds
Fun Game
thanks gents for playing it in a relaxed manner.
We used the terrain layout cards from The Hannibal rule set to create the battle field, which threw up marshes, stream, rough hill and woods
Thursday night , medieval warmaster

French pushing at English line

French flank attack
that's as far as it got

Hand gunners and crossbow

I was so amazed i had to take a picture.
so this is what it feels like to be Russ!!!

French still pushing

Flank attack still there
Principals battle at Ians

Just a quick pic of his fabulous modern air assets

Catholics on the right
Protestants on the left
The aim of the game was for the protestants to hold on until 7 pm game time
which allowed their baggage to escape.

Struggling to cross the stream


This took most of the morning

Tercios verses pike and shot


garrison in the town and the prepared works held up the catholic left flank

Protestant line crumbling, but they held on long enough

Good game Ian
thanks
Tuesday, 16 April 2019
Monday, 15 April 2019
Thursday night battle
A few things you should remember for Thursday.
1. Smoke is in effect. I'll roll for wind direction on the night but check the smoke rules in GQ2. If firing downwind you add 1 to your straddle roll if a straight line from your forward funnel and parallel to the wind intercepts the target ship at any point.
Add 1 to the straddle roll when a ships LOF passes within 1" of the stern of any coal-fired CA, B, BC, BB or BA.
DD and TBD's can make smoke screens but only 1/3 can lay smoke at the same time.
Players must announce before the movement phase that they intend to lay smoke.
Each section of smoke lasts 2 Turns.
Gunnery and torpedo attacks are not possible through smoke screens.
See page 7 for the smoke rules.
2. Crossing the T of a target ship will allow firing ships to penetrate at one class higher than they would normally be able to at that range. See page 12.
3. British and German ship dispositions will need to be drawn up before any ships are placed on table.
4. British entry is determined by random rolls by the referee as to one of three table edges and how far along each table edge.
5. British and German players will split up and sit on opposite sides. Any communication will take place before the movement phase. Each player will have 15 seconds to write out their communications which are then passed to the referee who determines how much of each message gets through.
6. Note the Goeben in a Moltke class BB. I refer you to Page 9. Basically if a ship is in the wing turret arc of the Goeben, it fires at is full effect BUT if outside of this arc Goeben fires at one box to the right (and half damage is taken from the same 1 box to the righ). If the British take one armament box off, the restriction no longer applies.
7. Note the victory conditions. The British conditions simulate slowing the Goeben down sufficiently to allow larger capital ships to catch up and destroy her. Taking 2 hull boxes will do this. Also note that the Breslau is dispensable BUT if lost the Germans can only win by kinocking out a couple of CA's (CLs don't count) and then escaping with less than two hull boxes removed.
Tuesday, 9 April 2019
Thursday Night Game - Iraqi amphibious assault
I have been moving the Iran-Iraq war project alongside developments in new terrain boards and operational game techniques and Thursday nights game will be an attempt to push all three developments.
This will be the first outing for my new river/desert boards. If we get the temperate boards done I will use the same process. These will be the river sections on table 2A in an operational game.
The game will be a mini simulation of a D-Day attack and will be the basis for rolling this out on an operational game level in the future. We will only be gaming on one of the tables below but the Iranians must potentially defend all three. The Iraqi's will decide on which they will launch their attack but will have opportunities to misdirect how the Iranians place their reserves.
 |
| The Iraqi bank is covered in date palm plantations giving extra cover for jump off points. The Iranian side is densely covered in village sectors and palm groves. |
 |
| (Got the rotation wrong!). The oil refinery is the main objective of our Thursday night mini-campaign. Devoid of cover the installation is a series of town sectors. |
 |
| There is no cover on the Iraqi side. The Iranian side is sparsley covered with a single village and two pieces of high ground |
 |
| The map for all three. The Iranians must choose carefully where to place their reserves so that they can influence the main battle as soon as possible. |
Iraqi Objectives
1 point for taking the oil refinery
1 point if pontoon bridge is built and a bridgehead is secured.
1 point if any battalion is exited off the Iranian side of the table.
-1 point for loss of Aircraft.
Iraqi's draw if they secure 1 point
Iraqi marginal win if they take 2 points
Iraqi decisive win if they hold 3 points.
Initial set-up
The Iranian's have one battalion of Revolutionary Guards dug in on each table. They have a weak mechanised brigade and a motorised battalion of Revolutionary Guards in reserve (or they can begin dug if they are that confident of Iraqi intentions!). The reserves are placed on any of the points behind each table.
The Iraqi's choose which table to attack. They have 1 x armoured and three mechanised battalions tasked with the attack. The mechanised infantry are in amphibious AFVs. The armoured battalion will need the pontoon to cross the river.
They have a company of commandoes which can be used prior to the game to deploy by dinghy on the Iranian side of the river and dig in during the night to secure an initial bridgehead - however the Iranians will know about this at first light and may move reserves; but as this is revealed before the game begins it may be used as a subterfuge to make the Iranians move reserves in the wrong direction!
If the commandoes seize a position already occupied by the Iranians then this is resolved by a close combat.
Or they can deploy the commandoes by helicopter during the game, risk AA attack and not be dug in!
The pontoon bridge is of five sections and one section is built every 1/4 hour from the start of the game if they are not attacked or shot at by the Iranians.
The engineers can make a head start on the bridge during the night by building up to 2 sections or construct up to four tank berms or any combination thereof. The tank berms will give a +1 cover for tanks and can be built on any table in order to fool the Iranians into sending reserves to the wrong table. Obviously a head start on the pontoon bridge will confirm where the main attack is coming!
The Iraqi armour may be attached out by companies of 2.
The Iraqi's may use preplanned bombardment on a wrong table to also try and make the Iranians send their reinforcements to the wrong place.
After all the Iraqi preliminary moves, the Iranians can move reserves from one spot to another as soon as the game begins. They can only do this again at every half hour point during the game.
Iraqi OoB
1 x Mech Brigade HQ with BRDM recon
1x Armoured Battalion of HQ BTR60, 1x ZSU57-2, 6x T55
3x Mech Battalions of HQ BTR60, BRDM recon with sagger, 6 BTR50
SA6 Gainful
1x Commando company with Mi-6 helicopter
2x Mig 21 attack flights
2x MLR with 2 rounds each (May smoke)
3x D30 with 4 rounds each (May use as div support)
Iranian OoB
Each table has one dug in Revolutionary Guard battalion.
1x HQ, 9x Inf, 1x RR A/T, 1x 120mm mortar, 1x Zsu57 AA
Reserves
1x Mech Brigade of HQ M113, 1x Scorpion recon, 1x M113 recon, 3x Chieftain, 1x Shilka and 3x M109A1 SPG (off table) - 4 rounds each
The M109A1 have an off table range of two tables (i.e positioned behind the oil refinery table they can hit the other tables either side) and can counter battery against Iraqi artillery positioned behind the same table on which they are deployed behind.
1x Motorised Martyrs Brigade of 1x HQ, 9x Inf, 1x RR in jeep.
1x AH-1 Cobra
1x F5
Hopefully, this should be an interesting little game.
Monday, 8 April 2019
Agincourt - what you think you know is wrong
aw a very interesting video on You Tube today which investigated what actually (or at least what they think actually happened) and out forward a very plausible explanation as to how 7,000 English managed to defeat over 20,000 mostly well armoured French knights.
1. The French plan was a good one, but....
Contrary to the accepted version of the battle, there was no massed cavalry charge bogged down in the mud and cut to ribbons by the famed English longbow. The majority of French knights approached the English lines on foot.
The French plan was for the crossbowmen to be in front of the massed French knights (on foot) to shoot at the men-at-arms in the middle of the English line (of which there were c. 1,500). Mounted knights were supposed to sweep the English bowmen from the flanks and leave the knights on foot to finish off the English nobility.
What actually happened was the French knights either ignored or misunderstood the plan.
There was an attempt by some French knights on horse to attack the longbowmen on the flanks of the English line but in actuality very few knights agreed to do this (many preferring to attack their opposite numbers in the middle of the English line where glory (and profit) called (see below) rather than waste their time and effort on bow-armed peasants.
There was no return crossbow fire either. The French crossbowmen could have inflicted some casualties on the English but would have fared badly against their bow armed counterparts who could fire 4x quicker. In reality they were pushed to the rear by the knights eager to close with the English knights
So the French attack was mainly a charge of foot by the majority of French knights towards the middle of the English line.
2. Why charge the middle of the line?
This was still a time of chivalry. There were expected codes of conduct in battle and knights expected to be captured and released on payment of ransom should the battle go against them. A juicy ransom could set up a man-at-arms for life so seeing the English line (with the King of England's and his retinues' banners in the middle of it) the French knights would ignore the peasantry on either side (confident in their arrow-proof armour) and go where the money and glory lay.
This meant that irrespective of terrain, the 20,000 would 'funnel' towards the centre of the English line - setting up a crush of French knights and reducing room for manouvre - in a desire to get to grips with the most lucrative targets - specifically Henry himself!

3. The longbow did NOT win the battle
While the English arrows (with iron bodkin points) could penetrate iron armour (as they did at Crecy and Poitiers) they were useless against steel - the new miracle metal which the vast majority of French knights were clad. The French knights on foot were confident of being protected from English arrows whiich simply bounced off well-made steel.
And why were the arrows made from iron rather than steel? Essentially cost! Making steel was a relatively new process and took time and money to get right. Bowmen knew that the arrows they fired would probably never be seen again once fired so there was no great desire to significantly increase the cost
But their horses were not. On the flanks the English bowmen's volleys brought down many of the horses involved in the flank attack and so the charge petered out. This was crucial for two reasons - it preserved the width of the English line and - as the French knights were converging on the English nobility - freed up the archers to become foot soldiers instead.
Bear in mind that the battle lasted 2 hours...but the arrows were expected to be fully expended in the first 15 minutes of battle. It was the 1 hour and 45 minutes of hand-to-hand combat that decided the outcome. But how could 20,000 lose to 7,000?
4. So why were there over 5,500 archers in the English army?
Again, cost rather than effectiveness was the key. Documents for the period show that archers' pay per day was around half that of men-at-arms. So you could field twice as many archers as men-at-arms for the same cost. Henry V was virtually broke (he had to pawn the Crown Jewels to fund his expedition) so getting more men for his money made sense. And it was to prove the correct decision - but not for their prowess with the bow.

5. The terrain was the main reason for victory
Again, popular belief is that the battlefield was hammed in on both sides by woods funnelling the French. This is not the case. The terrain around Agincourt (or Azincourt as it should be know) has barely changed since 1415. The battlefield is still home to the same 3 villages that were there when Henry V set up camp and the area has nearly always been farmland.
Standing on the battlefield it looks like a wide open plain. It is only when you study a map of the terrain that you see that the sides of the battlefield has significant slopes to each side and that the English were at the narrow part of this high plateau.
As the French men-at-arms were converging through this natural funnel they were squeezed into an area half the width of their starting point. If you've ever been in a crowded area where a lot of people are trying to get in or out through a narrow entrance (like leaving a football ground or a Black Friday when they open the doors) you can see how easy it is to bump into other people, to trip and fall and cause others to trip over you in their turn....
Add to this the soil around Agincourt. We know that it had rained the day before the battle but it is unlikely that (as is commonly believed) the area had been recently ploughed. This takes place in March not October. However the soil in this area of France is not dry and sandy nor clay but a soil that absorbs water really well. Unlike clay (which offers resistance to weight but can be slippery) the Agincourt mud was especially thick and cloying when wet. The French men-at-arms found themselves more than ankle deep in this thick cloying mud and each step was a physical challenge.

French knights would find it extremely difficult to walk - never mind charge - in these conditions. Steel foot armour (steel being extremely non-porous) would sink straight down and offer considerable suction resistance when trying to pull it back out again. This would have led to the French men-at-arms becoming stuck, falling over (and having others trip and fall over them in their turn) and quickly becoming exhausted.
As the crush developed (funnelled by terrain and a lust for profit) the French would have presented a long, thin line of men slipping, falling and tired out well before reaching the English men-at-arms who were waiting for them and who didn't have to struggle through mud to get to their enemy....
And the same mud that hindered the French was no hindrance to the lightly armed archers on their flanks. Cloth and leather (being porous) gave nothing like the resistance that steel footwear did. The archers left their bows and set about their noble enemies with knives, bodkins and the same mauls they 'd used to hammer their protective stakes into the ground.
The French nobles found their lightly armed enemies to have no sense of chivalry or honour. The English would simply kill one after the other by either a knife thrust through gaps in the armour of massive hammer blow to chest or head.
Coming in at the flanks, they simply massacred the exhausted French knights as they attempted to extricate themselves from the crush and the mud.
This explains the huge discrepancy in casualties - the English lost a few hundred, the French thousands.
The same was happening on the front line. Because of the crush, the terrain and the actions of the archers on the flanks, the French attack - rather than being an overwhelming rush against a much smaller force - became the opposite. The French in the front line were probably outnumbered when they reached the English men-at-arms (who were certainly fresher than their opposition). This would also explain the high number of prisoners the English nobles took during the battle - hurried to the back of the line to be guarded by their squires and hangers-on.
Later on (with the English thinking the result was still in doubt) Henry ordered these knights murdered in the worry that - should another French attack come, they could rearm and attack the English in the rear. The English men-at-arms refused to carry out the order (more from thoughts of loss of ransom than squeamishness) and so the majority were killed by the archers returning from the flanks.
So there you go! Fairly compelling and many miles away from Shakespeare's version! What do you think?
1. The French plan was a good one, but....
Contrary to the accepted version of the battle, there was no massed cavalry charge bogged down in the mud and cut to ribbons by the famed English longbow. The majority of French knights approached the English lines on foot.
The French plan was for the crossbowmen to be in front of the massed French knights (on foot) to shoot at the men-at-arms in the middle of the English line (of which there were c. 1,500). Mounted knights were supposed to sweep the English bowmen from the flanks and leave the knights on foot to finish off the English nobility.
What actually happened was the French knights either ignored or misunderstood the plan.
There was an attempt by some French knights on horse to attack the longbowmen on the flanks of the English line but in actuality very few knights agreed to do this (many preferring to attack their opposite numbers in the middle of the English line where glory (and profit) called (see below) rather than waste their time and effort on bow-armed peasants.
There was no return crossbow fire either. The French crossbowmen could have inflicted some casualties on the English but would have fared badly against their bow armed counterparts who could fire 4x quicker. In reality they were pushed to the rear by the knights eager to close with the English knights
2. Why charge the middle of the line?
This was still a time of chivalry. There were expected codes of conduct in battle and knights expected to be captured and released on payment of ransom should the battle go against them. A juicy ransom could set up a man-at-arms for life so seeing the English line (with the King of England's and his retinues' banners in the middle of it) the French knights would ignore the peasantry on either side (confident in their arrow-proof armour) and go where the money and glory lay.
This meant that irrespective of terrain, the 20,000 would 'funnel' towards the centre of the English line - setting up a crush of French knights and reducing room for manouvre - in a desire to get to grips with the most lucrative targets - specifically Henry himself!

3. The longbow did NOT win the battle
While the English arrows (with iron bodkin points) could penetrate iron armour (as they did at Crecy and Poitiers) they were useless against steel - the new miracle metal which the vast majority of French knights were clad. The French knights on foot were confident of being protected from English arrows whiich simply bounced off well-made steel.
And why were the arrows made from iron rather than steel? Essentially cost! Making steel was a relatively new process and took time and money to get right. Bowmen knew that the arrows they fired would probably never be seen again once fired so there was no great desire to significantly increase the cost
But their horses were not. On the flanks the English bowmen's volleys brought down many of the horses involved in the flank attack and so the charge petered out. This was crucial for two reasons - it preserved the width of the English line and - as the French knights were converging on the English nobility - freed up the archers to become foot soldiers instead.
Bear in mind that the battle lasted 2 hours...but the arrows were expected to be fully expended in the first 15 minutes of battle. It was the 1 hour and 45 minutes of hand-to-hand combat that decided the outcome. But how could 20,000 lose to 7,000?
4. So why were there over 5,500 archers in the English army?
Again, cost rather than effectiveness was the key. Documents for the period show that archers' pay per day was around half that of men-at-arms. So you could field twice as many archers as men-at-arms for the same cost. Henry V was virtually broke (he had to pawn the Crown Jewels to fund his expedition) so getting more men for his money made sense. And it was to prove the correct decision - but not for their prowess with the bow.

5. The terrain was the main reason for victory
Again, popular belief is that the battlefield was hammed in on both sides by woods funnelling the French. This is not the case. The terrain around Agincourt (or Azincourt as it should be know) has barely changed since 1415. The battlefield is still home to the same 3 villages that were there when Henry V set up camp and the area has nearly always been farmland.
Standing on the battlefield it looks like a wide open plain. It is only when you study a map of the terrain that you see that the sides of the battlefield has significant slopes to each side and that the English were at the narrow part of this high plateau.
As the French men-at-arms were converging through this natural funnel they were squeezed into an area half the width of their starting point. If you've ever been in a crowded area where a lot of people are trying to get in or out through a narrow entrance (like leaving a football ground or a Black Friday when they open the doors) you can see how easy it is to bump into other people, to trip and fall and cause others to trip over you in their turn....
Add to this the soil around Agincourt. We know that it had rained the day before the battle but it is unlikely that (as is commonly believed) the area had been recently ploughed. This takes place in March not October. However the soil in this area of France is not dry and sandy nor clay but a soil that absorbs water really well. Unlike clay (which offers resistance to weight but can be slippery) the Agincourt mud was especially thick and cloying when wet. The French men-at-arms found themselves more than ankle deep in this thick cloying mud and each step was a physical challenge.

French knights would find it extremely difficult to walk - never mind charge - in these conditions. Steel foot armour (steel being extremely non-porous) would sink straight down and offer considerable suction resistance when trying to pull it back out again. This would have led to the French men-at-arms becoming stuck, falling over (and having others trip and fall over them in their turn) and quickly becoming exhausted.
As the crush developed (funnelled by terrain and a lust for profit) the French would have presented a long, thin line of men slipping, falling and tired out well before reaching the English men-at-arms who were waiting for them and who didn't have to struggle through mud to get to their enemy....
And the same mud that hindered the French was no hindrance to the lightly armed archers on their flanks. Cloth and leather (being porous) gave nothing like the resistance that steel footwear did. The archers left their bows and set about their noble enemies with knives, bodkins and the same mauls they 'd used to hammer their protective stakes into the ground.
The French nobles found their lightly armed enemies to have no sense of chivalry or honour. The English would simply kill one after the other by either a knife thrust through gaps in the armour of massive hammer blow to chest or head.
Coming in at the flanks, they simply massacred the exhausted French knights as they attempted to extricate themselves from the crush and the mud.
This explains the huge discrepancy in casualties - the English lost a few hundred, the French thousands.
The same was happening on the front line. Because of the crush, the terrain and the actions of the archers on the flanks, the French attack - rather than being an overwhelming rush against a much smaller force - became the opposite. The French in the front line were probably outnumbered when they reached the English men-at-arms (who were certainly fresher than their opposition). This would also explain the high number of prisoners the English nobles took during the battle - hurried to the back of the line to be guarded by their squires and hangers-on.
Later on (with the English thinking the result was still in doubt) Henry ordered these knights murdered in the worry that - should another French attack come, they could rearm and attack the English in the rear. The English men-at-arms refused to carry out the order (more from thoughts of loss of ransom than squeamishness) and so the majority were killed by the archers returning from the flanks.
So there you go! Fairly compelling and many miles away from Shakespeare's version! What do you think?
Sunday, 7 April 2019
Torpedo attacks in GQ1 and II
After a couple of refresher games of General Quarters we found the main problem was when we started firing torpedoes at each other (especially the Japanese Long Lance). It was initially assumed that you simply had to a) choose a target and b) guess which one of 4 directions the target ship chose next turn (maintain, port, starboard or reverse course).
However the rules are more nuanced than that and requires considerably more input by the referee.

So lets look at the basics....
Before firing torpedoes, the attacking ship must obviously have some torpedoes left, have the right arc of fire (at least 30 degrees from bow or stern), have the capability of firing from the side facing the enemy and the target ship is in range OR will be when both ships have completed their move.
And of course they must have line of sight to the target. Smoke or other ships between the attacker and target mean that torpedoes cannot be launched.
The number in parenthesis in the shows the number of torpedoes that ship can fire each Game Turn. So if a ship has two numbers in parenthesis (e.g. (3) (3) it has tubes on either side and the number denotes the total amount it can fire off each Game Turn. It denotes the number of torpedoes ready for use in each Game Turn.

The player can specify how many torpedoes they want to fire each Turn but it cannot exceed the number left.
Note that on some ships they start with a single number in parenthesis e.g (10) but in subsequent armament boxes this drops to two numbers e.g. (4) (4). So initially the ship could fire 10 torpedoes at one target but once damage has been inflicted this capacity is reduced to 4 from each side (or less as torpedoes are used up or lost to enemy damage).
Players can (if they wish) make Dummy attacks with torpedoes (potentially forcing an enemy ship to manouvre). They simply write 'Dummy' on the slip of paper passed to the umpire.
To attack the attacking player writes down the target ship, expected heading and how many torpedoes are being fired (within the limitations mentioned above). For example 'Bismark - P - 4' means the attacker is aiming to torpedo the Bismark, expecting it to turn to Port next turn and is committing 4 torpedoes to the attack.
The attacker has 4 options to choose in terms of direction. Port, Starboard, Maintain or Reverse.
Note that in order to Reverse the ship must be stationary for at least 1 Game Turn. If the ship has sufficient speed and manouverability it may change course to be facing the other way. However it will depend on the quadrant it ends up in once it has completed the move....
Working out hits is then a case of dice rolls and measurement. Starting from the marker measure to the middle of the target ship. For WW1 range is 24" or 16" for light torpedoes. For WW2 its 36" or 72" for Long Lance.
Players can optionally choose to run Normal or Deep. Normal will run along the surface and impact any ship in its path buy will hit torpedo belts on battleships (minimizing its effect).. Deep will miss smaller ships but will have increased effect on larger ships.
Modifiers can be applied to the chances to hit or miss (such as if the ship can manouvre).
At the end of the firing phase the German player announces two torpedo attacks. Markers are placed in the middle of each attacking ship on the attacking side. Two notes are passed to the referee (Trento - M - 4 for the closest ship and Trento - S - 8 for the bottom-most ship).
The Italian player doesn't know what's planned for him but knowing he's reduced the attacking potential of the closer ship he tries to bluff the Germans by heading closer to the better armed destroyer (thinking the Germans will think he'll aim to increase the gap between the two and go to Port. He decides to move to Starboard.
Having received the German attack target (and before the Italian movement) the referee places a marker (such as a matchstick) alongside the base of the target ship BEFORE it moves. For Long Lance attacks which can run over 2 Turns the referee may want to have markers for ALL potential targets to ensure headings of each are marked down to keep the other player(s) guessing.
Moves are then made for all ships. Before gunnery starts the referee announces the two attacks. The 4 torpedoes from the topmost ship go wide (as they assumed the Italians would go straight ahead) and the marker is removed.
The second attack is different though.
Using the matchstick as a reference point its easy to see the direction the target ship has ended up in.
Now comes resolution. The Germans have got 8 torpdeoes off. Measuring from the marker to the end position of the Trento shows 23cm (we use cm rather than inches to to keep ranges sensible for space available). The range means no changes to the numbers on target. The Trento was bombing along at 13kts so 3 torpedoes are removed leaving 5 potential hits.
A poor roll and check on the hit table means just one torpedo hits - but a good roll on the damage table (Trento has 5 DEF) means the one torpedo takes off 2 Hull and 1 Armament.
Trento's guns can still bring retribution against her attackers but with speed reduced by half she is lucky that the Germans have fired all their torpedoes meaning she may yet live to fight again....
Alternative options
Speedy
To speed up play, players may opt to simplify the attack. Instead of choosing a heading the attacker simply rolls a D6. On a roll of 5-6 he hits (i.e. guesses correctly) then the other modifiers are applied. This is essentially the same odds are choosing one of three headings (ignoring Reverse as an option).
Fun!
The attacking player chooses an angle from which he wishes to attack (30-60-90-120-140) degrees. A matchstick is placed at the side of the attacking ship. At the end of the movement phase the referee measures the angle chosen for the attack and measures along the line. Any ship along that line (enemy and friendly) is subjected to attacks (closest first). The amount of torpedoes hitting each target is taken off the remaining torpedoes available. So if two ships are in line and 6 torpedoes are fired with one hitting the first ship then 5 go on to the next. This method may make players think twice about loosing all their torpedoes off in an area where their own ships are also located.
However the rules are more nuanced than that and requires considerably more input by the referee.

So lets look at the basics....
Before firing torpedoes, the attacking ship must obviously have some torpedoes left, have the right arc of fire (at least 30 degrees from bow or stern), have the capability of firing from the side facing the enemy and the target ship is in range OR will be when both ships have completed their move.
And of course they must have line of sight to the target. Smoke or other ships between the attacker and target mean that torpedoes cannot be launched.

The player can specify how many torpedoes they want to fire each Turn but it cannot exceed the number left.
Note that on some ships they start with a single number in parenthesis e.g (10) but in subsequent armament boxes this drops to two numbers e.g. (4) (4). So initially the ship could fire 10 torpedoes at one target but once damage has been inflicted this capacity is reduced to 4 from each side (or less as torpedoes are used up or lost to enemy damage).
Players can (if they wish) make Dummy attacks with torpedoes (potentially forcing an enemy ship to manouvre). They simply write 'Dummy' on the slip of paper passed to the umpire.
To attack the attacking player writes down the target ship, expected heading and how many torpedoes are being fired (within the limitations mentioned above). For example 'Bismark - P - 4' means the attacker is aiming to torpedo the Bismark, expecting it to turn to Port next turn and is committing 4 torpedoes to the attack.
The attacker has 4 options to choose in terms of direction. Port, Starboard, Maintain or Reverse.
Note that in order to Reverse the ship must be stationary for at least 1 Game Turn. If the ship has sufficient speed and manouverability it may change course to be facing the other way. However it will depend on the quadrant it ends up in once it has completed the move....
Working out hits is then a case of dice rolls and measurement. Starting from the marker measure to the middle of the target ship. For WW1 range is 24" or 16" for light torpedoes. For WW2 its 36" or 72" for Long Lance.
Players can optionally choose to run Normal or Deep. Normal will run along the surface and impact any ship in its path buy will hit torpedo belts on battleships (minimizing its effect).. Deep will miss smaller ships but will have increased effect on larger ships.
Modifiers can be applied to the chances to hit or miss (such as if the ship can manouvre).
Worked Example
The Italian cruiser Trento is attacked by two German Z class destroyers (one on either side of it). As the ships close Trento opens up all its guns at the nearest of the two and manages to knock out 2 armament boxes (reducing its torpedo complement from (8) to (4). |
| Trento finds herself in a terrible place. |
 |
| Good shooting reduces the attacking potential of the top Z destroyer by half! |
The Italian player doesn't know what's planned for him but knowing he's reduced the attacking potential of the closer ship he tries to bluff the Germans by heading closer to the better armed destroyer (thinking the Germans will think he'll aim to increase the gap between the two and go to Port. He decides to move to Starboard.
Having received the German attack target (and before the Italian movement) the referee places a marker (such as a matchstick) alongside the base of the target ship BEFORE it moves. For Long Lance attacks which can run over 2 Turns the referee may want to have markers for ALL potential targets to ensure headings of each are marked down to keep the other player(s) guessing.
 |
| Matchstick shows the position of the target ship before movement |
The second attack is different though.
 |
| The template shows the Trento has indeed gone to Starboard |
 |
| Working out the mechanics |
Now comes resolution. The Germans have got 8 torpdeoes off. Measuring from the marker to the end position of the Trento shows 23cm (we use cm rather than inches to to keep ranges sensible for space available). The range means no changes to the numbers on target. The Trento was bombing along at 13kts so 3 torpedoes are removed leaving 5 potential hits.
A poor roll and check on the hit table means just one torpedo hits - but a good roll on the damage table (Trento has 5 DEF) means the one torpedo takes off 2 Hull and 1 Armament.
Trento's guns can still bring retribution against her attackers but with speed reduced by half she is lucky that the Germans have fired all their torpedoes meaning she may yet live to fight again....
Alternative options
Speedy
To speed up play, players may opt to simplify the attack. Instead of choosing a heading the attacker simply rolls a D6. On a roll of 5-6 he hits (i.e. guesses correctly) then the other modifiers are applied. This is essentially the same odds are choosing one of three headings (ignoring Reverse as an option).
Fun!
The attacking player chooses an angle from which he wishes to attack (30-60-90-120-140) degrees. A matchstick is placed at the side of the attacking ship. At the end of the movement phase the referee measures the angle chosen for the attack and measures along the line. Any ship along that line (enemy and friendly) is subjected to attacks (closest first). The amount of torpedoes hitting each target is taken off the remaining torpedoes available. So if two ships are in line and 6 torpedoes are fired with one hitting the first ship then 5 go on to the next. This method may make players think twice about loosing all their torpedoes off in an area where their own ships are also located.
Subscribe to:
Posts (Atom)