Showing posts with label ACW. Show all posts

Thursday, 4 April 2019

ACW operational ideas

Just a quick post for an idea I was going to run past Jon regarding points for reinforcements in ACW operational games.
Image result for horse soldiers movie 1959
Union cavalry rush ahead of the main attack to deny Confederate reinforcements.

Turning the airfield table into a railway station and enabling the owner to send orders every half hour instead of by courier was a good way of being period specific with a vulnerable but high point objective table.  Linking the table to 3B and making it an alternative route to attacking the other high point table, as we did with the renaissance operational game, also makes sense and keeps the defender worried about his rear defence.
Related image
Come on boys we get a +1!

But what if we allowed the holder of the railway station the option of calling in extra reinforcements from outside the immediate operational area?  Extra reinforcements would mean surrendering additional points and could turn an attack/defence game into an encounter game by default.

For example, in our last game the Confederate defenders were outnumbered 3;2 by the Union attackers but managed a win of 10 to 8.  Another hour of play would certainly have seen the loss of 1B making the game a draw and possibly 3A leading to a Union victory of 13 to 7.

Would I have surrendered an extra point to the Union for another division to secure 3A?  Probably.  Would I surrender 2 points for two divisions in order to counter attack and secure the river line on 2A and 2B?  Possibly as this would give me 3A, 3B, 2C and a point on 2A and 2B which would be 10 points minus 2 = 8.  The Union would hold 8 leading to a draw.

This makes 3A as valuable in a 19th century setting as it is in our 20th century games.  The attacker has to consider denying this extra point of reinforcements for the defender as much for the points as well as for the tactical play.

Just an idea!

Friday, 29 March 2019

ACW Operational Game: Union Assault : The Battle Report Part 2

Confederate Battle Line
It was the end for Steinwehr. His battered brigades were finally pushed from the woods. The survivors of Costers brigade surrendered to the advancing brigades of Ramseur and Daniels whilst the combined force of O'Neal and Iverson pushed Smiths brigade back into the open fields beyond.

On table 1C combined infantry and cannon fire struck Cockes outnumbered defenders and a Federal Infantry assault by Brewsters Brigade crashed into the thin line of defenders and in a series of short battles  Cockes militia men surrendered .

Meanwhile the two other Brigades of Humphrey's Division, those of Burling and Carr advanced toward table 1B and the fight that was continuing in its intensity.


For a while I am going to concentrate on the fight on table 1B. The Confederate Brigades of Heth's Division turned to face the new threat. Whilst Archers brigade supported Rodes division ,Heth's brigades commanded by Pettigrew, Davis and Brockenbrough formed to face the rear and Humphreys approaching men. 
By the wood O'Neals crack infantry finally swept Smiths exhausted brigade from the field, but the breakthrough came at a price as O'Neals men came into range of the Grand Battery formed by XI and I corps artillery. Franks dice rolling found the range and O'Neals men were hit by medium range fire knocking meant to the ground and disordering the rest. 
Table 1B, at lunchtime. The woods to the left were the scene of Steinwehrs desperate stand. Robertsons cavalry are dismounted behind a fence line and Von Gilsa and Ames are stationary on the opposite fence line.

Burling and Carrs arrival have evened the odds but the Union right still looked under considerable pressure. Again the Confederate line rolled forward, echeloning left as it moved so that Ramseur and Daniels slighty overlapped to the right of Meredith, Archer moved into the line between Daniels and Iverson and O'Neil went straight for the cluster of farm buildings. Again the combined artillery struck O'Neils men and more fell but the Confederate line , now five brigades strong , advanced upon the brigades of Meredith and Cutler.

Meade far left ,has arrived on the battlefield to converse with his Corps commanders. In the foreground the four batteries of XI and I Corps rake O'Neils exposed men whilst the veteran fighters of Von Gilsa and Ames Brigades of Barlows Division wait for the rebel assault.

On the Confederate  left Ramseur and Daniels exchanged fire with the Iron Brigade (Meredith) with neither side getting the upper hand. Ramseur and Daniels then charged and hit Meredith, Archer and Iverson hit Cutler and O'Neil staggering yet again from artillery fire failed to close. Ramseur and Daniels pushed Merediths men back causing casualties but in the middle Cutler stood strong against the brigades of Archer and Iverson leaving a tide mark of confederate dead.


The Iron Brigade are pushed back as the Confederate brigades still appear to have the upper hand

To the rear Brockenbrough with Davis in support hit Carrs Brigade, but the Union brigade fresh from training responded to the presence of its Divisional and Corps commanders, and pushed Brockenbroughs equally Green troops back, after a fierce fight that inflicted casualties on both sides. 
Pettigrew couldn't reach Burling and the two settled with trading fire. Meanwhile artillery batteries from both sides hurried to set up.


Merediths men ,with an exceptional brigade leader, crack troop status, their divisional commander shouting encouragement and still fresh, easily rallied and charged the confederate line pushing Daniels back and forcing both Daniels and Ramseur back away from Cutler. These three brigades now had their own little battle on the Union right. Again the Confederate lines pushed forward right across the table. Daniels and Ramseur both hit Meredith, Archer and Iverson in supported line hit Cutler and O'Neil, rallied and surged into the extended end of Cutlers line holding the small group of buildings. 

To the rear Davis hit Carrs brigade again and Pettigrew crashed into Burling but Brockenbrough was now in the sights of the III Corps artillery and canister shredded the brigade as it attempted to support Davis. 

The results of these clashes was as varied as the rest of the day. To the right Meredith crushed the attack of Ramseur and Daniels, the exhausted Confederate brigades fresh from training could not cope with the battle hardened Federal infantry. Ramseurs brigade was utterly destroyed.
In the middle Cutler fell back from the farm building as the three combined rebel brigades struck, opening a hole in the Union line and suffering the brigades first losses of the day, but its defensive fire had disordered the confederate brigades and as they advanced to take the position O'Neils battered brigade moved once again into the sights of the Union Grand Battery. Canister fire battered the farm buildings, shredded trees and flayed skin and O'Neils men, blooded and spent were finally done.

Carr briefly held Davis and both brigades took casualties but the better class Confederate troops pushed Carr back off the table. Pettigrew also pushed Burling back onto table 1C with the help of some well timed artillery fire.

Yet again III Corps artillery hit Brockenbrough and the rebel brigade crumbled, but fire from Pettigrews brigade struck gun barrels and killed crew, and the Union battery became the first artillery piece of the day to become a casualty.

Meredith charged Daniels and Cutler rallied and struck the thinning brigades of Archer and Iverson. Suddenly the Confederate line on table 1B began to crumble. III Corps damaged artillery was charged down by the remnants of Davis brigades and destroyed. Meredith overwhelmed Daniels and made breakthrough charge toward the woods were Steinwehrs men had made their stand earlier in the day. Cutler smashed Archer and Iverson and the rebel centre collapsed. Lee and Longstreet retired their HQs to table 2C and the spent remnants of four Rebel Infantry brigades and Robertsons cavalry attempted to break for the rear. But for these battle weary survivors the end was near. Buford division of cavalry now reinforced by Gambles fresh brigade charged onto table 1B. Cut off by Merediths victorious Black Hats and being pursued by the Union cavalry it is doubtful that the isolated, spent and leaderless men would escape. So ended the battle on table 1B. 


Meanwhile on table 1C Anderson ,under orders from Lee had pushed some of his brigades forward. One of these hit the retreating brigade of Burling causing further casualties and pushing Burling and Carr further back. The Confederates however did not push on the town which was held by the remaining brigade and artillery of Grahams Division/III Corps.

On the rear table 3A the Union had having finally rebuilt the bridge arrived in force infront of the entrenchments surrounding the city and the small railway station. This force consisted of Doubledays  full divisions of three brigades, Robinsons Division of two brigades, the Army Reserve Artillery Brigade consisting of four batteries and a brigade of Pioneers.
 Behind the entrenchment sat three brigades of either Green or unknown quality troops and two large fortress guns.
 This Confederate force of was outnumbered by almost 3 to 1.


The last train out of dodge.

The Union force swept forward. In a scene reminiscent of the film Glory, the Coloured troops of the Pioneer brigade charged the Fortress Guns taking casualties at every step. By the railway station it looked like the small brigade of Green troops would not hold for long as they were it by the Union massed ranks. The rest of the Union brigades in double line closed on the Rebel Infantry sheltering behind the city entrenchments. And so time ran out

The rest will make for a very nice Thursday night battle as the forces from 3A and the survivors of table 1B, 1C and 2C will appear as I the umpire decree, in a fight to the finish on table 3A. Then I shall write the third instalment of this battle report.


But what of the day itself. Well on points the Confederates took it 10 to 8. The Union commanders seemed convinced that the Confederates had more brigades in reserve than they actually had, and the decision by the Confederates to force the issue on the top table 1B made for a frantic showdown which swayed one way and then another across the battlefield. 

All told the Union forces lost the Infantry Brigades of Smith and Coster wiped out. The Brigades of Carr, Burling and Cutler were heavily damaged and left spent as was the Cavalry brigade of Devin. The Iron Brigade lost two stands and Cutler five. Nine of the Union Infantry brigades and one cavalry brigade (Gamble) held positions but were not actively engaged until the very end of the day when I Corps arrived on table 3A.

The Confederates lost Cockes , Ramseur, Daniels, Brockenbrough and O'Neil Infantry Brigades wiped out and Archer, Davis and Iverson brigades heavily damaged (all spent). Robertsons cavalry whilst active at the beginning of the battle took no further part in the infantry battle that swirled about them and remained at 60% strength for the rest of the day.

On a more human side each of the stands we fought with represented approximately 200men (parts or whole battalions). Union casualties for killed, wounded , captured and missing reached 7400men (about 37stands). Thats about a 25% casualty rate.
Confederate casualties reaches 8,800 (about 44 stands). Thats about a 40% casualty rate. Historically by this point of the war those casualties on the confederate side were unsustainable and so whilst on the day they held, it may as Ozzy pointed out been a Pyrrhic victory. The divisions of Heth and Rodes were effectively removed from the Confederate order of battle and troops of their quality would be hard for the rebels to replace. 

So what as an Umpire did I learn. Well my decision to make all the Confederate units a standard 6/4/2 and the Union 8/5/3 worked really well as it made remembering whether a unit was Worn or Spent very easy and the random moral added some historic variation to the battles outcomes. Keeping weapons standard for the different sides also worked well. I shall use both systems again in future operational games. Green brigades unless large in numbers are brittle especially when they run up against highly motivated and trained troops. 
The order system for ACW operational games needs altering. Both sides gave up any pretence of sending messages (it was funny to watch, you just can't help it and their is no exception, so no finger waving) . In future both sides can talk as much as they like and whether an order is received will be determined by a dice roll modified by the distance and leadership qualities of sender and receiver HQ's. 
I also learned that with the right number of players much larger battle could be fought on both operational tables and big single battlefields alike. I felt we got a really good result although Dennis and Russ did not see as much fighting as Frank and Oz. I am completely sold on Fire and Fury (just as well considering the number of figures I've painted). It looked and played well and more importantly for me represented well the historical ACW battle reports that i have read. Hats off to Russ for his excellent photos which added context to the report.
A thoroughly enjoyable Saturday played in good humour with excellent company. Thanks chaps.


Wednesday, 27 March 2019

ACW Operational Game: Union Assault : The Battle Report Part One

Like all battle reports I'm going to start with the protagonists. On the Union side Mark was to be the C-in-C ,Frank the Right Wing and Dennis the left wing. On the confederate side Ozzy took command of the Louisiana Department of the Interior, Russ the New Orleans City Defence Force and Ian the C-in-C. Rule set was Fire & Fury : Brigade Level 2nd Edition


Order of Battle 

The point were spent on a Union:Confederate Ratio of 3:2

Green Infantry stands cost 1 point, Experienced 2,Veteran 3 and Crack 4. Artillery and cavalry were slightly higher. HQ stands of division or higher cost 4 points each.

Union brigades were all strength 8/5/3
Confederate brigades were all strength 6/4/2

 Confederate Forces
 C-in-C Major General R.E LEE


New Orleans Defence Force

Commander: II Corps R.S Ewell

Earlys Division: Brig Gen Early
                                                                                 Morale
Hays Tigers.                           6 stands                     Random
Gordons Brigade                    6 stands                     Random
Hokes Brigade                        6 stands                     Random
Artillery Battery                       1 stand (FB4)            Veteran                     

Smiths Brigade (Railway Garrison) 6 stands           Green

Cockes Brigade (Town Garrison)     6 stands          Green


9th Louisiana Heavy Artillery Battalion

4 Fortress Guns (FG) on artillery table                   Veteran                                                                                                                                                                                                                                                                                                                                                                                                                                          


Louisiana Department of the Interior

Commander: I Corps J Longstreet
                                                                                 Morale
Robertson’s Brigade (Cavalry) 6stands                   Crack


Rodes Division: Brig Gen Rodes
                                                                                 Morale
O’Neals Brigade                    6 stands                     Crack
Iverson Brigade                     6 stands                     Experienced
Ramseur Brigade                  6 stands                     Green
Daniels Brigade                     6 stands                     Green
Artillery Battery                      1 stand (FB1)            Veteran                     
Heths Division: Brig Gen Heth
                                                                                 Morale
Archer Brigade                      6 stands                     Veteran
Pettigrew Brigade                 6 stands                      Veteran
Davis Brigade                       6 stands                      Experienced
Brockenbrough Brigade        6 stands                     Green
Artillery Battery                     1 stand (FB2)             Veteran   

Andersons Division: Brig Gen Anderson
                                                                                 Morale
Mahone Brigade                   6 stands                     Veteran
Posey Brigade                      6 stands                     Veteran
Wilcox Brigade                     6 stands                     Veteran
Wright Brigade                     6 stands                     Experienced
Artillery Battery                    1 stand (FB6)             Veteran   


Union

C-in-C. Major General Meade

Army Assests

USA Cavalry Division:Brig Gen J Buford

                                                                                 Morale
Devin Brigade                       6 stands                     Experienced
Gamble Brigade                   6 stands                      Experienced
Horse Artillery Battery          1 stand (HA1)             Veteran

Army Reserve Artillery Brigade (Four Guns)
W                                          1 stand                       Veteran
X                                           1 stand                       Veteran
Y                                           1 stand                       Veteran
Z                                           1 stand                       Veteran

7th(Coloured) Infantry Brigade (Pioneers)
                                             6 stands                     Random
Bridge Sections                   4 wagons                   


I Corps


Wadsworth Division: Brig Gen Wadsworth
                                                                                 Morale
Meredith (Iron)Brigade          8 stands                     Crack
Cutler Brigade                       8 stands                     Veteran
         

Doubleday Division: Brig Gen Doubleday
                                                                                 Morale
Rowley Brigade                     8 stands                     Veteran
Stone Brigade                       8 stands                     Experienced
Stannard Brigade                  8 stands                     Green


Robinson Division: Brig Gen Robinson
                                                                                 Morale
Paul Brigade                         8 stands                     Experienced
Baxter Brigade                      8 stands                     Experienced


Corps Artillery
A                                           1 stand                       Veteran
B                                           1 stand                       Veteran


III Corps


Birney Division: Brig Gen Birney
                                                                                 Morale
Ward Brigade                        8 stands                     Veteran
De Trobiand Brigade             8 stands                     Experienced
Graham Brigade                    8 stands                     Green
         

Humphreys Division: Brig Gen Humphrey
                                                                                 Morale
Brewster Brigade                  8 stands                     Green
Burling Brigade                     8 stands                     Green
Carr Brigade                         8 stands                     Green


Corps Artillery
C                                           1 stand                       Veteran
D                                           1 stand                       Veteran


XI Corps


Barlow Division: Brig Gen Barlow
                                                                                 Morale
Von Gilsa Brigade                 8 stands                     Veteran
Ames Brigade                       8 stands                     Veteran
         

Steinwehr Division: Brig Gen Steinwehr
                                                                                 Morale
Smith Brigade                       8 stands                     Experienced
Coster Brigade                      8 stands                     Experienced


Corps Artillery
E                                           1 stand                       Veteran
F                                           1 stand                       Veteran


Initial Set up
         
 The Confederates opted to place two full divisions, those of Rodes and Heth with 8 brigades around the entrenched town on table 1C.
With them Longstreet and Lee set up their HQs
This allowed the Confederate C-in-C (Ian) to converse directly with his front line commander (Ozzy) .Cockes' independent brigade (the local militia) manned the town defences. This meant that upto over half the total confederate strength was positioned on table 1C. 
Andersons division was left in reserve on table 2C, with 4 brigades and the New Orleans Defence Force (3 brigades) occupied the walls of the city.
Robertsons Cavalry Brigade were on their own by the small settlement on table 1B.
Robertsons Cavalry HQ posted behind the small settlement on 2B


Opening Gambit
As the battle commenced the Union moved  their first divisions onto the tables. On the Union left III Corps marched onto 1D. Humphrey's Division consisting of the three Green brigades of Brewster, Burling and Carr began to organise on its flank facing table 1C, but made no aggressive move toward the Confederate positions on 1C whilst Birney's division of Ward, de Trobiand and Graham marched toward the underfunding table 2D.

No Union forces hit table 1C.

On the Union centre right, two divisions entered the table 1B and due to the presence of Robertsons CSA cavalry had to deploy. On the left of the this position advanced Smith and Costers brigades of Steinwehrs Division /XI Corps.
Steinwehrs Division, their mission to protect Franks left flank on table 1B

These two brigades also began to form a defensive position facing the Confederate positions on 1C. On the right the formidable 1st Division (Wadsworth)/I Corps consisting  of Merediths Black Hats and Cutlers brigade moved toward the left flank of Robertons Cavalry.
Merediths Black Hats (Iron Brigade) and Cutlers brigade along with their Corps artillery batteries enter table 1B


On the Union right flank, the two remaining division of I Corps, (Doubleday and Robinson) with four brigades, the Army Reserve artillery and Pioneers marched uncontested onto table 1A. This surprised the Union C-in-C as he had expected the Confederates to contest the gaps in the ridge lines. 

The Confederate first turn was short. Russ used his divisional commander to detonate preplanned explosives on the small bridge on table 1B.


The Confederates won the initiative and Robertsons Cavalry deployed and attempted to swing around the rear of Steinwehrs division. On table 1C frantic activity broke out amongst the Confederate brigades as the two divisions of Rodes and Heth began to move toward table 1B and Franks small flank guard. Meanwhile Flank managed to get Steinwehrs Division into some semblance of order to meet the Confederate threat

Steinwehrs Division forms awaiting the Confederate tidal wave.
and Devin's Cavalry brigade of Buford's Division accompanied by their commander entered 1B to attack Robertson's cavalry and cover Steinwehrs rear.

The Confederates attempted to turn Robertsons cavalry away from the Federal cavalry threat but the Federals won the initiative and struck Robertsons outnumbered troopers in the rear.
In a display of fraught combat (i.e awful dice rolling by Frank) a Desperate Struggle ensued and with the odds evened Robertons Crack horsemen got the better of Devins men and pushed them back.

The Confederate cavalry then won the initiative , rallied and charged Devins milling cavalrymen. Despite being outnumbered , the rebels broke the Union troopers who fled from the table.
On the other side of the woods Steinwehrs two brigades of Coster and Smith were about to begin their own desperate struggle as the first of the Confederate brigades (Ramseur and Daniels) entered the fray.
Lee, Longstreet  and Rodes ride close to the bullets as they follow their leading brigades charging into the open flank of Brigadier General Coster's outnumbered men. In the distance O'Neal and Iverson arrive to threaten Smiths isolated brigade.
Coster was hit hard and then as the Confederates won the initiative he was flanked and pushed back into the woods. Smith attempted to hold but was then hit by the arriving brigades of O'Neal and Iverson. Smiths brigade also fell back amongst the trees as the Confederate brigades pushed forward.


Confederate brigades push into the woods on the Union left.
Desperate messages were passing between the Union C-in-C and both his flank commanders as Dennis's III Corps advance stalled on table 2D at the end of their order and Frank requested reinforcements to stop the Confederate attack onto 1B.

Whilst Steinwehrs men fought and died amongst the woods behind them the Union Ist Division /I Corps had created a new defence line with its left on the small buildings and holding place on its right the Iron Brigade (Ian was later to ask me not to paint anymore of those chaps).
The Iron Brigade (Crack)(nearest the camera) and Cutler (Veteran) use the time forged by Steinwehrs desperate defence to form a new line
To their left and a little further back the combined artillery of I and IX corps formed a grand battery and to their left Barlow's division of XI Corps entered the table
Barlows all veteran division rush to form up on Cutlers left. A defensive line began to form but would it hold against the jubilant Confederates battering the thin line of Steinwehrs forward division.
and  formed up its two Veteran brigades on the Union left. Table 1B had now become the stage for a fierce battle that would last the rest of the day as the four brigades of Heths division entered the table behind Rodes, and began to support Rodes brigades attempts to shift Coster and Smith, whose men were grimly giving ground at the cost of mounting casualties. Eight Confederate brigades now faced two desperate Union brigades but a Union defensive line had been established made up of four of the best brigades in the Union Order of Battle.

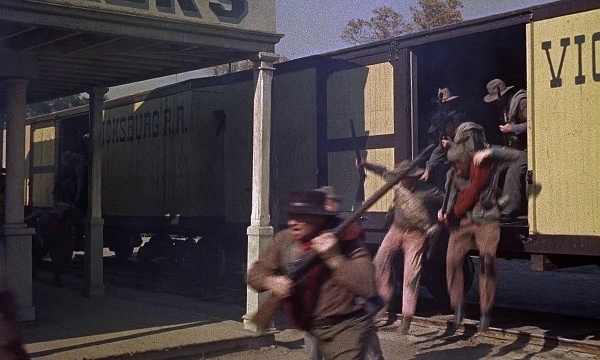
However the Union C-in-C (Mark) had finally released Dennis troops on table 1D and three Brigades plus artillery support moved onto table 1C with orders to take the town, still occupied by Cockes Independent brigade (under Russ's direction) and advance into the Confederate rear on table 1B.
Cocke's Militia prepare to defend the town.


The new threat to the Confederate plan as Humphreys division is released onto table 1C. 

On table 2A I Corps were now building a bridge across the river and were threatening to advance upon the city.

Would Cocke delay Humphreys division? Would Steinwehr hold? Would the City defences? Could the Union rescue the situation on table 1B? See Part 2.


Wednesday, 20 March 2019

American Civil War :Operation Game :Union Assault: The Preamble

The year is 1864. The conflict in both theatres has become a war of attrition. Casualties in both the Union North and Confederate South are horrific. Once proud battalions have been destroyed, rebuilt and destroyed again. The Great Snake ,the Union strangle hold on the Confederate South, has begun to starve the Confederacy of food, ammunition and support. British intervention has become a distant dream but still blockade runners sneak through the Union Naval picket lines, bringing much needed supplies  and carrying away the American Cotton that European factories crave.

In this fictional campaign the Federal forces have dispatched a force to eliminate the coastal city of New Orleans and cut off yet another Confederate supply line and vital rail network linking the port to the rest of the Confederacy.  Between them and victory stands a Confederate army and city defence force intent on turning back the Federal advance.


The Forces

Confederates

The New Orleans Defence Force: This will be commanded by Russ

The Louisiana Department of the Interior: This will be commanded by Ian

If a third player is available for the CSA a theatre commander will be appointed.


Union 

Two Army Wings: Commanded by everyone else.


Victory Point are awarded as per normal operational games. in addition, in the event of a Union victory the  Commander who enters New Orleans first will be declared the overall winner and can run for president unless he required support from the other wing commander to win in which case the Union C-in-C is declared the overall winner.


Terrain

Some small changes to the normal operation game.

There will be extra fences on the tables. Wooden fences are a linear obstacle slowing movement and effecting close combat. However they give no cover benefit against musket or artillery fire with the exception that a unit holding a linear obstacle can ignore any fall back effect on the fire table (NOT routing, the casualties or the disrupted effects).


Stone Walls  : Partial cover, 50% of unit must be behind it.counts as linear obstacle.


Hasty Barricades: Hasty defences are limited in availability. They may placed during a brigades movement phase. They require a full movement to complete and the unit cannot fire in the advancing fire phase. A unit that is fired upon during the defensive fire phase immediately after building the hasty defence counts as being a unit fired upon whilst changing formation. (So don't leave it to the last minute) They then follow the same rules as a stone wall. Partial Cover, linear.


Woods: Partial cover, counts as broken ground, visibility 2inches, NOT a linear obstacle. Artillery NOT allowed in woods.

Small buildings and towns: Partial cover, NOT a linear obstacle. Random nature of farm buildings and town blocks reduces unit cohesion. Units forced to retreat from a building sector will fall back the required distance from the rear edge of the buildings base.


Entrenchment and block house: Full cover, block house and its surrounding entrenchments ARE a linear obstacle
Fortifications

No pic yet because they still haven't arrived in the post. If they do they will be Fortified,Linear and obvious.

Random Morale.
Some units have random morale. These units will be considered experienced until such time as they are hit by musket or artillery fire at which point a D10 is rolled. On a 1-5 they are GREEN, 6-8 Experienced ,9 Veteran and 0 Crack.

Fortress Guns (FG's) cannot be moved once placed. Are positioned at the start of game and are visible to Union players. Northern sympathisers have reported their positions. FGs in the operational game can only fire in the defensive fire phase. They cannot run out of ammunition as they are supplied from the city armoury.