So we replayed Operation Harpoon (or at least Day 1 of Operation Harpoon) where a British convoy ran the gauntlet of the Italian Navy and combined air attacks by Italian and German aircraft. Rules are General Quarters with a slightly amended aircraft rules bit.
The different parts of the battle were sequenced (see here) and we played them in the same sequence (obviously). Myself and Frank were the Axis Powers, Jon and Mark the plucky British.
Ship formations took a bit of artistic liberty - the British in the latter stages pretty much had the convoy touching each other....didn't make much difference though!
Basically the British had to get 8 supply points through to Malta (each ship carrying I think 4-6 each) so basically 2 ships have to get into harbour unscathed for the British to win.

June 13th - Submarine P-43 (Unbeatable Class) attacks Italian 7th Cruiser Division
Submarine rules in GQ are fairly straightforward. The submarine player chooses a square on the table (2ft square) in which he places the attacking sub(s). The opposing player then chooses which channel his ships are coming down. So the sub can be in the right spot or not to attack. If in the right spot he can sit there waiting for targets or have to move to get there (on the surface which is not a good idea).
Anyway the British put their sub in the right place and wasn't spotted until ti attacked - but as there was only 1 sub and the Italian division was moving at full speed, the torpedoes missed.
And then the Italian ASW sank the sub.
Axis 1 - Allies 0
June 14th
02.00 - Italian submarines Uarsciek and Giado attack the Convoy
We thought we'd be clever and split the submarines onto both channels. I chose the right channel so Frank had to move his sub across (luckily it was nighttime so he wasn't spotted). In GQ subs have to be surfaced at night to attack - and so are easier to spot if you use searchlights - which the Allies did.
They had a screen of small destroyers with full searchlights on (which would have made life short but interesting had the Italian Cruiser Division been nearby) but made a sneak attack virtually impossible.
My sub got spotted and sunk by the nearest destroyers.
Frank managed to blast away (using his sub's gun) at the nearest destroyer and caused it considerable damage. With nerves of steel he waited and waited and waited as searchlights played over his sub - until the nearest merchant ship hoved into view and sent 4 tubes into it.
The slow speed of the ship made it a bit of a sitting duck and it essentially disappeared as 3 of the 4 torpedoes found it.
Discretion being 99% of Italian tactics, he then crash dived and headed home for his medal.
Axis 2 - Allies 1
10.00 - Convoy attacked by 8x Italian CR42 biplanes
For the next 8 hours nothing happened. Then 8 Italian CR42's turned up. As they approached the convoy they were 'bounced' by some Hurricanes chucked up as CAP from the British escort carriers (off table).
The leading elements dropped their bombs early to have a better chance in combat and (if memory serves) shot down one flight of Hurricanes and lost one of their own flights as well. The remaining Hurricanes flew back to re-arm so the remaining 4 CR42's took in the attack and picked (obviously) on the nearest merchant ship.
Mark was confident that his ship placement gave superb AA cover for the merchants - until Frank got the tape measure out and showed Mark that only one destroyer was actually providing any cover! As a result the biplanes went in unscathed and plastered the merchant ship, blowing it out of the water!
I was as surprised as everyone else! The Allies had lost two of the six merchants in two attacks!
The pilots flew back to base with the promise of pasta, a fine Chianti and medals galore awaiting them.
And worse was to come for the British....
Axis 3 - Allies 1
11.30 - Convoy attacked by 10 x Cants (bombers) and 12 x SM79 (torpedo) with 12 x fighters.
Axis 4 - Allies 1
18.20 - Convoy attacked by 12 x Ju88
As a consequence to what had happened to date, the British decided to sacrifice the security of the escorting force (i.e. the escort carriers and their attendant ships) and put all CAP over the convoy.
This was bad news for the next flight in as the 4 bases of Ju88's (coming in to dive bomb) got massacred by the CAP of Hurricanes and Fulmars.
I think they managed to shoot down some Hurricanes. I can't remember - but they certainly got no chance to attack the ships.
Never mind - their comrades were about to make up for it..
Axis 4 - Allies 1 (planes don't count)
20.00 - Convoy attacked by 20 x SM79s, 10 x Ju88, 15 x Ju87
Yes - you read that right. The skies around the convoy were darkened as the Ju'88's and 87's attacked from one side and the SM79's from the other. The CAP was swamped by the sheer number of planes and the British decided (probably correctly) that the Stukas were the most dangerous target and all British fighters attacked them
A number of Stukas went down but Frank managed to shoot down some Hurricanes and managed to get his remaining Stukas (and the Ju88's in). As we had time to spare we circled briefly until everyone was ready to pounce. The dive bombers again shut down the escorts' AA allowing the Sparvieros an untroubled run in.
Frank sank 3 of the escorts in the attack (a couple being blown asunder by 1000lb bombs landing amidships) and in the ensuing massacre the Italians sank the remaining merchant ships.

Axis 10 - Allies 1 - no wait....
Or at least we thought they had. Jon claimed they were still afloat (i.e. they had not yet sunk) and so the British sent two destroyers alongside the two floating hulks. The convoy was slowed to 3 knots (i.e. stationary). So we decided to play on for a bit.
21.00 - Convoy reinforced by 4 x Beaufighters from Malta.
21.15 - Convoy attacked by Italian submarine Alagi.
21.30 - Convoy attacked by 8 x CR42
In all the fun of blowing the convoy to Kingdom Come we missed the sequence of the submarine attack (which we should probably do when we reconvene next week) as a sub attack against destroyers lashed to sinking merchant ships should prove interesting.
The CR42's dropped their bombs to engage the remaining CAP (supplemented by the Beaufighters) and didn't fare too well (I think some Beaufighters were shot down).
At that point we called it a day. Frank and I claimed a moral victory anyway as the British only had 6 cargo units left and the convoy was virtually dead in the water before dawn of the 15th.
June 15th
05.00 - 4 x Beaufighters reappear to support the convoy.
06.20 - Convoy attacked by Italian 7th Cruiser Division
06.30 - The Beaufighters withdraw.
07.00 - Convoy attacked by 8 x Italian Ju87
08.40 - Italian 7th Cruiser Division withdraws.
10.30 - Italian 7th Cruiser Division attacked by 2 x Beauforts and 4 x Albacores from Malta.
10.40 - 4 x Spitfires reinforce the Convoy from Malta
11.20 - Convoy attacked by 6 x Ju87 and 6 x SM79.
11.30 - 4 x Spitfires withdraw.
13.55 - Convoy attacked by Italian 7th Cruiser Division.
14.25 - Italian 7th Cruiser Division withdraws.
15.20 - Italian 7th Cruiser Division attacked by 3 x Albacores.
18.00 - Convoy reinforced by 6 x Beaufighters and 6 x Spitfires
19.10 - Convoy attacked by 12 x Cants.
20.40 - Convoy attacked by 12 x Cants.
All survivors of the convoy are attacked once by uncharted mines before entering Valetta Harbour. Historically, two freighters reached Malta.
The different parts of the battle were sequenced (see here) and we played them in the same sequence (obviously). Myself and Frank were the Axis Powers, Jon and Mark the plucky British.
Ship formations took a bit of artistic liberty - the British in the latter stages pretty much had the convoy touching each other....didn't make much difference though!
Basically the British had to get 8 supply points through to Malta (each ship carrying I think 4-6 each) so basically 2 ships have to get into harbour unscathed for the British to win.

June 13th - Submarine P-43 (Unbeatable Class) attacks Italian 7th Cruiser Division
Submarine rules in GQ are fairly straightforward. The submarine player chooses a square on the table (2ft square) in which he places the attacking sub(s). The opposing player then chooses which channel his ships are coming down. So the sub can be in the right spot or not to attack. If in the right spot he can sit there waiting for targets or have to move to get there (on the surface which is not a good idea).
Anyway the British put their sub in the right place and wasn't spotted until ti attacked - but as there was only 1 sub and the Italian division was moving at full speed, the torpedoes missed.
And then the Italian ASW sank the sub.
Axis 1 - Allies 0
June 14th
02.00 - Italian submarines Uarsciek and Giado attack the Convoy
We thought we'd be clever and split the submarines onto both channels. I chose the right channel so Frank had to move his sub across (luckily it was nighttime so he wasn't spotted). In GQ subs have to be surfaced at night to attack - and so are easier to spot if you use searchlights - which the Allies did.
They had a screen of small destroyers with full searchlights on (which would have made life short but interesting had the Italian Cruiser Division been nearby) but made a sneak attack virtually impossible.
My sub got spotted and sunk by the nearest destroyers.
Frank managed to blast away (using his sub's gun) at the nearest destroyer and caused it considerable damage. With nerves of steel he waited and waited and waited as searchlights played over his sub - until the nearest merchant ship hoved into view and sent 4 tubes into it.
The slow speed of the ship made it a bit of a sitting duck and it essentially disappeared as 3 of the 4 torpedoes found it.
 |
| Frank's view of his handiwork |
Discretion being 99% of Italian tactics, he then crash dived and headed home for his medal.
Axis 2 - Allies 1
10.00 - Convoy attacked by 8x Italian CR42 biplanes
For the next 8 hours nothing happened. Then 8 Italian CR42's turned up. As they approached the convoy they were 'bounced' by some Hurricanes chucked up as CAP from the British escort carriers (off table).
 |
| My heroic CR42's return home |
The leading elements dropped their bombs early to have a better chance in combat and (if memory serves) shot down one flight of Hurricanes and lost one of their own flights as well. The remaining Hurricanes flew back to re-arm so the remaining 4 CR42's took in the attack and picked (obviously) on the nearest merchant ship.
 |
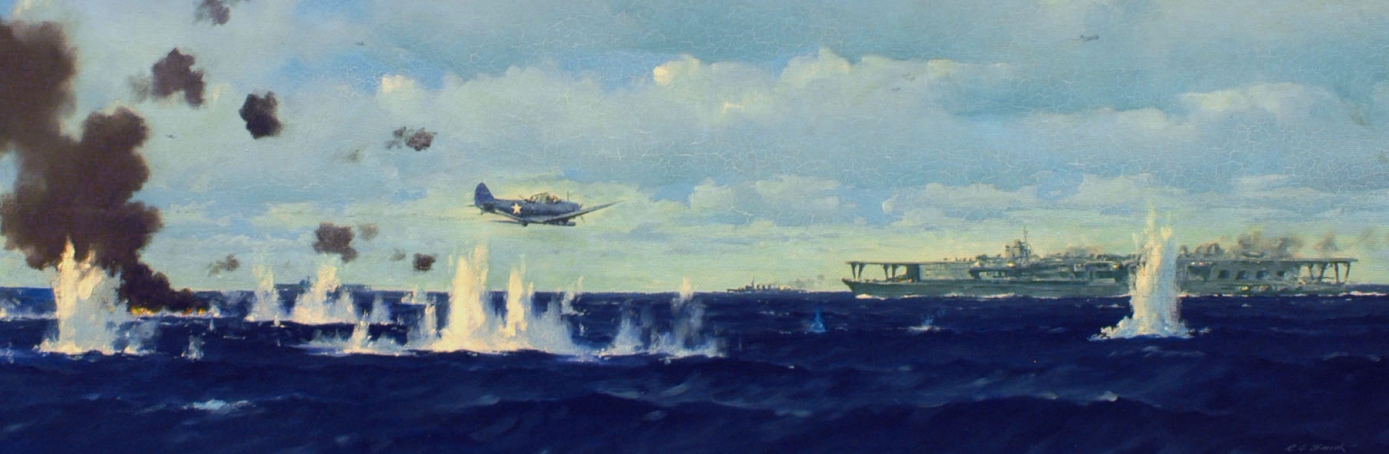
| British escort carriers wondering why their planes aren't coming back |
Mark was confident that his ship placement gave superb AA cover for the merchants - until Frank got the tape measure out and showed Mark that only one destroyer was actually providing any cover! As a result the biplanes went in unscathed and plastered the merchant ship, blowing it out of the water!
 |
| Merchant ship pays for Mark's lacklustre approach to measuring |
I was as surprised as everyone else! The Allies had lost two of the six merchants in two attacks!
The pilots flew back to base with the promise of pasta, a fine Chianti and medals galore awaiting them.
And worse was to come for the British....
Axis 3 - Allies 1
11.30 - Convoy attacked by 10 x Cants (bombers) and 12 x SM79 (torpedo) with 12 x fighters.
Actually I think Ian the ref forgot that the bombers were accompanied by fighters otherwise it would have been even more desperate for the British.
Even as it was the SM79's put up a good show of seeing off the fighter cover (which was drawn to the torpedo bombers as the more dangerous opponent). The SM79's lost a base but so did the British and 9 torpedo planes pressed home the attack. The CANT's did a stirling job of shutting down the British AA by attacking the nearest escorts to the targeted ships. This meant the Sparvieros got a virtually untroubled run and split their attack (two flights into the nearest merchant ship and one into the cruiser).
 |
| Sparviero's line up another merchant ship... |
As it was the merchant got obliterated - ironically from the only torpedo that managed to hit! The cruiser got away unscathed. But the CANT's too managed to inflict damage on the escorts and so whittled down the surviving AA support.
18.20 - Convoy attacked by 12 x Ju88
As a consequence to what had happened to date, the British decided to sacrifice the security of the escorting force (i.e. the escort carriers and their attendant ships) and put all CAP over the convoy.
This was bad news for the next flight in as the 4 bases of Ju88's (coming in to dive bomb) got massacred by the CAP of Hurricanes and Fulmars.
 |
| JU88's about to get mullered |
Never mind - their comrades were about to make up for it..
Axis 4 - Allies 1 (planes don't count)
20.00 - Convoy attacked by 20 x SM79s, 10 x Ju88, 15 x Ju87
Yes - you read that right. The skies around the convoy were darkened as the Ju'88's and 87's attacked from one side and the SM79's from the other. The CAP was swamped by the sheer number of planes and the British decided (probably correctly) that the Stukas were the most dangerous target and all British fighters attacked them
 |
| What's that coming towards us? Oh poop! |
A number of Stukas went down but Frank managed to shoot down some Hurricanes and managed to get his remaining Stukas (and the Ju88's in). As we had time to spare we circled briefly until everyone was ready to pounce. The dive bombers again shut down the escorts' AA allowing the Sparvieros an untroubled run in.
Frank sank 3 of the escorts in the attack (a couple being blown asunder by 1000lb bombs landing amidships) and in the ensuing massacre the Italians sank the remaining merchant ships.

 |
| More victims of the Italian Air Force |
Axis 10 - Allies 1 - no wait....
Or at least we thought they had. Jon claimed they were still afloat (i.e. they had not yet sunk) and so the British sent two destroyers alongside the two floating hulks. The convoy was slowed to 3 knots (i.e. stationary). So we decided to play on for a bit.
21.00 - Convoy reinforced by 4 x Beaufighters from Malta.
21.15 - Convoy attacked by Italian submarine Alagi.
21.30 - Convoy attacked by 8 x CR42
In all the fun of blowing the convoy to Kingdom Come we missed the sequence of the submarine attack (which we should probably do when we reconvene next week) as a sub attack against destroyers lashed to sinking merchant ships should prove interesting.
The CR42's dropped their bombs to engage the remaining CAP (supplemented by the Beaufighters) and didn't fare too well (I think some Beaufighters were shot down).
At that point we called it a day. Frank and I claimed a moral victory anyway as the British only had 6 cargo units left and the convoy was virtually dead in the water before dawn of the 15th.
June 15th
05.00 - 4 x Beaufighters reappear to support the convoy.
06.20 - Convoy attacked by Italian 7th Cruiser Division
06.30 - The Beaufighters withdraw.
07.00 - Convoy attacked by 8 x Italian Ju87
08.40 - Italian 7th Cruiser Division withdraws.
10.30 - Italian 7th Cruiser Division attacked by 2 x Beauforts and 4 x Albacores from Malta.
10.40 - 4 x Spitfires reinforce the Convoy from Malta
11.20 - Convoy attacked by 6 x Ju87 and 6 x SM79.
11.30 - 4 x Spitfires withdraw.
13.55 - Convoy attacked by Italian 7th Cruiser Division.
14.25 - Italian 7th Cruiser Division withdraws.
15.20 - Italian 7th Cruiser Division attacked by 3 x Albacores.
18.00 - Convoy reinforced by 6 x Beaufighters and 6 x Spitfires
19.10 - Convoy attacked by 12 x Cants.
20.40 - Convoy attacked by 12 x Cants.
All survivors of the convoy are attacked once by uncharted mines before entering Valetta Harbour. Historically, two freighters reached Malta.