Tuesday 28 November 2017

Visit to Hamburg

Visited Hamburg over the weekend and met up with my brother and niece. They were keen to show us Miniaturen Wunderland and said it would be up my street - hmmm, I thought, once more wargaming is tarred with the very wide brush of all things little and toylike!  I was wrong, it's an amazing place of huge dioramas in 1/72 scale - but I'll let the pictures do the talking.


Not a great photo - but in the German tradition of liberal realism this is the end diorama of a series showing the development of a city over the millennia  and this is its final manifestation at the end of WW2 amid utter destruction and occupation by the Soviets - its not toy town kids!

This one's for Phil

Giant floating dock in a Scandinavian fjord - that's real water and there was welding going on.

I think it would have looked better with an armoured recon battalion surging across and Para's waiting with 6 pounders. 

The operations hub for all the trains and automated vehicles - one day our operational games will have one of these.

An Alpine scene in Northern Italy - an excellent place to build the Gustav Line.

Hamburg airport - which was massive.

These vehicles were moving, stopping at lights, being unloaded via magnets and an electrical circuit below the layout.

That aircraft has just taken off and is now flying on another behind the scenes circuit - there was an actual departure and arrivals board.

Another view of a departing aircraft - as it was Germany there were models of a "dogging" meet outside the secluded Air traffic tower - Jon you would have felt at home!

This is the Swiss Alps - it stretched over two floors.

I tried to catch one of the many moving trains but failed.

Each of the layouts took between 100000 and 150000 man hours to build - apparently they are all volunteers.

The alps from below.

I think that's the Matterhorn 

In one of the rooms they were beginning to build Venice.  I should have taken a photo of the work stations in which they built the individual buildings, vehicles and accessories - very organised with all the tools to hand and racks of paints.  These were in rows of ten and the electrical modelling stations had their own welding equipment.
Hope the pictures do it justice and I would recommend a visit if ever you find yourself in Hamburg.

Supply in operational games

One of the things that pop up in conversation...I was talking with Mark about supply in operational games (as you do) and it got me thinking about how this works in practice.

Currently, as long as the unit can draw a line back to its line of supply, it is in supply.  Or if it carries units of supply with it OR it can be supplied by other means (usually by air but also of course by boat / ship for battles with a coastline or river).


But what about if players had to ensure supply for units by having to have supply units to hand? That means dragging their supply elements along with them, having supply dumps on (and off) table and physically moving supplies to fighting units (along roads or across country)? 

The logistical challenge would be to build up supplies at strategic points so they could be moved to where they need to be quickly or safely.  Each truck (or foot unit carrying supplies) would be worth 1 unit of supply (i.e. allowing the unit to fire at full effect for 1 turn). 


Supply dumps would then become targets of opportunity as well as key defensive positions.  In order to attack (or defend) effectively would require the fighting unit to drag a few units of supply along with them AND have access to additional supplies should a breakthrough occur. 

Similarly a defence would need supplies to hand and have access to additional supplies to keep up the defence.  Of course (and you have already thought this I'm sure) its much easier to keep a defensive force in supply than an attacking one.  As the length of the logistical tail grows, the harder it is to keep the front supplied and the greater need to build supply stockpiles near the front for this purpose.  And the greater the logistical problems faced by the C in C. Where best to allocate scarce resources?  Which side gets more supplies?  How can we defend the trucks as they make their way to the destination AND protect the supply dumps from air and ground attack?  Having said that, any unit defending a supply dump would be in full supply!

It may be overcomplicating the issue but it would add another layer (and a realistic one) to operational battles.


Anyway, food for thought...

Wednesday 22 November 2017

Pictoral OOB (right way up and labelled)

German 5th Panzer division

I used Snap Markup for the ipad (free in the App Store) to turn the image upside down and then number the units.

1. Divisional C in C
2. Recon Battalion
3. Panzer Regiment
4. Motorcycle Infantry Battalion
5. Attachments.

You're welcome.


Monday 20 November 2017

Pictorial Orders of Battle.


Hmmm, first problem - does any one know how I can rotate the above image?

Second problem - does any one know how I can generate labels and attach them to the image above?

Let me explain what I am trying to do.  The above is a bath tubbed version of 5th Light Panzer Division 1941 which basically means that one fighting battalion represents a brigade or regiment and that the supporting battalions are reduced to company sized units with no HQ.  This allows one player to comfortably play a divisional sized unit with all the attachments without being swamped by a host of elements.  In an operational game, a player will have a better sense of combined arms and the CinC will be ordering divisions and corp attachments rather then battalion sized reinforcements.  I think this will allow quicker games, quicker set ups, and a better understanding of the units under a players command without intensive schooling in WW2 organisations.

So, what I am trying to create is a pictorial representation of a division.  I think it's easier to understand the different units if you can see them before the game.  The element in the bottom left is the divisional CinC.  Behind him on the right is the recon battalion.  The next unit to its left is the panzer regiment and then to its left is the motorcycle infantry battalion.  These are the three fighting battalions that have HQs.  The divisional HQ can be attached to any of these units giving them a +1 for orders - he will require an order to move from one unit and reattach to another.  The final group on the far left are the attachments.

Hope that outlines my intentions.  Mark and I are planning to attempt a bath tubbed operational game on Saturday 2nd December - if anyone else is free please join in (unless Andy and his friend from the last operational game confirm they want to have a go in which case I will be putting on a proper original version as a friendly introduction).  I want to try out some of the streamlining ideas for an encounter battle and any help anyone can offer with the top two questions would be gratefully received!

Wednesday 8 November 2017

THE RELIEF OF FERRARA

Saturday November 4th dawned and we assembled at Broughton for our next "push of the envelope" operational game.  Not enough of us were available to do the desert encounter battle, so instead we made the most of the opportunity to have a go at transporting an earlier period to the operational format.  The Renaissance seemed the easiest period to attempt, and if successful, we would have a new mini-campaign system for our other pre-20th century periods.  I have to say, I think it played very well!

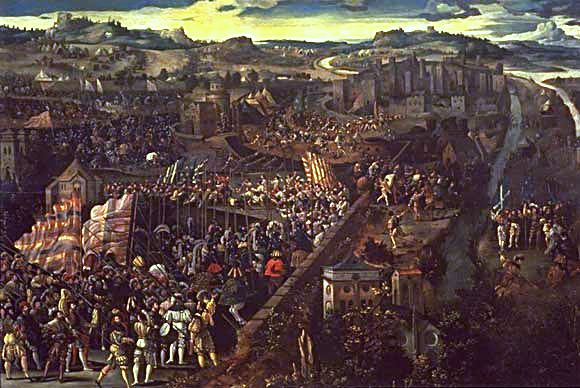
The original proviso was that the Duke of Ferrara, a close ally of the Pope (as played in our epic Renaissance campaign of nearly two years ago) is besieged by his aggressive neighbour, Venice.  Keen to aid his ally, the Pope has despatched an army of relief to save the city of Ferrara, and if possible, defeat the army of Venice - see previous post for the rules.

Jon, who had played the Pope in the previous campaign, assumed command of the Papal forces assisted by Russ, and likewise, Mark took charge of the Venetians with the help of Frank.

The initial plans for both sides were very well thought out, and I think for a first foray into a new period, very bold.  I do think familiarity with the tables has sped up decision making and generalship.

The Papal plan was to march quickly to the aid of Ferrara along 1D and 2D and assemble outside the walls of the city on 3B.  This would allow the army to operate with supplies from the city or attack the Venetian siege lines on 3A by marching through the city.  The Duke of Ferrara had a strong garrison that was largely poised along the walls of 3A to either pin the besieging Venetian force or sally out in support of the main Papal force.

The Duke of Ferrara, aware that a Papal army of relief is approaching , lines the ramparts of his city in readiness for a sortie against the Venetian siege lines.

The Venetians were aware of the strong garrison and had deployed a powerful force of artillery and infantry within the siege works.  However, the bulk of their army was deployed on 2B, well placed to assist the besiegers on 3A, defend against a Papal attack that would have to deploy piece meal through the difficult ground on 2C, or counter any Papal thrust along 1A and 2A.  Mark boldly detached his C in C with all his light cavalry to act as a trigger on 1B as he felt the most likely Papal attack would be along the "A" tables.  As an insurance he placed a small garrison in the fort on 1C and another detachment dug in at the bridge on 2B.  A dummy base was placed on 2C.

The Papal army was strong in Condottieri and Retainers and Russ commanded the Swiss Pike (which was of no surprise at all to Mark and Frank!).  Anticipating this, the Venetians had hired Landsknechts - 6 units! - which they hoped would lure the Swiss onto superior numbers or into poor tactical situations.

The Papal plan rolled out over the first few turns whilst the Venetians looked on and tried to gauge the main thrust of the attack.  Pleased that he had got his army unmolested to 3B, Jon quickly despatched Russ and his Swiss through Ferrara with attack orders against the Venetian baggage - no dithering there as an unbelievable swathe of sixes enabled easy passage and plenty of movement!

Swiss Pike arrive on 3A with orders to attack the Venetian baggage.

Meanwhile Mark moved his C in C from 1B to 1D to look as threatening as possible in conjunction with his dummy board on 2C as he still believed the most likely avenue of attack would be via 2C.  Unfortunately, he was insistent on referring to this board as "my C in C" and Jon, sensing an opportunity to cause chaos in the Venetian command and control despatched his heavy cavalry to engage this, as yet, undisclosed movement board.

Mark's light cavalry on the right turn tail and run as the Papal host romps onto 1C.

Mark only just managed to extricate his command from this powerful attack, literally keeping one move ahead of the Papal men at arms.  The garrison on 1C, shooting from the fort's ramparts vainly attempted to slow Jon's cavalry down but the speed of Mark's light horse saved him from annihilation.

Meanwhile, the Swiss with the close support of the Duke's garrison is attacking the Venetian siege lines.  Raked by Venetian light guns they ignore their casualties and storm into the defences.  The Venetian front line buckles and a battery of artillery routes but Mark has a second line which counter attacks and pushes the Swiss back.

Aware that the main Papal attack is on 3A, Mark has made it back to his main force on 2B and orders Frank with the majority of the Landsknechts to move to 3A.  I think that this is one of the pivotal decisions of the game; intending to keep his options open, Frank is ordered to the hill on 3A rather than attack the Swiss.  Does this allow a considered attack against the flank of the emerging Papal army or does it incur further delay whilst the Venetian C in C is busy elsewhere? - we will see.

Jon's uncommitted C in C languishes outside the walls of Ferrara on 3B as a rut of 1's and 2's prevents him changing his orders.

At the same time, Mark has ordered his dummy board on 2C to take 2D, cut off the aggressive Papal cavalry and look threatening against the Papal C in C on 3B.  With the success of the Venetian infantry against the Swiss Pike it looks like the battle has swung back to Mark and Frank.

Russ' Swiss are held and even pushed back across the siege lines.  Frank's force of Landsknechts with supports has arrived at the hill on 3A.

However, the Swiss setback is temporary, and Russ reorganised his veteran units to renew the assault, with one pike block punching through a crossbow unit and into the Venetian baggage.  Frank's Landsknechts arrive on 3A but with orders to hold the hill they are unable to intervene against the vulnerable Swiss flanks.  The Duke detaches mounted crossbow to harry this new threat and delay the Germans from intervening.

Frank's troops hover on the flanks but the Swiss are already looting the baggage  and the remaining Venetian foot are struggling to contain the onslaught.

Whist the battle develops on 3A, Jon (after 5 turns of failing to change his own orders) has managed to move his C in C through 2C, opening up supply lines and communication with his cavalry on 1B, and has emerged from the close terrain to hit Mark's C in C in the flank on 2B.  Mark struggles to extricate his command whilst sending the necessary orders to Frank to attack the Swiss.

Another shot of Frank's troops moving to the attack as the Duke of Ferrara and one Swiss  Pike  block  turn to face this new threat.

The Venetian light cavalry is no match for the armoured Papal horse and casualties begin to mount threatening to force the C in C's command on hold.  The Venetian foot on 3A have reached 50% casualties and have already dropped the aggression level of the Venetian army.  To emphasise the Swiss ascendancy, the Venetian sub-commander has met an heroic death attempting to stem the surge of pike.  Frank's Landsknecht's struggle to effectively intervene against the Swiss and the Papal heavy cavalry have succeeded in accepting new orders to take 1A and then charge down 2A into the exposed Venetian baggage as the bridge guard on 2A has been withdrawn to help in the entrenchments.

The small but effective Papal command base (on the right) arrives on 2B


The next turn, it's two heavy cavalry units smash into the Venetian light horse.  The movement board is a powerful force of Venetian foot and cavalry but Mark's C in C is too busy to send it orders.


The Papal cavalry has now crossed the river on 2A and is poised to take the undefended baggage on 3A.

After 21 turns the battle came to a close with a 11 to 7 victory for the Pope and Venetian army morale faltering.  It must be admitted that Russ and Jon rolled a lot of 6's which meant movement and orders were swift.  There was one notable exception when Jon struggled to order his C in C to attack 2B and the heavy cavalry were in danger of romping after Mark's C in C and onto the prepared positions of the main Venetian force.  However, on the whole the Papal orders were simple and direct and I think the Swiss and the Duke Ferrara required only one order change each for the whole battle.

Venetian dispositions were good and the initial plan sound.  Detaching the C in C was a calculated risk, especially towards the end of the game when bolder orders were required for the Landsknechts.  However, the initiative was always going to be with the Pope until the Venetians were sure of the main line of attack.  I wonder whether both sides took too much of a risk dividing their forces, although I would say Jon and Russ won through bolder and more decisive orders.

As an operational game it worked very well.  The sense that a battle could be fought at any number of points kept both sides careful with reserves and over commitment of forces - it did feel like a mini campaign.  All the tables were moved over and there were actions fought on three of them.  The size of the armies at equal points felt correct and the game was in the balance right until the end.  No one played badly and as Umpire I had a great game watching two teams manoeuvre their armies and "duke" it out - well done everyone!


Thursday Night

If no-one minds, I'm going to put on a winter WW2 scenario (Spearhead) using the winter rules so you can get a bit more conversant with the nuances!

OOB etc.I'll bring on the night.  It will be 1942 German vs Russians.

Wednesday 1 November 2017

Rule Amendments for Renaissance Operational Games.

Related image


Some rules amendments for Saturday's operational game.


Line of supply for both armies is from their baggage train or the city on 3A and 3B.

The besieger has x8 bases of supply permanently positioned as one of the objective points on 3A.

The relieving army has x4 bases of supply in wagons that must be attached to one of the commands.

The City also counts as a line of supply by whoever occupies it.

Loss of baggage or being out of supply results in a unit suffering a shift left for firing, melee and a -1 for morale.

Any command out of supply will drop down a level of aggression for orders e.g. attack becomes engage.  This is cumulative.  So, for each command in the army that is less than 50% strength then this drops the aggression level of the army by one level.  As does the loss of the CinC.  Thus Attack is the highest level of aggression, then Engage, then hold then Retire.  Any individual command on less than 50% can only be on Hold as the highest level of aggression.

It takes one unit, one turn to destroy a baggage unit and then it is shaken.

Movement is allowed between 3A and 3B by whoever occupies the city.

Movement is double across uncontested tables.

Hidden movement boards are used for commands that have not been spotted.

Table 3A has on objective point for the besiegers baggage, the open ground outside the city walls and the city walls.  The besieger may have any units that begin on table 3A behind earth works.  The besieged army initially holds the city walls.

Table 3B has an objective point for the outer fortifications, the bridge and the inner city walls.  All these points are initially held by the besieged army.

The rivers on Tables 2A and 2B both have bridges across them.

The relieving army can decide to deploy as many units as it likes within the city walls, the remaining troops will enter on any of Tables 1A,B,C or D.  The besieging army holds all the remaining points on the other tables and deploys accordingly once the amount of units in the garrison has been decided.

The armies will be Venice as besieging army and the Italian League as army of relief and garrison.  They will be their full army lists plus one extra D6 commander and x8 points of additional reinforcements. Reinforcements can be placed in any command.  Both armies get x1 dummy movement board.

Reinforcements can be picked from the German States, the Italian States or the Swiss Mercenaries.  Swiss Pike will not fight other Swiss Pike.  Swiss Pike will ignore all orders and attack Landsknechts if visible within 16".

Hopefully I've covered everything!