Monday, 12 January 2015

One up to the French

British Tudor V French
Played a POW renaissance game on Saturday giving Ian's Gendarmes an outing
BIG MISTAKE!!!
The French Cavalry rode over all opposition as if it wasn't there.
The Tudor army had no answer to the French in the open and even sitting back was no good as the French artillery is Heavy and out gunned the Tudors .
Back to the drawing board

Tudor army, No cavalry!!!


French army, Mostly cavalry


Most of the battle so far was the Tudors trying to get away from the heavy cannon.
This is where the French cavalry charged
The game ended 2 turns later


ouch!!


 more ouch!!!

Please make the pain go away!!!

No right wing left


The glorious dead
The worst the French got was a blister from using the Lance too much

Thanks Ian


Friday, 9 January 2015

Battleground on youtube


Action from Peter Guilder's wargames holiday centre - he was the creative designer for the TV show and an immense influence on wargaming throughout the 1970's, 1980's and 1990's


Back in the 80's when I became aware that wargaming was a serious hobby rather than "just playing soldiers", I heard rumours that in the 1970's there had been a wargames television series called "Battleground".

Shown on Tyne Tees it was an attempt by the hobby to break into mainstream culture.  Unlike televised darts, snooker and sheep dog trials, it failed!

All I knew was that it was presented by Edward Woodward who had played a spy with a penchant for wargaming in the absolutely superb TV series and film "Callan".


Edward Woodward as "Callan"

Mention of this mythical "Battleground" has wafted around wargames magazines and blogs for as long as I have wargamed.  So, I was very surprised to find some of the missing episodes have been put on youtube.  Edgehill, Waterloo and the first part of Chalons are played using superbly painted figures and terrain for the 1970's.  See Peter Guilder, legendary wargamer, Duncan McFarlane editor of the Miniature Wargames and Wargames Illustrated, Brian Tilson well known authority on ECW, and other luminaries play a wargame whilst Woodward explains what is going on. They play using measuring sticks with windage indicators and break British squares with Polish lancers (a hoary 1970's myth!).  Woodward presents from a leather chair amidst heavy books and painted maps which still influences how we all view the presentation of the hobby.

Go to youtube and search for Battleground Tyne Tees and it is uploaded by a C. Douglas.  Have a look and let me know what you think!

Tuesday, 6 January 2015

Battle of Matapan

I'm reading quite a few books (one of my sins is that I can't read just one book at a time - I usually have 4-5 on the go at the same time).  Most are on navies during WW2 (In Which They Served, Citizen Sailors, Naval Battles of WW2, The Pacific Companion, etc.) as I'm boning up on my limited naval history knowledge.  I would recommend Citizen Sailors to anyone - a great read so far.

One I'm coming close to finishing is the Battle of Matapan - written by one of the crew of the Formidable.  Its a fairly well written account (he references the Italian commanders' view of what was going on at the same time) although also terribly biased!

Its a very good indication of the pros and cons of each sides attitude (British aggresiveness vs Italian caution) and also the vagaries of spotting and recognition (both sides recon aircraft correctly identified the opposition but were discounted as actually spotting separate friendly forces!).  British radar came into its own in the hunt and subsequent fight but the Italians were either unlucky or terrible shots as a very limited British aircraft force (very limited, Jonno!) got in a vital torpedo strike on the Italian flagship through a hail of supporting AA fire as well as crippling the Pola (which led to the Italians leaving a cruiser force to take on Cunningham's entire fleet - with obvious results.

The Victory At Sea rules has a couple of Matapan-related scenarios that I wouldn't mind putting on one night (with Jon's help as I need his ships!) which with a tweak or two could make for a much more even battle than the one that was fought.


For example, the Formidable had a limited number of aircraft split between a number of duties including recon, CAP and actually attack planes.  During the day, the Italian fleet were expecting cover from the Italian Air Force and bombing attacks by the Luftwaffe.  Apart from a couple of sorties by some Ju88's, there was actually no air cover available.  Had there been so, the British force would have had a much more uncomfortable day as it would have been likely that the majority of Formidable's attacking aircraft would have been lost and a decent showing by the Luftwaffe could have inflicted a significant blow on the British force.

In addition, they would have then met a full strength Italian squadron with the Vittorio Veneto unscathed and ready to try out its 15" guns in anger as well as a very powerful cruiser force (rather than a handful of cruisers, one of which was crippled).  So the action would be split between a daytime action (with a possible advantage to the Italians) followed by the night action (definite advantage to the British).


Of course, I've got to finish basing the Italians first and I'm waiting on a couple of cruisers from Skytrex to finalise the Italian fleet.

Well at least the aircraft are done!

Marie bought me a load of 1:1200 aircraft (WW2 German and Italian) which I finally completed last night.  The hardest part was drilling the teeny tiny holes in the bottom to fit the wires into - then finding thin aluminium tubes for the wires to slip into (thanks Russ for the shout about Oxton Road Model Shop).

Now they all live on a old car sponge!

For the Germans, 10 Stukas, 10 Me109's, 3 He 111 bombers, 2 Condors (shore based recon but can also be bomb armed), 10 Arado recon and 4 He 115 torpedo bombers / recon.

For the Italians, 20 assorted fighters, 6 Sparviero bombers / torpedo bombers, 6 BR20 medium bomber and 10 RO43 recon planes.

More than enough for the average Thursday night game but the basis for a more ambitious air force should the need arise.  The Italians aimed for the idea that their fleets would operate close to where their aircraft could patrol so more heavy bombers and fighters may be required.  For the Germans, the proposed 1944 plan called for 2 aircraft carriers so I will probably need more Stukas and fighters (a shame that the Me 262 could not be considered as an option for a carrier fighter!).

The basing was relatively easy and I went for manageable 'heights' and numbers (mainly as the tubes work out at £1.10 each for 30cm!).

So the torpedo bombers sit at 3 cm above the sea (both countries had twin-engined torpedo bombers so I've done them as single plane stands).  Large bombers are also single stands at 6cm above the sea, dive bombers at 6cm and 9cm heights on the same stand (mainly for the Stukas), fighter aircraft the same and recon as single stands at 10cm.

The double heights (dive bombers and fighters) look OK to me and suggest more action taking place (getting ready to dive or in the process of doing so).

I'll bring them down Thursday night for you to look at.  

In the meantime I have started work on rebasing the German and Italian fleets with more of a 3D effect on the ship's wake.  The first real attempt (on an Italian battleship) looks much better than the orginal and has inspired me to complete both fleets in the same manner.  I'll do a little tutorial as well should you like the effect.  Again, I'll bring it down on Thursday.  However, only one done so far and it takes a little bit of time and care on each one to get the effect right.  But I think they'll look the business once both fleets are done.

Thursday, 1 January 2015

Pelelui - AAR


Our second Christmas game took place today, an amphibious landing by the Americans on the Japanese occupied island of Pelelui.

Ian was the umpire whilst Phil and Mark teamed up with the Americans.

Jon and I took control of the Japanese forces defending the island.


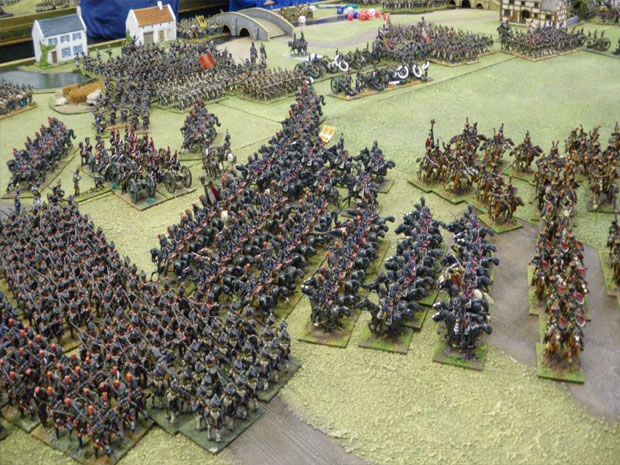
A few shots of the table prior to the start of the game...


Turn 1 - The Invasion begins.


U.S landing craft approach the reef......
Mark is eating invisible chips out of bubble wrap and I think Phil is practicing his new role in the remake of the elephant man.
First Wave!
It did not take long before the boats were up the reef.


The Americans call in their off table air support in what was the first attempt to take out our artillery batteries hidden deep in the jungle.


Back on the beach and the American's now have to deal with hidden mines which caused a great deal of damage. Any vehicles moving across would be destroyed on a 6 and suppressed on a 4 or 5


Unfortunately for the American's my dice rolling was exceptional on the day and the sixes just kept on rolling...........
First wave makes it on to the beach!


Back out beyond the reef more landing craft prepare to assault


View from the Japanese side, the first American platoons can be seen making their way through into " no mans land"


Japanese airfield, one of the key objectives for the Americans.


Ian's very nice Timecast palm trees....


Mark's battalion were making good ground. Our plan was to defend in depth and before the game started Jon and I were allowed up to 12 spider holes which we secretly noted on skitch. These were invisible to the Americans and we were to use these to our advantage later on......


Phil's battalions took a bit of a hiding on the first wave and he was left having to make a morale test early on but as his troops were all veteran a pass meant they would fight on to the death. Phil made the roll so despite a weakened force on the beach he still was able to use the depleted platoons to pin our forces.


More of Phil's second wave makes it to the reef. Phil was quick to learn not to cross the beach with what landing craft he had preserved.

Mark's LVT approaching..... This was loaded with a squadron of Sherman tanks


Jon and I were both pleased with our initial defense, the mines made easy work of 2 thirds of the U.S landing craft and our machine gun bunkers were able to kill of several platoons before being overrun.

We knew that once the Americans had secured the beach it would possibly be all downhill from here on in....


Mark's battalion was already up to their initial order objective but he was unaware of a hidden mg bunker and a 20mm machine cannon bunker on the hill at our base line. Unfortunately for us it only managed to kill one of his platoons before it was close assaulted!

View from across the airfield, Mark's weakened second battalion is slowly making it's way across the table, little did he know that our spider holes were about to come into play....


A few turns on and Mark lands his Sherman Tanks

This was the only one left on the table after the other 4 ended up getting mined to death.

Mark decides to re enforce with his RHQ battalion.

This nearly cost the American's the game and Mark must of sacrificed several sheep earlier as the gods were on his side.

Once his RHQ passed over and on to the airstrip we sprung our spider holes and began piling on fire on Mark's position. He quickly realised he was in trouble and ordered a break off but with the weakened orange battalion. This left his RHQ battalion in the open and unsupported.

We had a battalion of tanks hidden in the jungle which were only a move away from Mark's RHQ. If we could just get an order change in then the tanks would be sure to overrun the RHQ in the open and if we could kill the HQ then the American's would loose all command and control for the attack, a sure victory for the Japanese!

The problem was we could not roll the 5 or 6 for the order change and after 11 turns of trying it was all too late! we did try a few close assaults on the RHQ but we got thumped. It was very close but Mark managed to get away with it this time..........

A few turns on and the American's have swarmed on to the airfield. We had a slim chance left to force a few morale tests but at this stage our tanks were our last hope

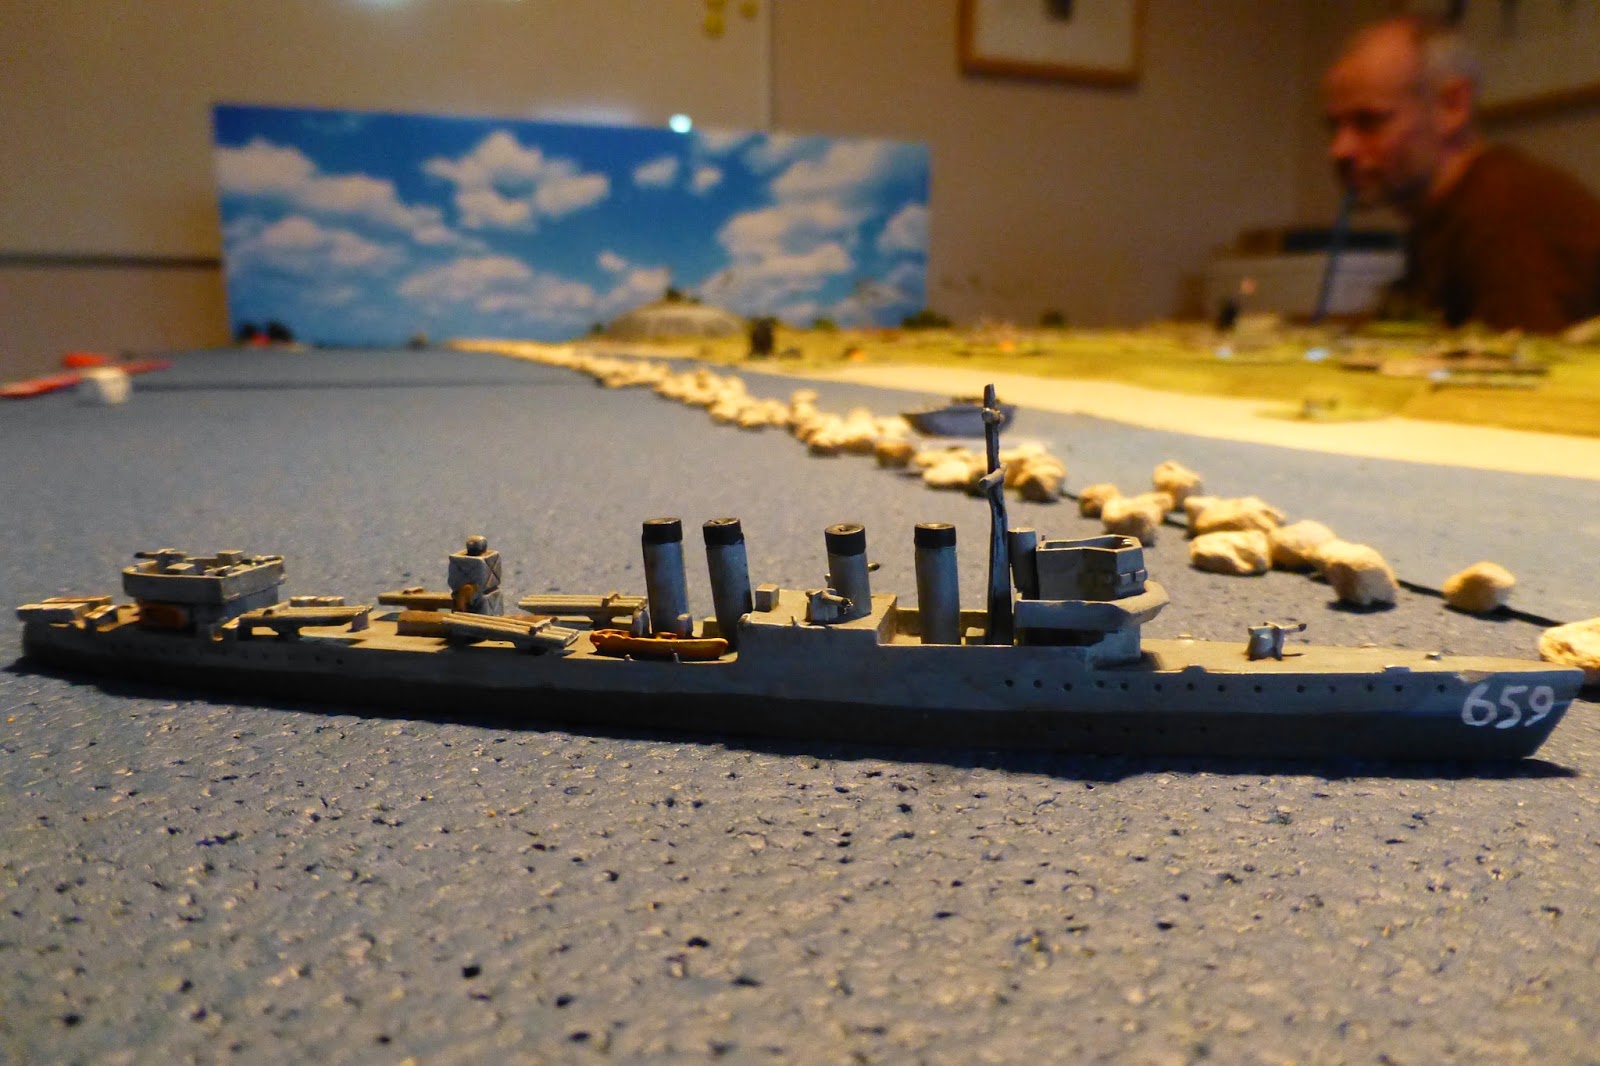
U.S destroyer off shore.... a few miles further of the the coast were 6 U.S cruisers which poured down a lot of heavy off table artillery support throughout the game which really hurt the Japanese. I think the America's needed these guns!


Our second (blue) battalion was now taking casualties. Mark had virtually overrun the airfield and our left flank


Our tanks made a last dash attempt to overrun some American platoons but were aptly "Whooped" in the process. This caused a morale test and the tanks failed. It was curtains for the Japanese!


Final position of forces on table at the end of the game


The American's won the day but it was a lot closer than we thought. They attacked with 5 battalions and 3 of these had taken heavy casualties. They lost a lot of landing craft too and their tank battalion was taken out. The Japanese defended with 2 battalions plus a very small tank battalion. We had the benefit of the minefield plus 6 mg bunkers not including our 20mm canon's and 105 / 75mm artillery battery.

I think Ian got the balance spot on here and this was a fine example of how to re enact an amphibious assault. It proved that we may be able to do a Normandy game in the future.


Mark gets to celebrate with his corn on the cob pipe and tin of spinach


Well played to the American's and thanks to Ian for a great game.